Star Wars has some of the most iconic artwork of any movie franchise in history. Nowhere is this more apparent than in its theatrical posters. This lithopone lamp captures all nine main storyline Star Wars posters (with a blank standing in for Episode 9 until the official poster is released!) in a lovely desktop lamp that celebrates your favorite movies. Simply place an approximately 2.5 inch diameter LED puck light (like you would place under a cabinet) inside the indentation in the base and run the cord out the slot!
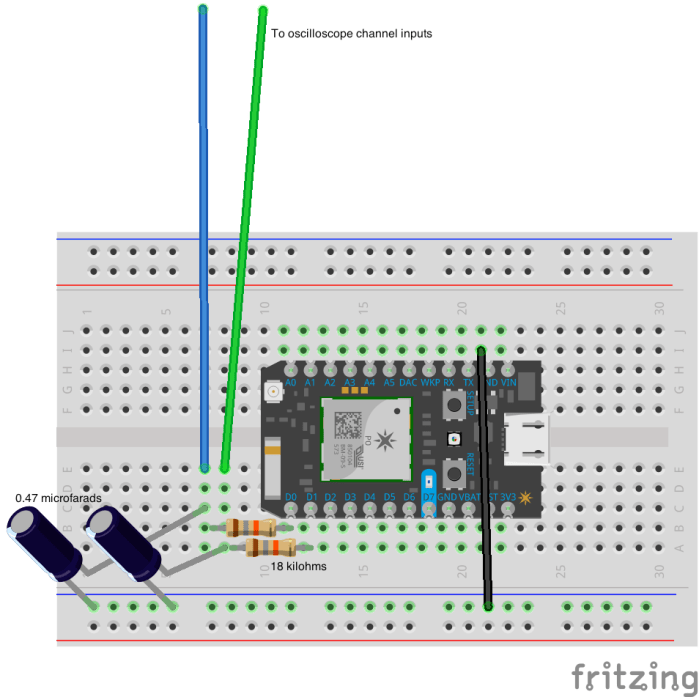
One of my favorite blogs is johngineer, which features projects by the very talented J. M. De Cristofaro. Basically, his blog is what my blog wants to be when it grows up. Anyway, I was in a festive mood and wanted to revisit one of my favorite articles of his in which he draws a Christmas tree on an oscilloscope using an Arduino and a pair of RC filters. He does a great job of going into the details of how exactly this works, but the gist is that the RC filters on the end of your PWM output pins on your Arduino act as a very simple digital to analog converter, letting you draw arbitrary shapes on an oscilloscope in X-Y mode! For those who are unaware of what an oscilloscope is, they are measurement tools that let you visualize electronic signals by plotting the signal versus time. Older ones, like mine, use cathode ray tubes so that you can draw with an electron beam! I made a small modification to his setup- my Arduinos were otherwise indisposed, so I used my favorite dev board, the Particle Photon. I also used different values for my RC filter- 18 kilohms for the resistor and 0.47 microfarads for my capacitors. These were chosen purely because they gave me the best picture on my scope- you may need to play with your part values as well, as your goal is to smooth the square wave that will be coming out of your digital outputs. A diagram of the quick circuit I built is shown below:
I also had to modify the original code a bit to get it to work on the Photon. Mainly you will want to set the X and Y variables to whatever digital pins you want to use, and you will need to modify the trace delay. Using the original value is too fast with the Photon, and I found the value below produces the tracing effect you see in my above .GIF. You can adjust it to taste to get a more constant image or to make the hypnotic drawing process slower. My modifications are shown here:
This file contains hidden or bidirectional Unicode text that may be interpreted or compiled differently than what appears below. To review, open the file in an editor that reveals hidden Unicode characters. Learn more about bidirectional Unicode characters
Simply paste this into the Particle IDE and flash it to your board- this is a quick and geeky holiday season project that is sure to get some curious looks in the lab. What better way to start the holiday season than bending a beam of electrons produced by an expensive and invaluable piece of equipment in order to draw yourself a little green tree?
The ‘Welcome to Colorful Colorado’ sign has been greeting visitors to the state on the highways since 1950. In this video I show how I made my own miniature version using a CNC router and simple photo editing tools.
Recently a triceratops fossil was found at a construction site in my hometown of Thornton, Colorado. Inspired by some incredible 3D printing work being done with 3D scans of dinosaur fossils, I decided to make my own triceratops skull and later made a t-rex skull after the discovery of a tyrannosaur tooth at the site days later. These were done on my Robo 3D R1 Plus printer with special marbled PLA that gives the models a nice stone look. The time lapses were done with an iPhone 7 and then sped up considerably in editing!
I want to be able to harmlessly prank friends, pets, and neighbors from my smartphone (and a safe distance away).
THE SOLUTION
Skeeter is an open-source internet-of-things hardware project I have developed that will harmlessly prank your friends, pets, neighbors, etc. by emitting a 17.4kHz tone (just within the hearing of young people) or an 8kHz tone (just within the hearing range of older people) with the press of a button on a smartphone app I have developed. By emitting tones just within the hearing of your victims, they will become annoyed and agitated just as if there were a mosquito or fly buzzing in their ear, hence the name Skeeter! Use it as a dog whistle, a way to shut your loud neighbors up, or leave it hidden somewhere in the office so that you can trigger it at will.
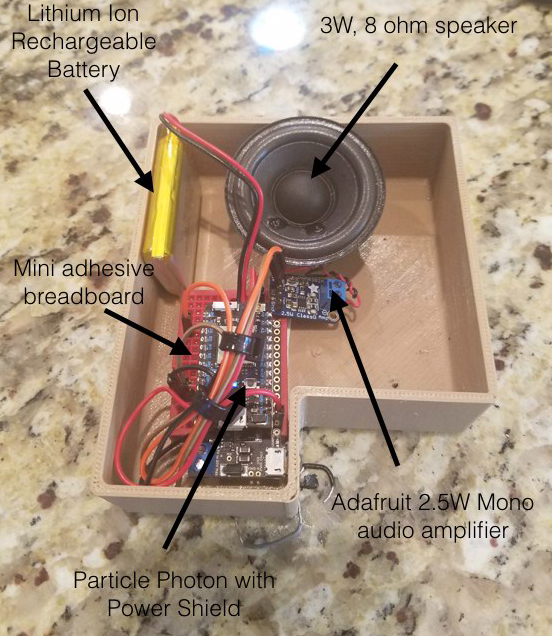
How is this possible? Skeeter is driven by the Particle Photon WiFi IoT development board and runs on rechargeable batteries. A small amplifier is put on the output of the Particle Photon to drive a speaker with an impedance of 4 ohms or higher, perfect for small speakers like the one I used, which was an 8 ohm, 3W speaker which produced a nice, clean output sound.
1 speaker (if using the Adafruit amplifier choose any speaker of 4-8 ohms impedance that can accept up to 2.5W of power.)
The Particle Photon is an exceptionally handy board to have around- you can write code for it that can be triggered via an HTTP request, meaning that any functions you write you can set up so that clicking a link on a website, in an app, or even querying Alexa will trigger a function to occur in your system. They are low-cost, tiny, and there are a number of peripherals you can buy. I bought the Power Shield which includes a charging circuit and a battery so that the system could be powered by rechargeable lithium ion batteries. I chose a small speaker I had handy (3W, 8 ohms) and wired it with a small amplifier circuit. I could have built my own, but the Adafruit 2.5W mono amplifier is perfect for this application and was actually cheaper than ordering the independent components that I wanted to use, not to mention it works out of the box without debugging. Thus, the whole thing fits together quite nicely and simply. The D0 pin is connected to the audio input of the amplifier (this is arbitrary of course- you can modify the code to use another pin if you would like) and the amplifier is connected to the power and ground pins of the Photon so that it can drive your speaker. The speaker itself is connected to the two output pins on the amplifier, as shown in the wiring diagram. It comes with handy screw terminals so that you can simply connect or swap speakers until you find one you like or that is loud enough. You can see exactly how to wire it up in the wiring diagram I have included, which excludes the batteries and the power shield. These simply plug into the Photon directly.
Skeeter wiring diagram, showing exactly how to wire your Skeeter on a breadboard or on a perforated board.
Skeeter, since it was built around the Particle Photon, is programmed using their online development environment. The details of how exactly to do this can be found here, however the gist is that you connect your Photon to your WiFi using the Particle app you can download on your smartphone. Then, from their online IDE you can simply directly paste the code you find in the Firmware section of my GitHub repository for Skeeter. The code itself is quite simple- it generates a square wave at either 17.4kHz or 8kHz depending on what the software receives in an HTTP POST request from your website or app.
WolframAlpha diagram of a 17.4kHz square wave.
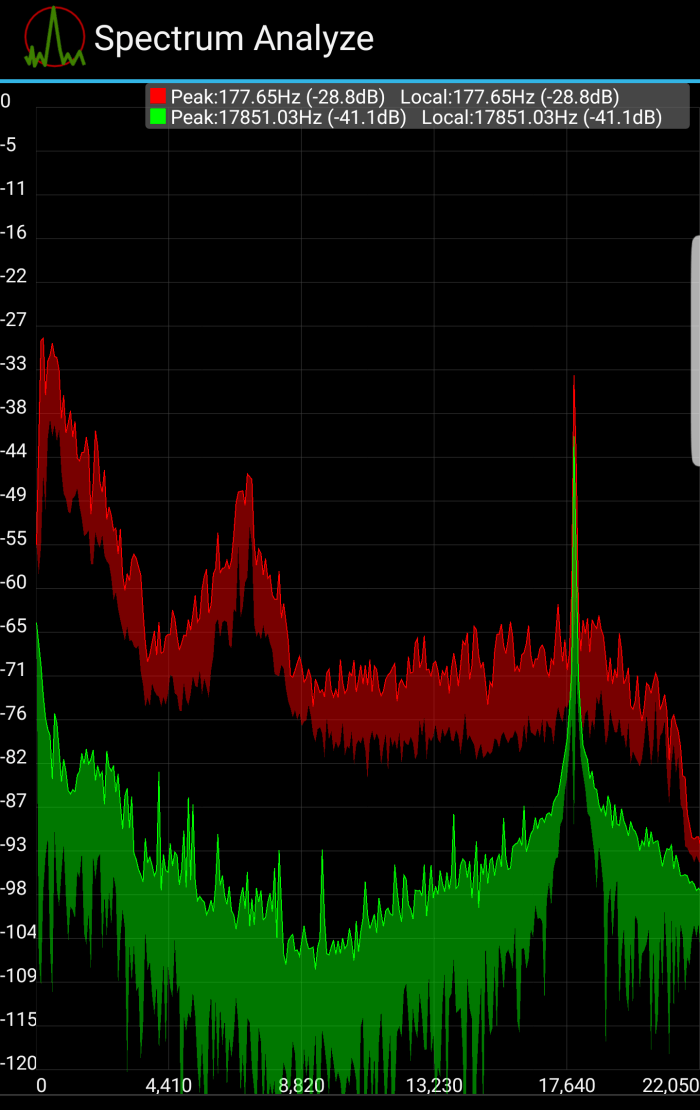
This square wave goes directly to the audio input of the amplifier and then out to your speaker. An off function is also provided that sets the outputs on the audio pin, D0, low. A quick test shows that this works extremely well, giving a nice, well defined peak on a spectrum analyzer where one would expect the 17.4kHz tone to be. It is also satisfyingly loud! You can see if you can hear a 17.4kHz sound yourself by clicking here.
Output of a spectrum analyzer as the Skeeter plays a 17.4kHz tone.
Screenshot of the Ionic application I developed for Skeeter
Ionic, if you are not aware, is a framework for developing mobile apps which lets you build with your favorite web development languages. I put together a quick app that simply performs a different HTTP POST request each time one of the different buttons in the screenshot shown on the left is pressed. The Photon will then cause the Skeeter to play a 17.4kHz tone, an 8kHz tone, or turn off all tones. You can compile the app’s code found in the GitHub repository using Ionic for your smartphone’s OS and then load it. Alternatively, you can simply use the HTML from Skeeter.HTML in that repository to build a web app or website for your own use.
The app needs a quick modification before you compile and use it however. It needs your Particle access token and your device ID, which you can post in Skeeter.HTML in the spots I have outlined for you. These details can be found for your device and account by going to the Particle Photon IDE and looking in your settings. Skeeter.html should look like this:
This file contains hidden or bidirectional Unicode text that may be interpreted or compiled differently than what appears below. To review, open the file in an editor that reveals hidden Unicode characters. Learn more about bidirectional Unicode characters
Simply paste your token and your device ID in the form tag as indicated and you are good to go!
3D Printing the Case
Render of Skeeter’s 3D Printed Case
Skeeter’s case was designed in OnShape in a public document that you can edit yourself! I tried to make it as small as possible, with holes for the speaker and the charge cable. The small jog in the perimeter of the case allows for the USB port on the power shield to be accessed on the side, as shown in the above image of the inside of the Skeeter unit. This can be customized to your content! Simply download the files from the OnShape document or from your own copy of the case files and send them off to your printer!
What do I use this for again?
Hide it in your house to annoy your siblings or the family dog. Leave it on your porch and annoy the neighbors. Connect it to the school WiFi and annoy your classmates. Bring it to the office and probably get fired. The possibilities are endless! Produce an annoying buzzing sound that will drive everyone crazy with the press of a button. So long as you’re in range of a WiFi network you can put your Skeeter anywhere and cause hilarious mayhem wherever you go.
You don’t even have to be on the same network as Skeeter- leave it somewhere and go get a coffee or lunch and press the button. Skeeter will start playing the noise even if you are miles away since it communicates with Particle’s cloud service, so you can craft the perfect alibi while still driving people nuts. Have fun!
I spent some time back around Christmas trying to find an Alexa skill that would do one simple thing- tell me what it feels like outside. Sure there are plenty of weather apps, but I really wanted one that took the wind chill into account- that funny other temperature websites give you that’s usually called the “feels like temperature”. Finding none I decided to make my own.
The Amazon Echo surprised me with how easy it is to customize it and make your own skills (the apps of the Alexa world). Amazon has an amazing set of tools its Amazon Web Services, and it is brilliant that their microservices product, Lambda, is tied in with Alexa as a platform for hosting Alexa skills. This tutorial I have prepared will show how to develop an extremely simple but useful Alexa skill- one that interfaces with the API of your favorite website, pulls down some information, and then has Alexa tell you the latest updates when you trigger your new skill.
First things first, some vocabulary:
API: Application Program Interface. Many websites and tools have these so that developers can incorporate their functionality into their projects. If you’ve ever logged into a website using your Facebook login, you used the Facebook API. Google has many APIs for products like maps and search. Dropbox and OneDrive have APIs for saving files from apps. Dig around your favorite site and see if they have an API you’d like to use. For this tutorial, one that gives you information like headlines or the weather is best.
REST: Representational State Transfer. Essentially these APIs usually consist of a number of “links” like the ones you’d click on a webpage. They correspond to different functions in the API. There are endpoints for logins, uploading files, and other functions for all sorts of APIs. In the documentation for each API you should be given a list of endpoints to use. We will use Node.js to easily make requests to these links, known as HTTP Endpoints, to make our app work.
Node.js: A serverside JavaScript environment that is very handy for handling web functionality. You won’t need to install it for this tutorial but I recommend messing around with it. It makes web servers and making HTTP requests very easy. This skill will be written in Node.js and we will use the code editor on the Amazon Lambda website.
Using a REST API
REST APIs are how we will get information from our website of choice to our app so that Alexa can say it out loud. I want to make a weather app of course, so the first place I turn is OpenWeatherMap. You can get started with their API for free and they provide all the information needed to calculate a ‘feels-like’ temperature like the one we want, namely the current temperature and the wind speed. You can follow along with me there or you should find the steps to using other APIs are roughly the same. Go to your favorite news site and see if they have an API you can use.
Most APIs have you register an account so that you can be given a key. This key prevents abuse of their system and also lets you track the usage of your app in many cases. This key will have to be part of your requests to their servers.
Let’s go to the documentation to figure out how to make a request to get the current weather. I see on the sidebar that they have “conditions” listed so I click there. Depending on what you want to do you will have to learn the “lingo” of your specific API. For example, the Dropbox API has (or at least had) two different ways of uploading files. One request was for upload, the other was for chunking up files, and they were both called different things. Be careful and read what each endpoint does to make sure you build the most optimized app!
You will need to pass in your own API key you receive when registering at OpenWeatherMap when you make this request for your local. Keep your API key a secret- malicious users can use your key to deplete your free calls to the API and get your account disabled! Additionally, I have added an ‘&units=imperial’ to get the units in US customary units, but you can switch this to metric if that is the system your country uses.
What you are seeing here is the response to the HTTP request. REST APIs often respond in what is called JSON format, which is basically a really nice way of formatting data so that everything has a key and a value. That way you can search for the data you want just by having the key (since you likely aren’t sure of what the value is!). So here I would want to write code that picks out “temp” and ‘speed’ so that I can calculate the ‘feels like’ temperature using these values.
Knowing this, it’s time to start writing some code!
Getting Started with Amazon Lambda
You will need to go to the Amazon Lambda website and create an account. Lambda is for microservices- you write code and get a URL that triggers that code to run. This lets you do all sorts of fun things, like periodically check on and analyze data from a weather-station in your back yard or send data to a database all without having to worry about servers or hosting the script. Today we will use it to build our Alexa skill.
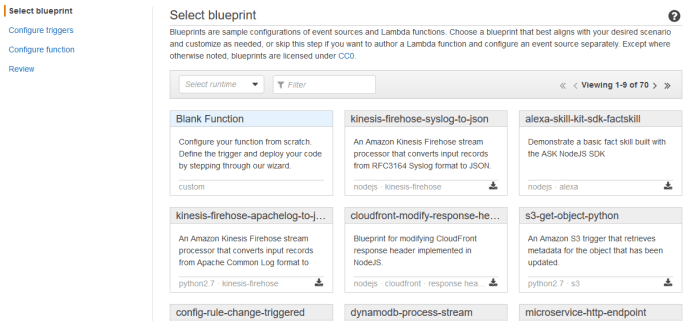
From the console, select “Create a Lambda function”
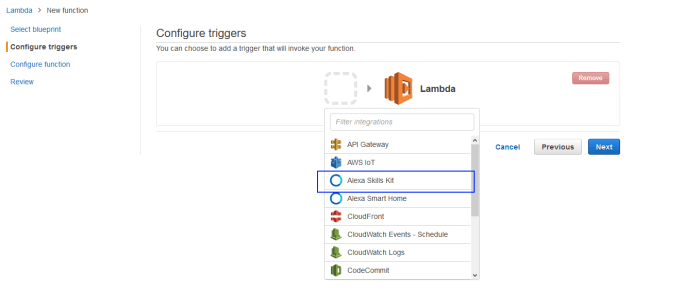
You don’t actually have to select a blueprint, but if you want to go ahead and just use the blank function blueprint. Click “Configure triggers”.
We need to configure the app so that it uses Amazon’s kit for developing Alexa skills. You don’t need to have this installed or anything like that- it simply tells Lambda how exactly it is going to get triggered so it knows to accept requests from the Alexa Skills kit for triggering your app. Click the Alexa Skills Kit option and then click next.
Now we are into the meat and potatoes of the actual skill development! Give your skill a name and a quick description. Leave the runtime alone- it’s fine as is using Node.js. If you’re reading this in the future and thinking “Ah man, we’re on Node.js 7.2 and this script will never work now!” I apologize but I’m trying to keep things as future proof as possible.
The Lambda function code box is where we will finally begin writing our app.
The bulk of every Lambda function is the handler. You can see the tiny sample code they give you already. This is what Lambda will run when it is triggered. All your functionality is called from in here.
Let’s think about what we need to accomplish in our handler:
Make an HTTP request to get our weather information
Parse that big JSON response to just get the feels like temperature
Store this in a way Alexa can say what it is.
Not too hard! Let’s take a look at the handler I wrote and then I will break it down.
This file contains hidden or bidirectional Unicode text that may be interpreted or compiled differently than what appears below. To review, open the file in an editor that reveals hidden Unicode characters. Learn more about bidirectional Unicode characters
We keep the structure of the handler the same- the function definition looks the same, we just do more inside! First, we get the Node.js HTTP client so that we can make our requests. The URL module will make it easier for you to format your request URL, but I don’t use it here. I included it so you know that it exists in case you need to build more complicated URLs, such as subsituting a user’s query. Here I am keeping it simple- simply paste in your zip code and your API key so that OpenWeatherMaps gives you the conditions at your location. You can give your OpenWeatherMaps link a try in your browser. It should display a JSON object of current conditions. Not all endpoints let you do this, but it can be handy way to test your work. The next section is the actual HTTP request. We make a GET request because we are GETTING something. If you want to upload something to a server you would make a PUSH or PUT request, and there are many other types of requests you can try. But for now we use the simplest- a GET request. You can see we use our HTTP client and set up a function with a single response parameter. This response is what Alexa is going to say! The empty data string simply allocates memory for us to put our desired JSON object into. For me it will be the ‘feels like’ temperature. I tell Lambda that after it makes the GET request, every time it gets data from the server it should add it to my empty data string. This way we get the entire response and we handle our inputs. Finally the real logic comes in handling the end of the response. When there is no more data we now need to parse our huge JSON object to get the specific data we want. By running JSON.parse I break the entire string up into keys and values that I can now search through to get my temperature and wind speed values for our ‘feels like’ temperature. Notice how I index into the JSON response using dot-notation (e.g. I know that the temperature is stored in main looking at the response in the above screenshot so I get at it by writing json.main.temp, since the temp is in the json object under main). The formula for calculating a temperature with wind chill using US Customary units is as follows (you should be able to find a corresponding metric formula on the web):
Finally you can see that I placed our ‘feels like’ temperature value in the middle of a written response for Alexa to read. You can make this whatever you want (so long as it fits Amazon’s community guidelines). We then output this response. How does Output work? You define it yourself. Let’s take a look:
This file contains hidden or bidirectional Unicode text that may be interpreted or compiled differently than what appears below. To review, open the file in an editor that reveals hidden Unicode characters. Learn more about bidirectional Unicode characters
The function of output is simple: We are now giving Alexa a JSON object to read! It’s really JSON all the way down if you’re starting to catch on. This is mostly provided by Amazon’s documentation but let’s explain it anyway. Response is our JSON response when Alexa triggers our Lambda function, so that’s what it stores. It has a section for specifying how the output speech will work- PlainText is what you will use almost all the time and Alexa will simply read what you give it. The “Card” is what appears in the Alexa app when the user checks on their Amazon device what people have been asking Alexa or if they want to read what the response was later. We specify a simple card- the name of the app (for identification) and the text that Alexa gave. That’s it! Finally we set the end session variable to True. We have no reason to tie up Alexa any longer waiting for any more input after we get our weather, so we tell the device that the skill is done. The final line simply says that if the response is successfully built to return it to the Alexa device calling the function.
Before you create your function you need to assign a role to it. This basically just lets Amazon know what permissions your skill needs. Go ahead and let Lambda create a role for you and give it a name. This is handled automatically. Select the parameters as shown:
Go ahead and click next. On the review page, click Create Function. You’re done! Click the ‘Test’ button on the top toolbar to create a test invocation of your new Lambda function and name it whatever you wish. You can leave the default inputs as this simple Alexa skill does not process any user input. From the dropdown menu select your new test event and press ‘Test’ to run it. You should see a successful result displayed on your screen:
More complicated Lambda functions will let you specify JSON test files that will simulate various inputs and outputs so you can test your skill.
But I wanted to hear Alexa run my skill!
I know! In order to do that though you need to go about adding your Alexa skill to the Amazon Developer Console. Keep your Lambda tab open- you’ll see that there is now a number associated with your function called an ARN you’ll have to paste into the skill form. Amazon covers this process really well in step 2 of this great visual guide! When it asks you for your intent schema and sample utterances, go ahead and use the ones from my GitHub repository and modify them to taste. You will then get a chance to test your skill and hear Alexa say your response on your PC from your browser! Once you are done testing submit the skill for certification and if Amazon approves it, your friends can find your skill and enable it. You can also create skills just for yourself and add them to your device now that you have the skill up on the developer console.
Have fun! Creating skills for yourself and for your friends can be a rewarding and fun aspect of owning an Alexa device. It can also get you some free swag. Let me know if you have any problems in the comments, and good luck!
If you just want to add the game to your Alexa device, click here!
THE PROBLEM
Sometimes the problem I am trying to solve isn’t something practical like a new educational game or 3D printed gadget. This time, the problem I was trying to solve is that I wanted a t-shirt. Amazon has monthly offers for swag if you develop skills for their Amazon Alexa product, which are basically like the platform’s “apps”. They let you have the digital assistant perform all sorts of tasks, like turn on and off your smart devices or interface with your favorite websites. You can also make Alexa play games with you, which is what I decided to do.
It’s no mystery from my website that I love roller coasters, so I decided that what Alexa really needed was a roller coaster trivia skill. This would let me get my feet wet into how Alexa development works and let me produce a fun game to share with my fellow roller coaster enthusiasts. The idea is that it will take a number of questions I have written about the best roller coasters in America, like what years rides opened, what park they are at, how fast they go, and more. Alexa asks five of these questions at random and keeps track of your score. Here’s some sample questions:
Name this roller coaster model who’s namesake was used by Aboriginal Australians for hunting. (Answer: Boomerang)
The oldest roller coaster in America is what? (Answer: Leap-the-Dips)
THE SOLUTION
I was happy to discover that I could write Alexa skills using one of my favorite languages, Node.js, and that I could set them up on one of my favorite platforms, Lambda, which is part of Amazon Web Services. Essentially you can develop an Alexa skill like you would any microservice. Of course, there are rules that you have to follow that you can learn from one of their many samples, which is where I found an excellent sample for a trivia game. My coaster trivia uses this code extensively, and let me see a fully functioning Alexa skill that follows the best practices. I discovered all sorts of things- building responses, handling requests, and what Alexa has trouble saying. When you go to publish your Alexa skill you get a nice interface to test what you’ve done, which is where I found out that some roller coasters have names that do not play well with Alexa’s speech technology. I found, for example, that the roller coaster Rougarou is very hard to understand, so my questions related to it had to be dropped. If you are at all interested in making your own skills for Alexa, I recommend starting with one of their samples. It walks you through the whole process, from getting started with Lambda to creating intent schemas and testing.
SHARING THE SOLUTION
I made all of my code public by forking the original Amazon sample. You can get it here!
I really like the Alexa platform and have many more skills in development. I have a lot of plans as to how digital assistants may be valuable in the classroom. You can keep posted on my projects here, or on my new Alexa Skills page I linked from my Projects page.
One of the most famous short stories by Jorge Luis Borges is The Library of Babel which features a library filled with books containing every combination of letters possible- implying that in that library there must exist every book to every be written or ever will be written. Similarly, users on the message board for the AllThePictures project believe that they can write a computer program to generate every combination of pixels in a 100×100 image possible- creating images of everything that has existed and everything that will exist.
THE PROBLEM
Now, in Borges’ story the sheer amount of gibberish and nonsense information drives the librarians to despair. But with only a 100×100 image rather than books, could it be easier? How many images could there be? On AllThePictures, they claim 1677721610000 possible images using 24 bit color. Yikes.
THE SOLUTION
Example output .GIF
Still, such a program sounds exciting, so I put together my own generator to see if I could make the process easier. I used Mathematica to generate images filled with random color pixels of a user specified size. To make things more tractable I did the following:
Let the user generate a number of images they specify they want to analyze
String those images together like a movie so that they can analyze a large number of images at a time looking for ones that have meaningful patterns
Added export buttons so that the strings of images can be shared online in .GIF and .AVI format
As you can see from the above image, you can analyze a lot of images at once (that one contains 100 different images believe it or not. I could have probably done better with a camcorder and an old tube TV). This gives you an idea of how many images there really are- for something really to randomly appear in this noise is very unlikely. But at least I made it easy! On a less cynical note, it was a lot of fun to make and I really do hope someone with the project finds something amazing someday in all that entropy.
A close up of a bumper. They are made out of green PLA thermoplastic.
Bumpers attatched to an iPad mini. Cheapo digital calipers for scale!
THE PROBLEM
My mother is a first grade teacher. That’s not the problem but it does give me a lot to work with. The problem is that she uses these iPad Minis to let her students play with OSMO, an educational game system that teaches everything from shapes to coding. They had these thick rubbery ballistics cases on them that prevented the little mirror that lets the game work attach to the iPad. It reflects the camera’s view forwards and down so that it looks at what the students have placed in front of the machine- a very cool application of machine vision. The cases have to be removed to play the game- leaving the iPads vulnerable to damage.
THE SOLUTION
3D Printed Bumpers! Take a bit of soft, nontoxic PLA thermoplastic (it’s probably in your water bottle or Tupperware), choose a kid-friendly color, and in no time you have these cute bumpers that will protect the iPad from short falls and hits to the corners that could shatter the screen. They print in about 15 minutes each in high-quality on my Robo3D printer. Notice how there is plenty of room for the OSMO mirror- perfect for playtime. They are a form fit and slide right on and off.
SHARING THE SOLUTION
You can get your 3D model here on Thingiverse. You can even use 3D Hubs to find a local place to get it printed if you don’t have access to a 3D printer!
For more technical folk who want to customize these bumpers, you can get the CAD file on OnShape! OnShape will let you download the file for various CAD packages if you do not want to use its web-based editor.
A project for your Carvey or X-Carve machine to make some beautiful stand-up nametag holders! Perfect for teachers- they’re inspired by similar nametag holders that can cost up to $4 each! I think they would also work great for board games.
From my description:
A cheap way to have your students’ nametags stand vertical on their desks, which keeps them from picking at them all year long. These holders have a slot for one nametag and a tray for pencils. Velcro them to the desk and moving students around the room is very easy.