
THE PROBLEM
I want to be able to harmlessly prank friends, pets, and neighbors from my smartphone (and a safe distance away).
THE SOLUTION
Skeeter is an open-source internet-of-things hardware project I have developed that will harmlessly prank your friends, pets, neighbors, etc. by emitting a 17.4kHz tone (just within the hearing of young people) or an 8kHz tone (just within the hearing range of older people) with the press of a button on a smartphone app I have developed. By emitting tones just within the hearing of your victims, they will become annoyed and agitated just as if there were a mosquito or fly buzzing in their ear, hence the name Skeeter! Use it as a dog whistle, a way to shut your loud neighbors up, or leave it hidden somewhere in the office so that you can trigger it at will.
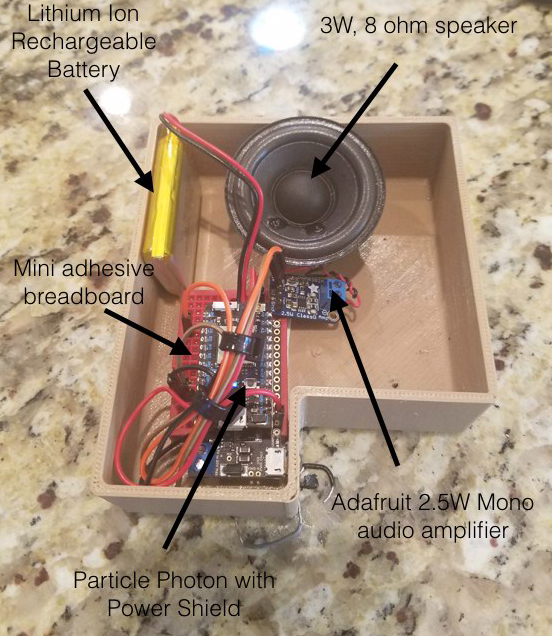
How is this possible? Skeeter is driven by the Particle Photon WiFi IoT development board and runs on rechargeable batteries. A small amplifier is put on the output of the Particle Photon to drive a speaker with an impedance of 4 ohms or higher, perfect for small speakers like the one I used, which was an 8 ohm, 3W speaker which produced a nice, clean output sound.
Here is what you need:
- 1 Particle Photon WiFi development board
- 1 Particle Photon Power Shield (with rechargeable battery). This will let you charge the batteries over USB and the Photon slides right into it.
- 1 Adafruit 2.5W Mono Audio Amplifier, or an appropriate circuit to drive your speaker as the Photon cannot do it alone.
- 1 speaker (if using the Adafruit amplifier choose any speaker of 4-8 ohms impedance that can accept up to 2.5W of power.)
The Particle Photon is an exceptionally handy board to have around- you can write code for it that can be triggered via an HTTP request, meaning that any functions you write you can set up so that clicking a link on a website, in an app, or even querying Alexa will trigger a function to occur in your system. They are low-cost, tiny, and there are a number of peripherals you can buy. I bought the Power Shield which includes a charging circuit and a battery so that the system could be powered by rechargeable lithium ion batteries. I chose a small speaker I had handy (3W, 8 ohms) and wired it with a small amplifier circuit. I could have built my own, but the Adafruit 2.5W mono amplifier is perfect for this application and was actually cheaper than ordering the independent components that I wanted to use, not to mention it works out of the box without debugging. Thus, the whole thing fits together quite nicely and simply. The D0 pin is connected to the audio input of the amplifier (this is arbitrary of course- you can modify the code to use another pin if you would like) and the amplifier is connected to the power and ground pins of the Photon so that it can drive your speaker. The speaker itself is connected to the two output pins on the amplifier, as shown in the wiring diagram. It comes with handy screw terminals so that you can simply connect or swap speakers until you find one you like or that is loud enough. You can see exactly how to wire it up in the wiring diagram I have included, which excludes the batteries and the power shield. These simply plug into the Photon directly.

Skeeter, since it was built around the Particle Photon, is programmed using their online development environment. The details of how exactly to do this can be found here, however the gist is that you connect your Photon to your WiFi using the Particle app you can download on your smartphone. Then, from their online IDE you can simply directly paste the code you find in the Firmware section of my GitHub repository for Skeeter. The code itself is quite simple- it generates a square wave at either 17.4kHz or 8kHz depending on what the software receives in an HTTP POST request from your website or app.

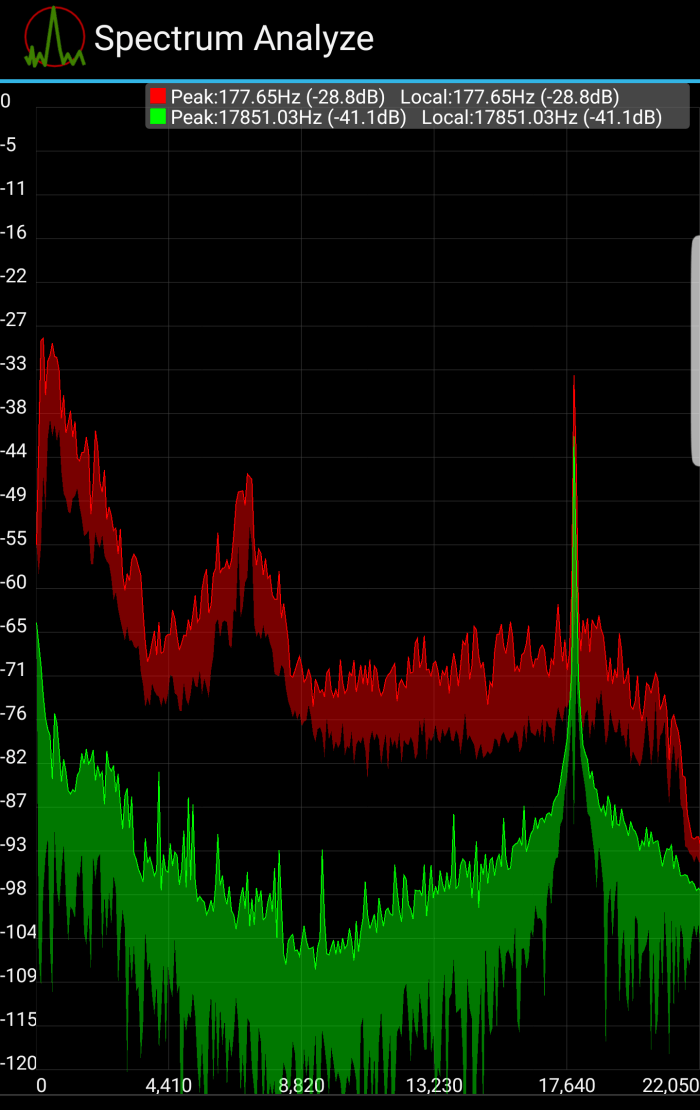
This square wave goes directly to the audio input of the amplifier and then out to your speaker. An off function is also provided that sets the outputs on the audio pin, D0, low. A quick test shows that this works extremely well, giving a nice, well defined peak on a spectrum analyzer where one would expect the 17.4kHz tone to be. It is also satisfyingly loud! You can see if you can hear a 17.4kHz sound yourself by clicking here.
You can follow this tutorial provided by Particle to build your own website or app to control your Skeeter or you can use the Ionic smartphone application I have provided in the GitHub repository under Ionic Application to drive your Skeeter from your smartphone!

Ionic, if you are not aware, is a framework for developing mobile apps which lets you build with your favorite web development languages. I put together a quick app that simply performs a different HTTP POST request each time one of the different buttons in the screenshot shown on the left is pressed. The Photon will then cause the Skeeter to play a 17.4kHz tone, an 8kHz tone, or turn off all tones. You can compile the app’s code found in the GitHub repository using Ionic for your smartphone’s OS and then load it. Alternatively, you can simply use the HTML from Skeeter.HTML in that repository to build a web app or website for your own use.
The app needs a quick modification before you compile and use it however. It needs your Particle access token and your device ID, which you can post in Skeeter.HTML in the spots I have outlined for you. These details can be found for your device and account by going to the Particle Photon IDE and looking in your settings. Skeeter.html should look like this:
This file contains hidden or bidirectional Unicode text that may be interpreted or compiled differently than what appears below. To review, open the file in an editor that reveals hidden Unicode characters.
Learn more about bidirectional Unicode characters
| <ion-view title="Skeeter" id="page1" style="background-color:#036D70;"> | |
| <ion-content padding="true" class="has-header"> | |
| <div> | |
| <img src="img/HUInigOUSSylDwF0M3qq_mrt.jpg" style="display: block; width: 100%; height: auto; margin-left: auto; margin-right: auto;"> | |
| </div> | |
| <div> | |
| <iframe width="0" height="0" border="0" name="dummyframe" id="dummyframe"></iframe> | |
| <form action="https://api.particle.io/v1/devices/yourdevicehere/tone?access_token=yourtokengoeshere" method="POST" target="dummyframe"> | |
| <button class="button button-balanced button-block" name="17khz" value="17">Turn on the 17kHz Tone</button> | |
| <button class="button button-energized button-block" name="8khz" value="8">Turn on the 8kHz Tone</button> | |
| <button class="button button-assertive button-block" name="off" value="off">Turn the sound off</button> | |
| </form> | |
| </div> | |
| </ion-content> | |
| </ion-view> |
Simply paste your token and your device ID in the form tag as indicated and you are good to go!
3D Printing the Case

Skeeter’s case was designed in OnShape in a public document that you can edit yourself! I tried to make it as small as possible, with holes for the speaker and the charge cable. The small jog in the perimeter of the case allows for the USB port on the power shield to be accessed on the side, as shown in the above image of the inside of the Skeeter unit. This can be customized to your content! Simply download the files from the OnShape document or from your own copy of the case files and send them off to your printer!
What do I use this for again?
Hide it in your house to annoy your siblings or the family dog. Leave it on your porch and annoy the neighbors. Connect it to the school WiFi and annoy your classmates. Bring it to the office and probably get fired. The possibilities are endless! Produce an annoying buzzing sound that will drive everyone crazy with the press of a button. So long as you’re in range of a WiFi network you can put your Skeeter anywhere and cause hilarious mayhem wherever you go.
You don’t even have to be on the same network as Skeeter- leave it somewhere and go get a coffee or lunch and press the button. Skeeter will start playing the noise even if you are miles away since it communicates with Particle’s cloud service, so you can craft the perfect alibi while still driving people nuts. Have fun!
