This tutorial adapts code from this excellent JavaScript cookbook prepared by AnalyticPhysics.com.
If you just want the code, click here.
If you just want to enable the Thornton Windchill skill we’ll make, click here!
UPDATE 11/25/18: IBM has deprecated the Weather Underground API. This tutorial has been updated to use the OpenWeatherMap API instead.
I spent some time back around Christmas trying to find an Alexa skill that would do one simple thing- tell me what it feels like outside. Sure there are plenty of weather apps, but I really wanted one that took the wind chill into account- that funny other temperature websites give you that’s usually called the “feels like temperature”. Finding none I decided to make my own.
The Amazon Echo surprised me with how easy it is to customize it and make your own skills (the apps of the Alexa world). Amazon has an amazing set of tools its Amazon Web Services, and it is brilliant that their microservices product, Lambda, is tied in with Alexa as a platform for hosting Alexa skills. This tutorial I have prepared will show how to develop an extremely simple but useful Alexa skill- one that interfaces with the API of your favorite website, pulls down some information, and then has Alexa tell you the latest updates when you trigger your new skill.
First things first, some vocabulary:
API: Application Program Interface. Many websites and tools have these so that developers can incorporate their functionality into their projects. If you’ve ever logged into a website using your Facebook login, you used the Facebook API. Google has many APIs for products like maps and search. Dropbox and OneDrive have APIs for saving files from apps. Dig around your favorite site and see if they have an API you’d like to use. For this tutorial, one that gives you information like headlines or the weather is best.
REST: Representational State Transfer. Essentially these APIs usually consist of a number of “links” like the ones you’d click on a webpage. They correspond to different functions in the API. There are endpoints for logins, uploading files, and other functions for all sorts of APIs. In the documentation for each API you should be given a list of endpoints to use. We will use Node.js to easily make requests to these links, known as HTTP Endpoints, to make our app work.
Node.js: A serverside JavaScript environment that is very handy for handling web functionality. You won’t need to install it for this tutorial but I recommend messing around with it. It makes web servers and making HTTP requests very easy. This skill will be written in Node.js and we will use the code editor on the Amazon Lambda website.
Using a REST API
REST APIs are how we will get information from our website of choice to our app so that Alexa can say it out loud. I want to make a weather app of course, so the first place I turn is OpenWeatherMap. You can get started with their API for free and they provide all the information needed to calculate a ‘feels-like’ temperature like the one we want, namely the current temperature and the wind speed. You can follow along with me there or you should find the steps to using other APIs are roughly the same. Go to your favorite news site and see if they have an API you can use.
Most APIs have you register an account so that you can be given a key. This key prevents abuse of their system and also lets you track the usage of your app in many cases. This key will have to be part of your requests to their servers.
Let’s go to the documentation to figure out how to make a request to get the current weather. I see on the sidebar that they have “conditions” listed so I click there. Depending on what you want to do you will have to learn the “lingo” of your specific API. For example, the Dropbox API has (or at least had) two different ways of uploading files. One request was for upload, the other was for chunking up files, and they were both called different things. Be careful and read what each endpoint does to make sure you build the most optimized app!
The documentation gives a nice example of what a call to the current conditions endpoint looks like, and I immediately identify the data I want to parse out:

You will need to pass in your own API key you receive when registering at OpenWeatherMap when you make this request for your local. Keep your API key a secret- malicious users can use your key to deplete your free calls to the API and get your account disabled! Additionally, I have added an ‘&units=imperial’ to get the units in US customary units, but you can switch this to metric if that is the system your country uses.
What you are seeing here is the response to the HTTP request. REST APIs often respond in what is called JSON format, which is basically a really nice way of formatting data so that everything has a key and a value. That way you can search for the data you want just by having the key (since you likely aren’t sure of what the value is!). So here I would want to write code that picks out “temp” and ‘speed’ so that I can calculate the ‘feels like’ temperature using these values.
Knowing this, it’s time to start writing some code!
Getting Started with Amazon Lambda
You will need to go to the Amazon Lambda website and create an account. Lambda is for microservices- you write code and get a URL that triggers that code to run. This lets you do all sorts of fun things, like periodically check on and analyze data from a weather-station in your back yard or send data to a database all without having to worry about servers or hosting the script. Today we will use it to build our Alexa skill.

From the console, select “Create a Lambda function”
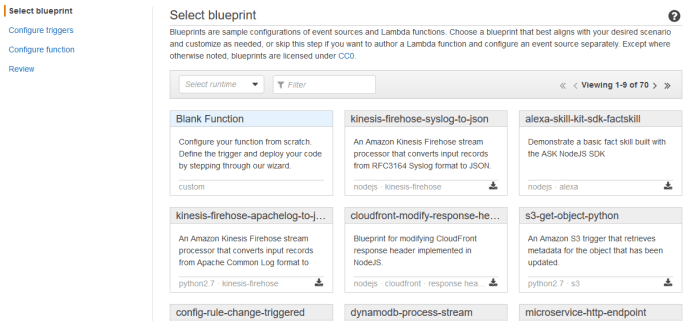
You don’t actually have to select a blueprint, but if you want to go ahead and just use the blank function blueprint. Click “Configure triggers”.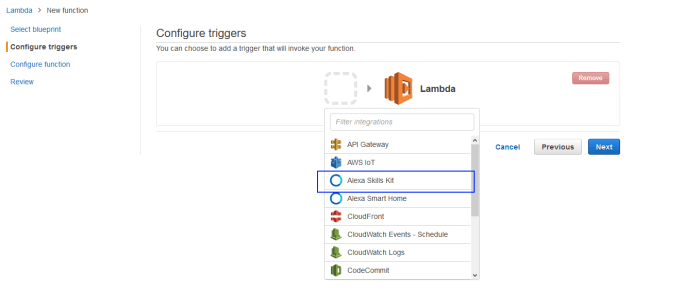
We need to configure the app so that it uses Amazon’s kit for developing Alexa skills. You don’t need to have this installed or anything like that- it simply tells Lambda how exactly it is going to get triggered so it knows to accept requests from the Alexa Skills kit for triggering your app. Click the Alexa Skills Kit option and then click next.

Now we are into the meat and potatoes of the actual skill development! Give your skill a name and a quick description. Leave the runtime alone- it’s fine as is using Node.js. If you’re reading this in the future and thinking “Ah man, we’re on Node.js 7.2 and this script will never work now!” I apologize but I’m trying to keep things as future proof as possible.
The Lambda function code box is where we will finally begin writing our app.
If you would like to simply grab all the code at once, the Github link is here.
The bulk of every Lambda function is the handler. You can see the tiny sample code they give you already. This is what Lambda will run when it is triggered. All your functionality is called from in here.
Let’s think about what we need to accomplish in our handler:
- Make an HTTP request to get our weather information
- Parse that big JSON response to just get the feels like temperature
- Store this in a way Alexa can say what it is.
Not too hard! Let’s take a look at the handler I wrote and then I will break it down.
This file contains hidden or bidirectional Unicode text that may be interpreted or compiled differently than what appears below. To review, open the file in an editor that reveals hidden Unicode characters.
Learn more about bidirectional Unicode characters
| exports.handler = function( event, context ) { | |
| var http = require( 'http' ); | |
| var url = 'http://api.openweathermap.org/data/2.5/weather?zip=<YOURZIPCODEHERE>,us&units=imperial&APPID=<YOURAPIKEYHERE>'; | |
| http.get( url, function( response ) { | |
| var data = ''; | |
| response.on( 'data', function( x ) { data += x; } ); | |
| response.on( 'end', function() { | |
| var json = JSON.parse( data ); | |
| var temp = json.main.temp; | |
| var wind_speed = json.wind.speed; | |
| var wind_chill = 35.74 + 0.6215*temp – 35.75*Math.pow(wind_speed, 0.16) + 0.4275*temp*Math.pow(wind_speed, 0.16); | |
| var chill_rounded = Math.round( wind_chill * 10 ) / 10; | |
| var text = 'Outside with wind chill the temperature feels like '; | |
| text+=chill_rounded+" degrees fahrenheit."; | |
| output( text, context ); | |
| } ); | |
| } ); | |
| }; |
We keep the structure of the handler the same- the function definition looks the same, we just do more inside! First, we get the Node.js HTTP client so that we can make our requests. The URL module will make it easier for you to format your request URL, but I don’t use it here. I included it so you know that it exists in case you need to build more complicated URLs, such as subsituting a user’s query. Here I am keeping it simple- simply paste in your zip code and your API key so that OpenWeatherMaps gives you the conditions at your location. You can give your OpenWeatherMaps link a try in your browser. It should display a JSON object of current conditions. Not all endpoints let you do this, but it can be handy way to test your work. The next section is the actual HTTP request. We make a GET request because we are GETTING something. If you want to upload something to a server you would make a PUSH or PUT request, and there are many other types of requests you can try. But for now we use the simplest- a GET request. You can see we use our HTTP client and set up a function with a single response parameter. This response is what Alexa is going to say! The empty data string simply allocates memory for us to put our desired JSON object into. For me it will be the ‘feels like’ temperature. I tell Lambda that after it makes the GET request, every time it gets data from the server it should add it to my empty data string. This way we get the entire response and we handle our inputs. Finally the real logic comes in handling the end of the response. When there is no more data we now need to parse our huge JSON object to get the specific data we want. By running JSON.parse I break the entire string up into keys and values that I can now search through to get my temperature and wind speed values for our ‘feels like’ temperature. Notice how I index into the JSON response using dot-notation (e.g. I know that the temperature is stored in main looking at the response in the above screenshot so I get at it by writing json.main.temp, since the temp is in the json object under main). The formula for calculating a temperature with wind chill using US Customary units is as follows (you should be able to find a corresponding metric formula on the web):
Wind Chill = 35.74 + 0.6215T – 35.75(V^0.16) + 0.4275T(V^0.16) (Courtesy of MentalFloss)
Finally you can see that I placed our ‘feels like’ temperature value in the middle of a written response for Alexa to read. You can make this whatever you want (so long as it fits Amazon’s community guidelines). We then output this response. How does Output work? You define it yourself. Let’s take a look:
This file contains hidden or bidirectional Unicode text that may be interpreted or compiled differently than what appears below. To review, open the file in an editor that reveals hidden Unicode characters.
Learn more about bidirectional Unicode characters
| function output( text, context ) { | |
| var response = { | |
| outputSpeech: { | |
| type: "PlainText", | |
| text: text | |
| }, | |
| card: { | |
| type: "Simple", | |
| title: "Thornton Windchill", | |
| content: text | |
| }, | |
| shouldEndSession: true | |
| }; | |
| context.succeed( { response: response } ); | |
| } |
The function of output is simple: We are now giving Alexa a JSON object to read! It’s really JSON all the way down if you’re starting to catch on. This is mostly provided by Amazon’s documentation but let’s explain it anyway. Response is our JSON response when Alexa triggers our Lambda function, so that’s what it stores. It has a section for specifying how the output speech will work- PlainText is what you will use almost all the time and Alexa will simply read what you give it. The “Card” is what appears in the Alexa app when the user checks on their Amazon device what people have been asking Alexa or if they want to read what the response was later. We specify a simple card- the name of the app (for identification) and the text that Alexa gave. That’s it! Finally we set the end session variable to True. We have no reason to tie up Alexa any longer waiting for any more input after we get our weather, so we tell the device that the skill is done. The final line simply says that if the response is successfully built to return it to the Alexa device calling the function.
Go ahead and check your work against the whole code file on Github now.
Before you create your function you need to assign a role to it. This basically just lets Amazon know what permissions your skill needs. Go ahead and let Lambda create a role for you and give it a name. This is handled automatically. Select the parameters as shown:

Go ahead and click next. On the review page, click Create Function. You’re done! Click the ‘Test’ button on the top toolbar to create a test invocation of your new Lambda function and name it whatever you wish. You can leave the default inputs as this simple Alexa skill does not process any user input. From the dropdown menu select your new test event and press ‘Test’ to run it. You should see a successful result displayed on your screen:

More complicated Lambda functions will let you specify JSON test files that will simulate various inputs and outputs so you can test your skill.
But I wanted to hear Alexa run my skill!
I know! In order to do that though you need to go about adding your Alexa skill to the Amazon Developer Console. Keep your Lambda tab open- you’ll see that there is now a number associated with your function called an ARN you’ll have to paste into the skill form. Amazon covers this process really well in step 2 of this great visual guide! When it asks you for your intent schema and sample utterances, go ahead and use the ones from my GitHub repository and modify them to taste. You will then get a chance to test your skill and hear Alexa say your response on your PC from your browser! Once you are done testing submit the skill for certification and if Amazon approves it, your friends can find your skill and enable it. You can also create skills just for yourself and add them to your device now that you have the skill up on the developer console.
Have fun! Creating skills for yourself and for your friends can be a rewarding and fun aspect of owning an Alexa device. It can also get you some free swag. Let me know if you have any problems in the comments, and good luck!
