
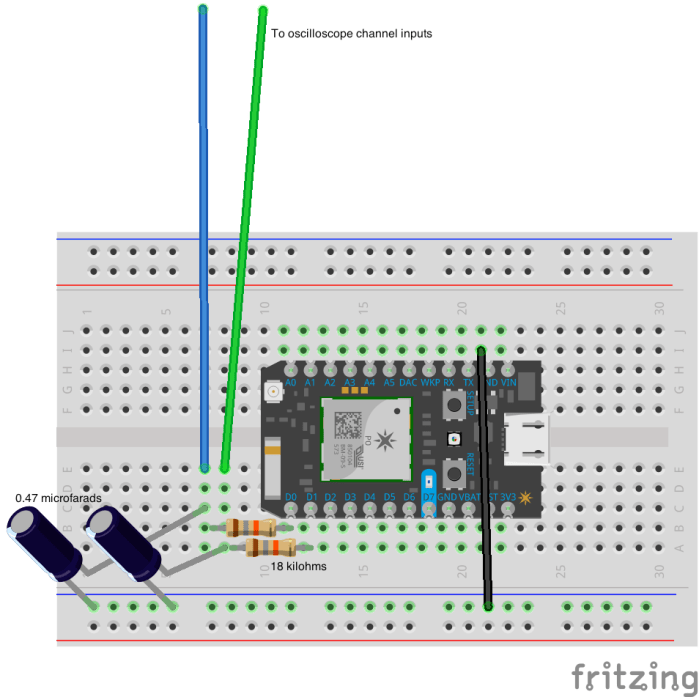
One of my favorite blogs is johngineer, which features projects by the very talented J. M. De Cristofaro. Basically, his blog is what my blog wants to be when it grows up. Anyway, I was in a festive mood and wanted to revisit one of my favorite articles of his in which he draws a Christmas tree on an oscilloscope using an Arduino and a pair of RC filters. He does a great job of going into the details of how exactly this works, but the gist is that the RC filters on the end of your PWM output pins on your Arduino act as a very simple digital to analog converter, letting you draw arbitrary shapes on an oscilloscope in X-Y mode! For those who are unaware of what an oscilloscope is, they are measurement tools that let you visualize electronic signals by plotting the signal versus time. Older ones, like mine, use cathode ray tubes so that you can draw with an electron beam! I made a small modification to his setup- my Arduinos were otherwise indisposed, so I used my favorite dev board, the Particle Photon. I also used different values for my RC filter- 18 kilohms for the resistor and 0.47 microfarads for my capacitors. These were chosen purely because they gave me the best picture on my scope- you may need to play with your part values as well, as your goal is to smooth the square wave that will be coming out of your digital outputs. A diagram of the quick circuit I built is shown below:
I also had to modify the original code a bit to get it to work on the Photon. Mainly you will want to set the X and Y variables to whatever digital pins you want to use, and you will need to modify the trace delay. Using the original value is too fast with the Photon, and I found the value below produces the tracing effect you see in my above .GIF. You can adjust it to taste to get a more constant image or to make the hypnotic drawing process slower. My modifications are shown here:
This file contains hidden or bidirectional Unicode text that may be interpreted or compiled differently than what appears below. To review, open the file in an editor that reveals hidden Unicode characters.
Learn more about bidirectional Unicode characters
| #define TRACE_DELAY 15000 // trace delay in uS. making this longer will | |
| // result in a straighter drawing, but slower | |
| // refresh rate. making it too short will result | |
| // in an angular blob. | |
| #define NUM_POINTS 19 // our tree is defined by 19 x/y coord. pairs | |
| #define X D0 // attach scope channel 1 (X) | |
| #define Y D1 // attach scope channel 2 (y) | |
| // x coords for drawing the tree (in rough clockwise order, from bottom) | |
| unsigned char x_points[NUM_POINTS] = { 110, 110, 50, 80, 65, 95, 80, 110, 95, 125, | |
| 155, 140, 170, 155, 185, 170, 200, 140, 140 }; | |
| // y coords | |
| unsigned char y_points[NUM_POINTS] = { 15, 35, 35, 85, 85, 135, 135, 185, 185, 235, | |
| 185, 185, 135, 135, 85, 85, 35, 35, 15 }; | |
| void setup() | |
| { | |
| pinMode(X, OUTPUT); | |
| pinMode(Y, OUTPUT); | |
| //analogWriteResolution(X, 234); | |
| //analogWriteResolution(Y, 234); | |
| } | |
| void loop() | |
| { | |
| unsigned char t; | |
| { | |
| for(t = 0; t < NUM_POINTS; t++) // run through the points in x & y | |
| { | |
| analogWrite(X, x_points[t]); | |
| analogWrite(Y, y_points[t]); | |
| delayMicroseconds(TRACE_DELAY); // wait TRACE_DELAY microseconds | |
| } | |
| } | |
| } |
Simply paste this into the Particle IDE and flash it to your board- this is a quick and geeky holiday season project that is sure to get some curious looks in the lab. What better way to start the holiday season than bending a beam of electrons produced by an expensive and invaluable piece of equipment in order to draw yourself a little green tree?
