This Halloween I have a new treat for everyone- a multiplayer remake of Death Race, an infamous arcade game from 1976. Video game developer Exidy built the game as a modification of their popular Destruction Derby game in which drivers hit cars to win points. In Death Race they instead were challenged to run over monsters called “gremlins”, which in the primitive graphics of the time looked like stick figures that resemble people. To add to the confusion the “gremlins” give out a high pitched scream when hit. This game marks the earliest controversy regarding video game violence and as such has a special place in video game and computer software history, as never before had a program been as attacked in the media as Death Race. Now you and your friends can play against each other in a web-optimized multiplayer remake!
COVID-19 is taxing our internet infrastructure, and many stuck at home are struggling with tasks where it would be useful to share one’s screen with others, such as teaching from home, sharing content with someone without handing them your device and getting it contaminated, or monitoring what is happening on a home computer in real time.
FreeDisplay is a free open-source program written in Python that allows you to share your screen with anyone on your local network, such as your home Wi-Fi network. It creates a QR code other can scan for easy sharing and serves a simple webpage with a mirror of your screen so that any device with a web browser can easily view your screen! Use it for home teaching, sharing content without handing someone your device, presentations, monitoring activity on your home computer and more. Download for free here: https://kevinl95.github.io/freedisplay/
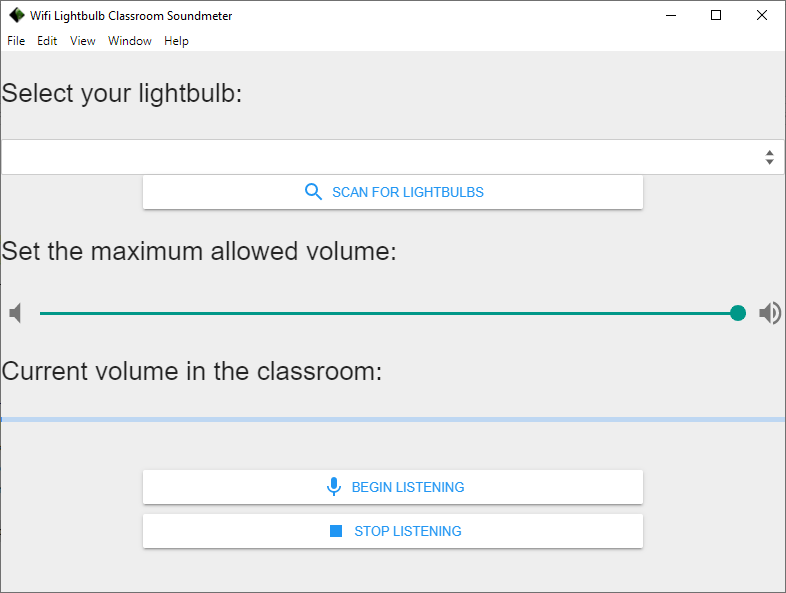
This is an exciting new project I’ve been working on to use off-the-shelf smart lightbulbs to make an inexpensive and automatic classroom management gadget. Using a bit of Node I was able to get the noise level of a classroom and translate it into a color for a connected smart lightbulb, from green to red as the classroom gets louder! Inspired by the ‘traffic light’ noise warning gadgets I see in classrooms, this one is fully automatic. There are no switches to throw- just set the maximum volume in the free software and the lightbulb will change color on its own!
Screenshot of the GUI. The program is an Electron application, and I have applied a material design stylesheet.
This is a DIY Ghost Box like the Ovilus ghost hunting device. While I don’t believe in ghosts, I do think ghost hunting gear is fascinating. This box chooses words out of a 1000 word dictionary based on magnetic field and temperature changes. The code is available for free on GitHub: https://github.com/kevinl95/ghostbox
Electronics:
1x Adafruit Feather M4 Express (If substituting, make sure you either buy a board with a DAC for the speaker or build one)
1x Adafruit 9-DOF Accel/Mag/Gyro+Temp Breakout Board – LSM9DS0
1x Adafruit Illuminated Toggle Switch with Cover – Green
1x Adafruit Thin Plastic Speaker w/Wires – 8 ohm 0.25W
1x Adafruit Lithium Ion Battery – 3.7v 2000mAh
Do you remember playing Roller Coaster Tycoon, the famous amusement park simulation game that shattered sales records and that remains one of the most beloved computer games of all time? I do, and I also remember the most important part of building any roller coaster in the game – testing. While it may seem mundane to someone who has never played, testing was how you figured out if your ride was going to make any money. The game would give your ride a score in three categories- excitement, intensity, and nausea. The goal was to maximize excitement, keep intensity reasonable, and keep nausea minimal. Largely this score was determined by the g-forces your ride produced. High g-forces could mean high excitement or it could mean people are too afraid to go on your ride. These ratings each varied from ‘low’ to ‘ultra-extreme’- both being scores you generally wanted to avoid. ‘Medium’ and ‘High’ were the sweet spot (except for nausea of course, which you always wanted ‘low’) and if you started to edge into ‘Very-high’ intensity you would start to see a drop in ridership, and thus revenue.
G-force relates the acceleration produced by something to the gravitational pull of the Earth. Most roller coasters pull at most 5G’s, or 5 times Earth’s gravity. They only do this briefly though- on big hills or tight turns. The Space Shuttle, for example, pulled 3Gs on reentry and sustained them longer – amusement park goers are clearly not astronauts! Big drops, lots of inversions, intense helixes, and lots of air-time (or negative Gs, where you feel like you are floating out of your seat) are what sell big rides. While real coaster designers don’t use the Roller Coaster Tycoon rating system to determine if their ride is any good they surely have the same design philosophy- be exciting, be intense but not too intense, and make sure the poor teenagers running the thing aren’t scrubbing vomit off the seat every time people get off. I hypothesized most rides, if they were in the game, would probably fall in the ‘Medium’ to ‘High’ intensity and excitement scores. Fortunately we now all carry around an accelerometer in our pockets built right into our smart phones so we can find out for ourselves!
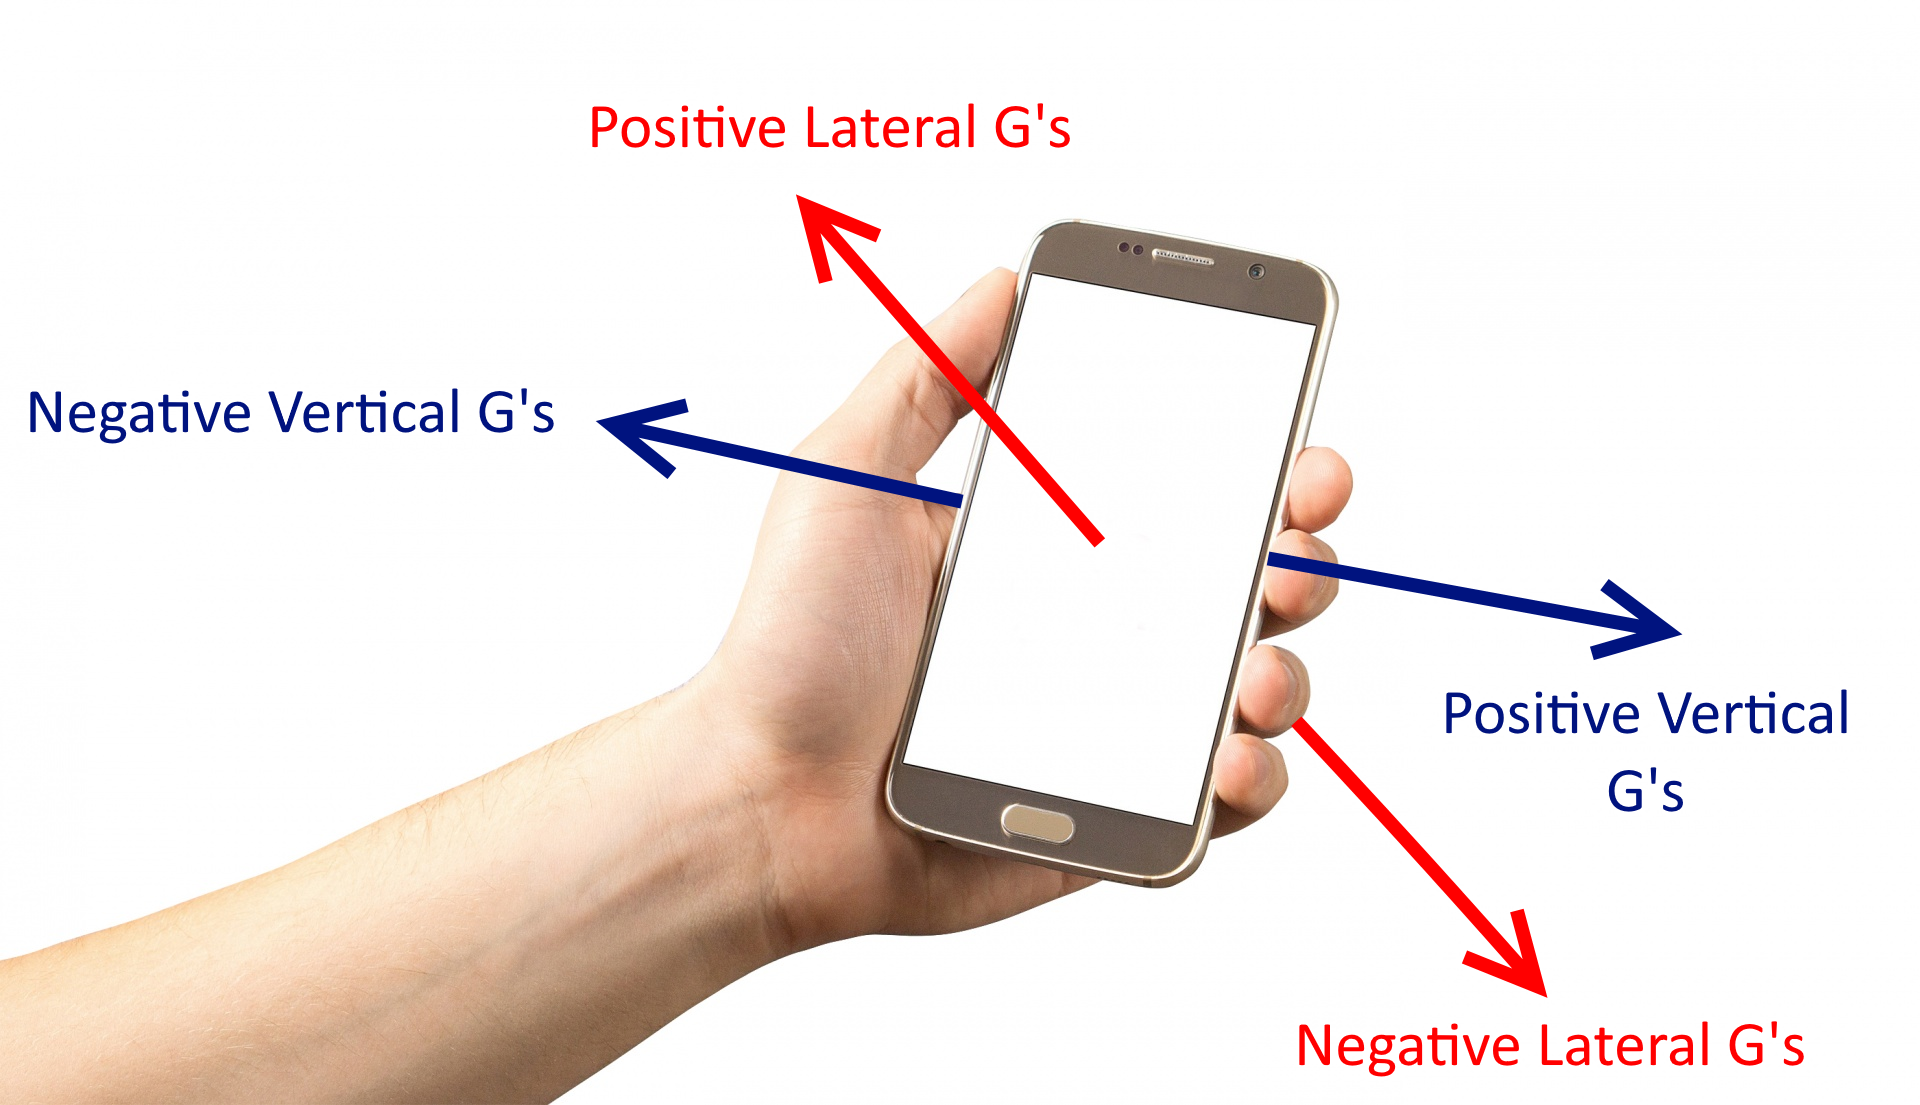
This diagram shows how the accelerometer maps to the G’s measured by the Roller Coaster Test Meter.
The above diagram shows the axes I chose so that your phone could measure acceleration while resting safely in a zipped or sealed pocket while you rode a roller coaster. Vertical Gs are along your phone’s x-axis while lateral G’s are measured along your phone’s z-axis. This assumes that you put your phone into your pocket with your screen facing to your left and top-first, by convention.
The game’s formulas for computing the ratings for each ride were somewhat mysterious until the OpenRCT2 project published their open-source code and formulas. We knew for years that primarily the g-forces the ride produced made up the bulk of the score, and other features like theming, dueling trains, and music among other things also contributed. There are also unique multipliers for each ride that come into play.
I am simply trying to build a toy however that you can turn on, throw in a pocket, and share with your friends so I avoided the design route of asking you a whole survey about the ride’s features before you get on. Instead I went a different route to produce a set of formulas that roughly approximate that in the game regardless of what kind of roller coaster you are on, mystery multiples and all, by comparing the scores of real roller coasters to those in the game. Fortunately this summer I have had access to a roller coaster that was in the game and that I could ride in real life- a ‘boomerang’! These roller coasters are everywhere, as they have a small footprint and low cost that makes them perfect for parks wanting to add a coaster on a small budget. The model in the game is ‘Defibrillator’ and it can be found in the ‘Funtopia’ scenario of the original game.
So, readers, I rode it just for you! Just kidding- I am obsessed with roller coasters and the fact that I needed to ride one to complete this project was no coincidence. I started building a prototype of my app using Ionic and Apache Cordova, which would enable me to release my app for you on either Android or iOS without needing to rewrite any of my code. There are excellent tools for making a fun UI (I tried to keep the colors and theming true to the original game) and you can import great packages for social sharing and interfacing with the accelerometer. I ran my app and saved the base score using the basic formulas from OpenRCT2 with no multiples. I then tested for the scores for ‘Defibrillator’ in the game, computed my multiples empirically to scale my ratings appropriately, and voila! We now get scores we would expect if real coasters were in the game!
My Boomerang test ride with raw (unscaled) scores reported at the bottom.
Additionally I wanted to provide you with the raw data that went into your scores, just like the game. I used the awesome Chart.js library to plot the vertical and lateral G-forces live for you right on the screen, letting you have a nice plot of the forces experienced on the ride once you’re done:
It is amazing fun- my favorite highlights are the legendary The Beast having an appropriate intensity of ‘Very-high’ and the crowd-favorite Maverick having excitement at ‘Very-high’. I even rode the new Steel Vengeance– just look at those vertical G’s! Simply download the app from Google Play or Apple App Store, insert the phone top-first and screen facing left into a pocket, and hang on tight! Obviously follow any rules about loose articles (they are there for a reason) but generally as long as you have a pocket that can be sealed this is a fun way to rate coasters, plot their g-forces, and brag to your friends about how you pulled 5G’s on Steel Vengeance this summer. Once you hit the ‘end’ button hit ‘share’ and post the scores to social media, then hit ‘clear’ and enter the next coaster’s name before going and conquering it. Have fun and make good choices!
Using hardware store materials (making them easy for anyone to procure) we can create an enclosed system that bathes screens in UV-C light and charges the devices at the same time! All we need is a box, a UV-C bulb, a power strip, and some elbow grease. Watch the video above for all the details, and click these links to buy the materials I used to create my sanitizer/charger:
Star Wars has some of the most iconic artwork of any movie franchise in history. Nowhere is this more apparent than in its theatrical posters. This lithopone lamp captures all nine main storyline Star Wars posters (with a blank standing in for Episode 9 until the official poster is released!) in a lovely desktop lamp that celebrates your favorite movies. Simply place an approximately 2.5 inch diameter LED puck light (like you would place under a cabinet) inside the indentation in the base and run the cord out the slot!
The ‘Welcome to Colorful Colorado’ sign has been greeting visitors to the state on the highways since 1950. In this video I show how I made my own miniature version using a CNC router and simple photo editing tools.
Recently a triceratops fossil was found at a construction site in my hometown of Thornton, Colorado. Inspired by some incredible 3D printing work being done with 3D scans of dinosaur fossils, I decided to make my own triceratops skull and later made a t-rex skull after the discovery of a tyrannosaur tooth at the site days later. These were done on my Robo 3D R1 Plus printer with special marbled PLA that gives the models a nice stone look. The time lapses were done with an iPhone 7 and then sped up considerably in editing!