I’m at PyCon 2018 in Cleveland this upcoming week, so I thought that it would be a great time to post a quick Python writeup on how you can collect data from microcontrollers like Arduino and then save the data to your PC to process however you wish! PySerial makes this remarkably easy. This is a great project for science teachers as they show how you can use simple, ~$10 microcontrollers to create excellent data collection systems by connecting a few sensors and modifying my simple software! If you want to skip the tutorial you can download my software for Windows or Mac at the bottom of this page or use the link there to clone my repository on GitHub.
As usual,
THE PROBLEM
How can I collect a bunch of sensor data and then save it to my computer so that I can analyze it in a Jupyter notebook or in Excel?
THE SOLUTION
Over serial, and then use a simple Python program to save the data into a format like CSV that can be easily read by any analysis program!
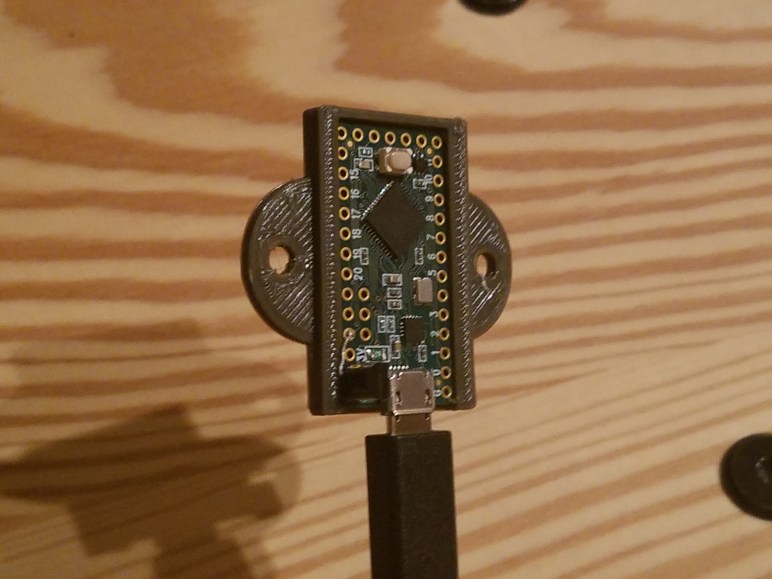
For this writeup, I was specifically trying to collect data from an analog temperature sensor (TMP36) and then plot that temperature over time. I used a Teensy LC- a $12 Arduino-compatible microcontroller board that is so cheap and easy to use that I throw them at any of my rapid-prototyping problems. It features an ARM Cortex-M0+ processor, lots of analog and digital pins (including capacitive touch!) and a convenient micro-USB port for setting up an easy USB serial connection.
Here’s how I wired up the sensor:

Since all of my projects must include 3D printing, I also 3D printed a great case off of Thingiverse by a user named Kasm that nicely contains the project and makes sure I don’t accidentally short any of the pins to anything:

For those curious how this works, the temperature sensor is an analog component that, when given 3-5V, returns a voltage that is proportional to the temperature around it. We are feeding the voltage into an analog to digital converter (ADC) so that our digital microcontroller can make sense of the reading. This means that in our code, we need to convert a number from 0-1023 back into a voltage so that we can use the formula from the data sheet to convert to a temperature. Fortunately, this is a simple conversion:
This will return a voltage in millivolts. The 3300 comes from the 3.3V reference voltage of the Teensy, and the 1024 comes from the Teensy having a 10-bit ADC, meaning it has 210 discrete analog levels.
We can then convert to a temperature using the formula from the device data sheet:
This will return a temperature in Celsius. I have adapted the Arduino sketch from this excellent Adafruit tutorial so that it will work with the Teensy:
This file contains hidden or bidirectional Unicode text that may be interpreted or compiled differently than what appears below. To review, open the file in an editor that reveals hidden Unicode characters.
Learn more about bidirectional Unicode characters
| void setup() | |
| { | |
| Serial.begin(9600); //Start the serial connection with the computer | |
| //to view the result open the serial monitor | |
| } | |
| void loop() | |
| { | |
| int reading = analogRead(9); | |
| // Teensy reference voltage is 3.3V | |
| float voltage = reading * 3.3; | |
| voltage /= 1024.0; | |
| // now print out the temperature | |
| float temperatureC = (voltage – 0.5) * 100 ; //converting from 10 mv per degree wit 500 mV offset | |
| //to degrees ((voltage – 500mV) times 100) | |
| Serial.print(temperatureC); | |
| // Print a space | |
| Serial.print(' '); | |
| // now convert to Fahrenheit | |
| float temperatureF = (temperatureC * 9.0 / 5.0) + 32.0; | |
| Serial.print(temperatureF); | |
| // New line | |
| Serial.print('\n'); | |
| delay(60000); //waiting a minute | |
| } |
Note what we are doing here:
- We are opening a serial port at 9600 baud (bits per second)
- We are reading from analog pin 9 on the Teensy, where the voltage out pin is connected
- We are converting the reading there to a voltage.
- We are converting that voltage to a temperature
- We are printing that line to serial so that it is transmitted
- We convert again from Celsius to Fahrenheit
- We print this line to serial as well
- We print a new line character so each row only has the one pair of readings
- We wait one minute to take another reading
Pretty simple! You can change the delay to any interval you wish to collect more or less data- the units are milliseconds. I wanted to only collect data once per minute, so I set it to 60000 milliseconds. Go ahead and flash this to your Teensy or Arduino using the Arduino IDE, making sure your device type is set to Serial. This is important, as without doing it you will not be able to read the data being sent over serial USB.

Now to build the Python program. If you would rather simply download the binaries or clone the repository on Github for the Python client the links are available at the bottom of this page. We are going to use PySerial. We are also going to use Python 3, so make sure you have it installed if you are still using Python 2. Pip install PySerial by typing pip install pyserial. The logger is going to be wrapped in a simple Tkinter GUI. We want to accomplish the following:
- Read the temperature data being printed to serial by the Teensy
- Save it to a CSV value
- Let the user select an interval to read from serial
- Let the user select where they want the csv file saved
- Let the user select what serial port they want to read off of.
The end result will look like this:

Let’s take a look at the code and then break it down:
This file contains hidden or bidirectional Unicode text that may be interpreted or compiled differently than what appears below. To review, open the file in an editor that reveals hidden Unicode characters.
Learn more about bidirectional Unicode characters
| #!/usr/bin/env python | |
| import os | |
| import serial | |
| import serial.tools.list_ports | |
| import threading | |
| import tkinter as tk | |
| import time | |
| from threading import Thread | |
| from time import sleep | |
| from tkinter import filedialog as fd | |
| from tkinter import ttk | |
| running = True | |
| f = "" | |
| def timer(sp, interval): | |
| global f | |
| while running: | |
| sleep(interval) | |
| line = sp.readline().decode("utf-8") | |
| data = [float(val) for val in line.split(' ')] | |
| t = time.strftime("%Y-%m-%d %H:%M:%S") | |
| newRow = "%s,%s,%s\n" % (t, data[0], data[1]) | |
| with open(f.name, "a") as datafile: | |
| datafile.write(newRow) | |
| def collect(strPort, interval): | |
| global f | |
| # Ask for a location to save the CSV file | |
| f = fd.asksaveasfile(mode='w', defaultextension=".csv") | |
| if f is None: # User canceled save dialog | |
| return | |
| # Overwrite existing file | |
| try: | |
| os.remove(f) | |
| except: | |
| # File does not exist yet | |
| pass | |
| sp = serial.Serial(strPort, 9600) | |
| time_thread = Thread(target=timer, args=(sp, interval)) | |
| time_thread.start() | |
| def end(): | |
| global running | |
| running = False | |
| def onIncrement(counter): | |
| counter.set(counter.get() + 1) | |
| def main(): | |
| root = tk.Tk() | |
| root.title("Serial USB Temperature Data Collector") | |
| mainframe = ttk.Frame(root) | |
| mainframe.grid(column=0, row=0, sticky=(tk.N,tk.W,tk.E,tk.S)) | |
| mainframe.pack() | |
| serial_label = ttk.Label(mainframe, text="Sensor Serial Port:") | |
| serial_label.grid(row=0, column=0) | |
| serial_var = tk.StringVar(root) | |
| raw_ports = list(serial.tools.list_ports.comports()) | |
| ports = [] | |
| for p in raw_ports: | |
| if "USB Serial" in p.description: | |
| ports.append(p.device) | |
| serial_menu = ttk.OptionMenu(mainframe, serial_var, *ports) | |
| serial_menu.grid(row=0, column=1) | |
| counter = tk.IntVar() | |
| counter.set(60) | |
| duration_label = ttk.Label(mainframe, textvariable=counter) | |
| duration_label.grid(row=1, column=1) | |
| duration_increment = ttk.Button(mainframe, | |
| text="Increase Collection Interval (sec)", | |
| command=lambda: onIncrement(counter)) | |
| duration_increment.grid(row=1, column=0) | |
| collect_button = ttk.Button(mainframe, text="Begin Data Collection", | |
| command=lambda: collect(serial_var.get(), | |
| counter.get())) | |
| collect_button.grid(row=2, column=0, sticky=(tk.E, tk.W)) | |
| end_button = ttk.Button(mainframe, text="End Data Collection", | |
| command=lambda: end()) | |
| end_button.grid(row=2, column=1, sticky=(tk.E, tk.W)) | |
| root.mainloop() | |
| if __name__ == '__main__': | |
| main() |
What’s happening here is actually more simple than it seems! Let’s go through how it works, step by step, starting in Main():
- We create the root window where all of our widgets are stored (buttons, fields, etc.)
- We give it a name
- We grid a label
- We grid a dropdown menu
- We use PySerial to look at all serial ports open on the system and look for one called ‘USB Serial’. By default when you flash the Arduino or Teensy with the sketch shown above it will appear as ‘USB Serial’ on either Windows or Mac computers. We want to make sure the user selects the right serial port, so we filter the choices to these. More than likely there will be only one- the Teensy or Arduino connected to the machine.
- We populate the dropdown menu with these serial ports.
- We add a button and a counter. The default value of this counter is 60. This is letting the user know that they don’t have to sample every 60 seconds, and they can increment this value if they wish. You can change this value to whatever sampling rate you have set on your Teensy or Arduino in the sketch above.
- We add a button that lets the user start the data collection. This triggers a function where we ask the user where they want to save their output file in a save dialog, then open a serial port we called sp using PySerial. We must make sure we open it at 9600 baud, just like the serial port we opened on the Teensy! This is so the two ports can talk to each other. We then create a new thread to run our code in- if we did not, the program would freeze and you would not be able to stop the program because it would constantly be running the timer() function, collecting data, and never returning to the thread running the GUI! We set up this thread to run the timer() function as long as the global variable running is set to true. This lets us have a stop condition to terminate the thread when we are finished. In the timer function we use the filename the user has given to use and every sixty seconds save a time stamp in the first column, the temperature in Celsius in the second column, and the temperature in Fahrenheit in the third column. We read a line of of serial using the PySerial serial port’s readline() function and then convert whatever it gets to UTF-8 to make sure that what we are saving are readable Unicode characters. The output database is always being updated with each minute’s data in a new row! We open the CSV value in append mode (open(f.name, “a“)) so that we do not overwrite any existing data.
- We add a button to stop data collection. This sets the global variable running to false, causing the thread where we are saving the temperature data to stop. This halts all data collection.
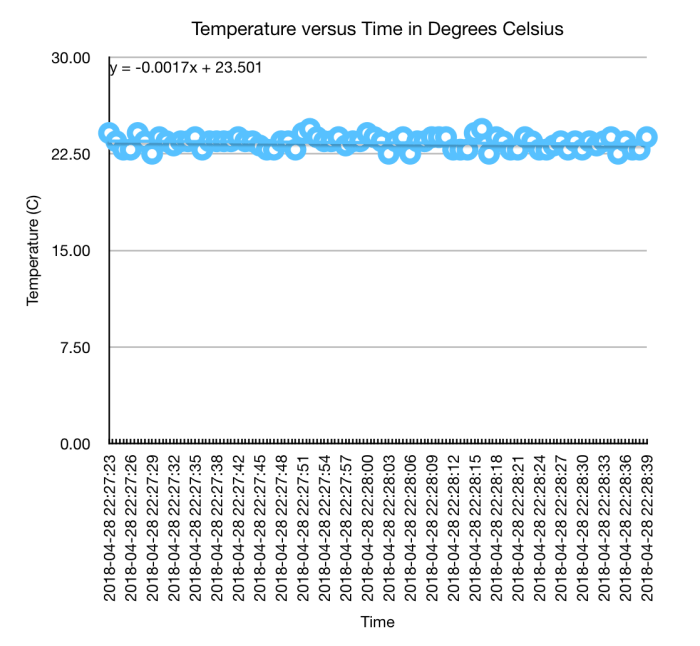
And we are done! PySerial handles the heavy lifting and we have a nice, simple GUI to collect our data from. The CSV files can then be read into your favorite analysis program to create plots or fits:
SHARING THE SOLUTION
You can clone or fork the repository that contains all of these files here or you can download binaries to use right away on your system:
