Introducing ScamSense: Protecting Seniors from Scams with Alexa
In an increasingly connected world, scams and fraud have become more sophisticated, targeting vulnerable individuals with alarming frequency. Seniors, often less familiar with digital tactics, are particularly at risk. That’s why I created ScamSense — an Alexa skill designed to educate, inform, and empower seniors to recognize and avoid scams.
But what if there was a simple, accessible tool to help?
What is ScamSense?
ScamSense turns your Alexa-enabled device into a personal scam prevention assistant. It’s easy to use and provides:
Daily Scam Alerts: Stay informed about the latest fraud tactics, such as phishing, fake charity schemes, and tech support scams.
Identity Protection Tips: Get actionable advice on how to safeguard your personal information.
How It Works
ScamSense draws from reputable resources to deliver accurate and timely information. Every day (at 6AM Central time), it produces a new report of concise updates about recent scams and tips to protect yourself. It integrates with The News API, fetching relevant top stories and then summarizes them using advanced AI (using Llama hosted on SambaNova Cloud).
For example, you might hear:
Empowering Seniors Through Technology
One of the key challenges with senior-focused technology is ensuring it’s user-friendly. Alexa’s voice-first interface makes ScamSense accessible to anyone, even those unfamiliar with smartphones or computers.
ScamSense isn’t just about providing information; it’s about creating peace of mind for seniors and their families.
Try ScamSense Today
ScamSense is available now for Alexa devices. Setting it up is simple:
Enable the skill from the Alexa Skill Store.
Say, “Alexa, open ScamSense,” to start receiving scam alerts and tips.
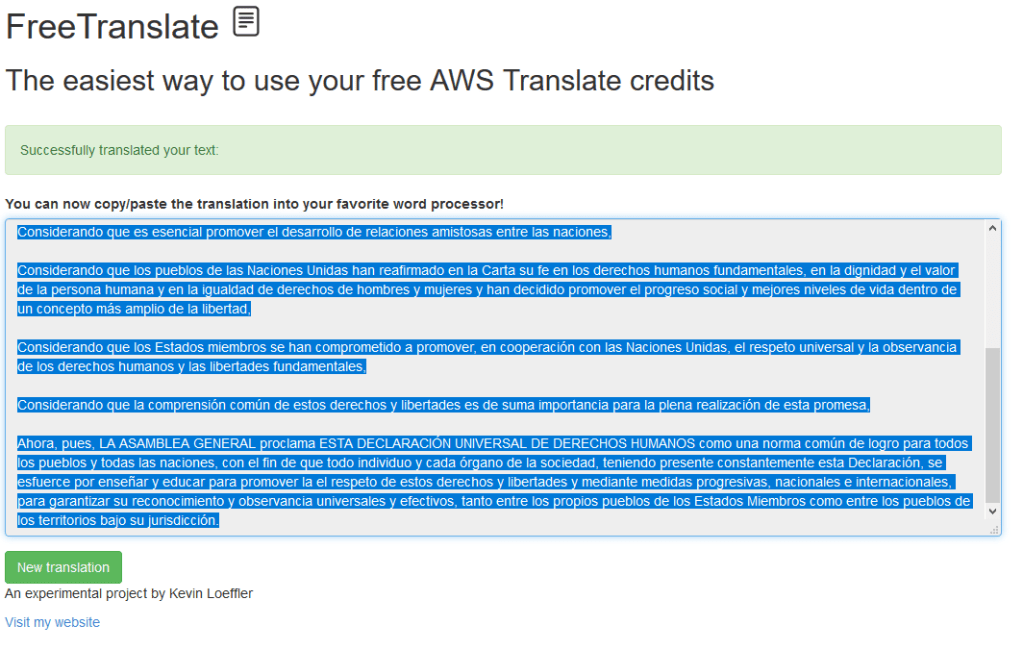
Amazon Web Services has a product called Amazon Translate which is a neural machine translation service, meaning it translates text using machine learning. It is very powerful, and while it cannot replace a human translator, can help people like teachers convey meaning to the communities they work with reliably. Unfortunately this tool is intended for developers, whereas it can be of great value to people who are not programmers who could leverage its generous free usage tier, letting you translate 2 million characters per month for 12 months at no cost.
That’s where FreeTranslate comes in. FreeTranslate is a software project I have worked on that allows people to deploy a personal translation page to use these free credits by simply clicking a button. It will deploy FreeTranslate to your Amazon account and generate a personal URL just for you!
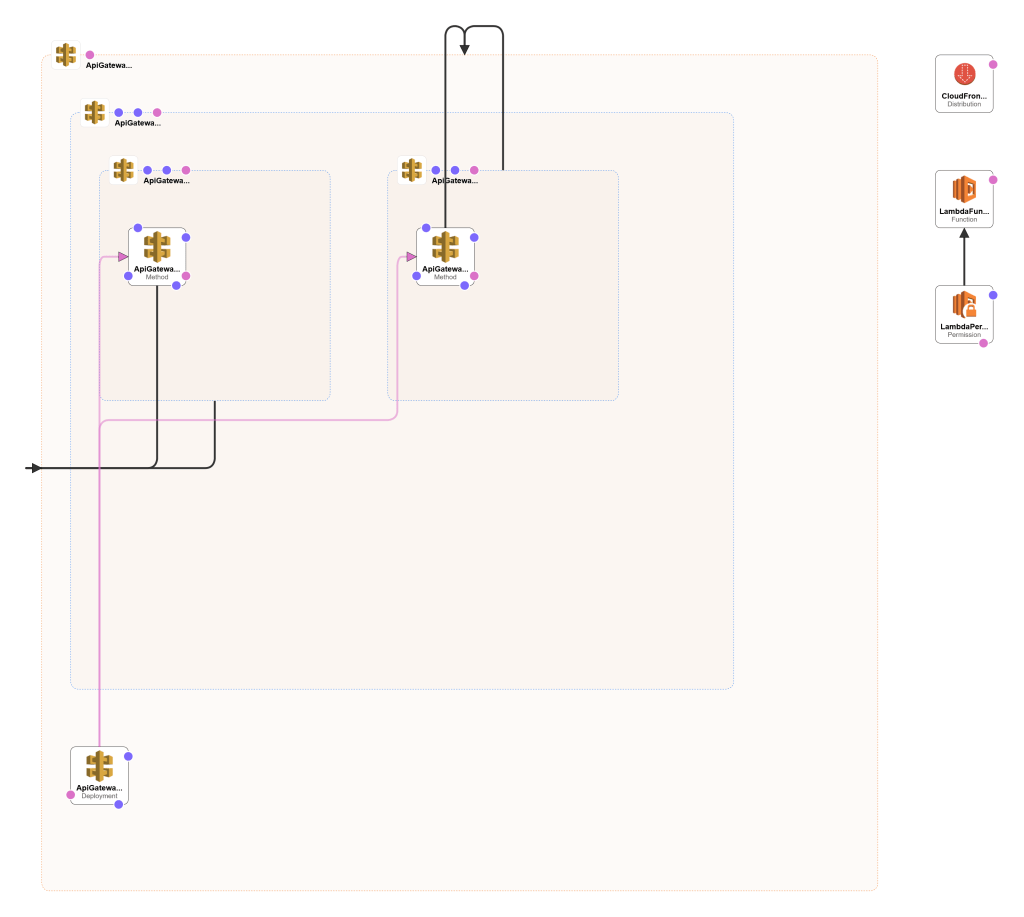
The technical details are that I have built a CloudFormation template that deploys when you click a URL on my projects page. This template deploys an API Gateway (for the webpage and sending translation requests) and a Lambda function (which does the actual translation bit). You can see a diagram from the CloudFormation designer tool here:
Diagram of FreeTranslate and what CloudFormation deploys when you click my Launch Stack button.
Famous author and artist Eric Carle turns 91 today. I remember loving his books when I was a kid, especially The Very Hungry Caterpillar and Brown Bear, Brown Bear, What Do You See?. Each book features his distinctive art style. The images are collages composed of tissue paper and acrylic paint, producing vivid depictions of animals and nature.
THE PROBLEM
Carle’s work is as complex as it is beautiful. How can we make it easier for children to produce their own homages to his creations?
THE SOLUTION
Neural style transfer is a technique that allows you to compose images in another’s style using deep learning. That is, you teach a computer to identify key elements of an image’s style and redraw that image in that style it has just learned.
Taking the code from the tutorial I built a website that lets you upload images, have the style of Eric Carle’s The Very Hungry Caterpillar transferred to it, and display it for the world to see and for you to download! At any given time the latest 10 images will be displayed for any visitors to see. The website is built in one of my favorite frameworks, Flask.
You can access the website at ericcarletransfer.ml. Be warned, the transfer time can be in excess of 10 minutes- it is very computationally intensive.
The results have been encouraging though! Take a look:
The neural network is picking up on the look of the tissue paper and paint. In the future I want to work on reducing the amount of noise seen in the backgrounds.
Word searches can be a great way to build a summary activity for reading a story, article, or book. However, they are time consuming and difficult to make.
THE SOLUTION
text2wordsearch uses the Rapid Automatic Keyword Extraction (RAKE) algorithm to automatically extract the top key words from a blob of text! Simply copy the text from the article or story and choose how many words you want in your word search. Then copy the word search into your favorite word processor (be sure to use a monospace font!). The keywords selected are found in the bottom box.
The technical details are that this uses an AWS Lambda function to run the RAKE algorithm and generate the word search, ingesting the text from the web interface above which is deployed on AWS API Gateway. The Lambda function is written in Python and leverages two excellent packages: python-rake and word-search-puzzle. Because it is a Lambda function they had to be installed to a directory and uploaded as part of a zip bundle along with my function code. This zip is included in the repo linked below for you to deploy and play with yourselves!
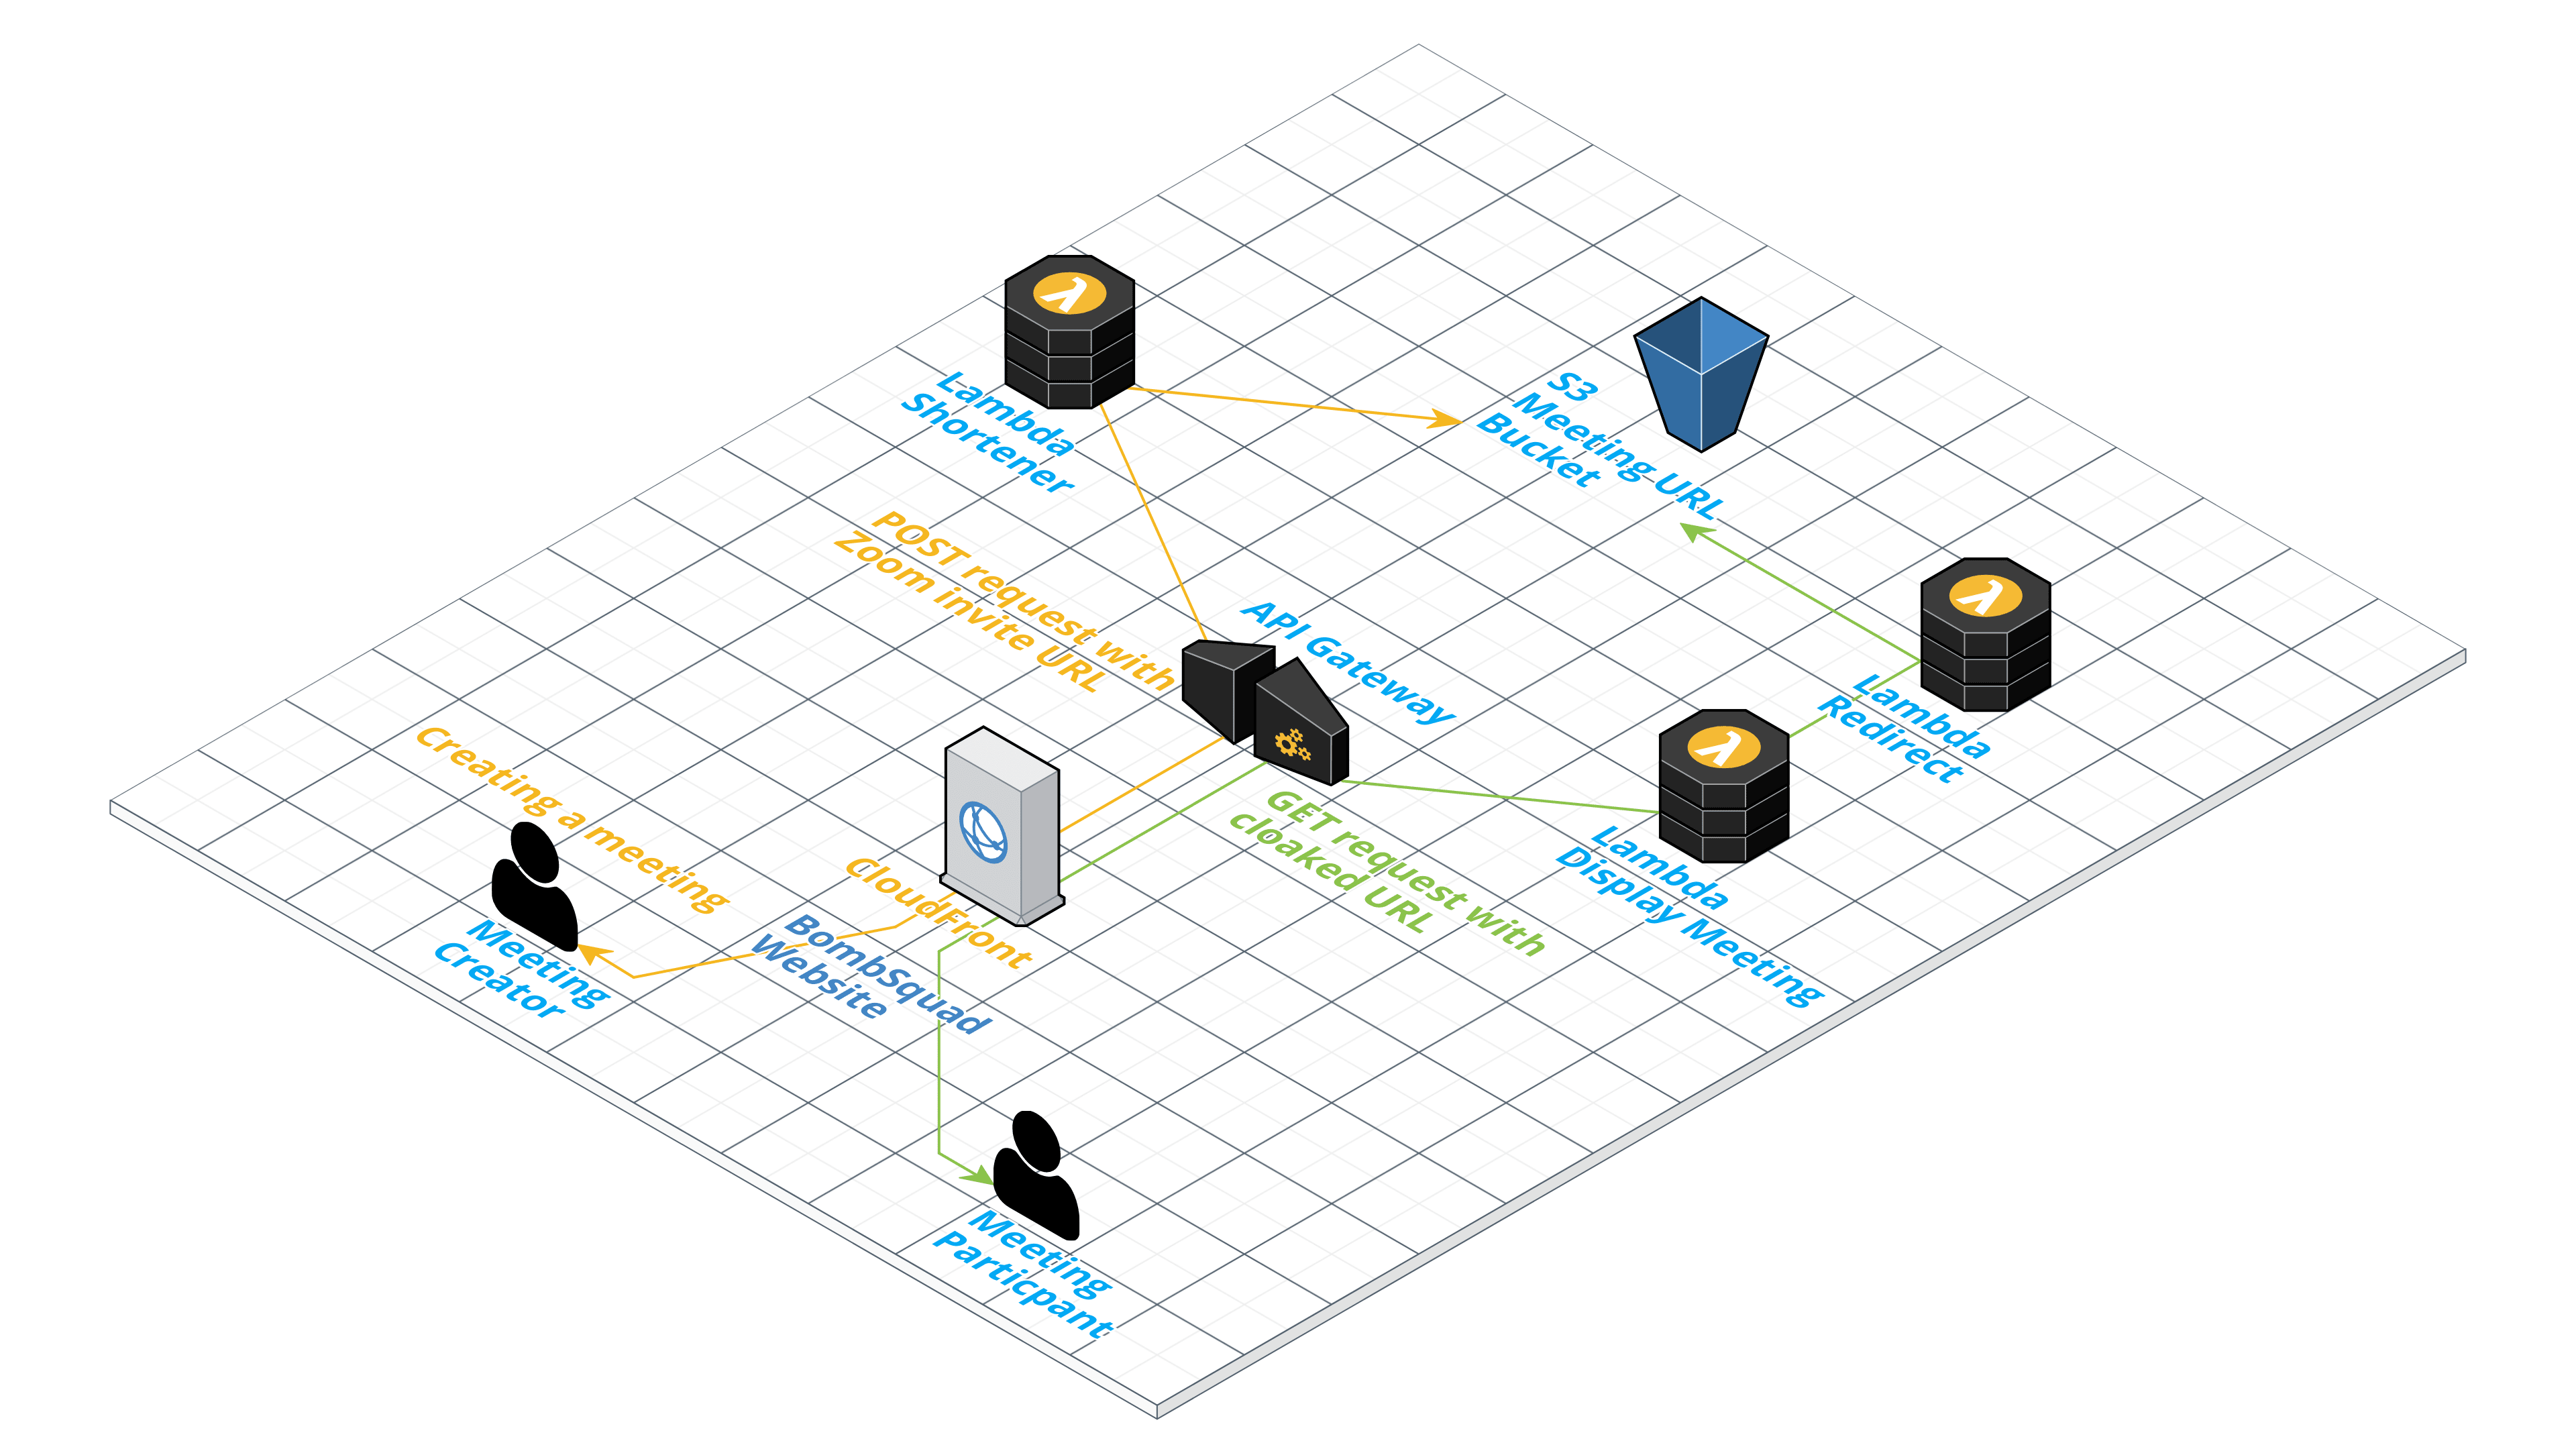
Zoom Bombing is exposing children learning remotely to inappropriate content and disrupting meetings so a few pranksters can have a laugh. The biggest unsolved issue with Zoom Bombing is that people are sharing links and passwords on social media in order to egg trolls and classmates on to bomb these classes and meetings. How can we share a meeting without disclosing the meeting ID and password?
THE SOLUTION
BombSquad is a solution I built on Amazon Web Services to help mitigate the worst of Zoom Bombing. Here’s how it works:
Select your meeting options- you can permanently turn off the participant microphone and camera so that nobody can reenable it by clicking the checkboxes.
Paste your invitation link
Get a sharable cloaked URL that goes right to your meeting!
Continue orchestrating your meeting from the Zoom client like normal.
The technical details are as follows: BombSquad takes your URL, transforms it to force the user to use the Zoom web client, stores the original URL securely, and only redirects the browser to the real meeting URL if the user clicks through the sharable link you receive. The invitation link inside the window is disabled. Thus, all a user can see are BombSquad URLs! This is performed using a combination of AWS S3 and Lambda instances as shown above, making this a neat example of a serverless application– the first I am distributing publicly!
COVID-19 is taxing our internet infrastructure, and many stuck at home are struggling with tasks where it would be useful to share one’s screen with others, such as teaching from home, sharing content with someone without handing them your device and getting it contaminated, or monitoring what is happening on a home computer in real time.
FreeDisplay is a free open-source program written in Python that allows you to share your screen with anyone on your local network, such as your home Wi-Fi network. It creates a QR code other can scan for easy sharing and serves a simple webpage with a mirror of your screen so that any device with a web browser can easily view your screen! Use it for home teaching, sharing content without handing someone your device, presentations, monitoring activity on your home computer and more. Download for free here: https://kevinl95.github.io/freedisplay/
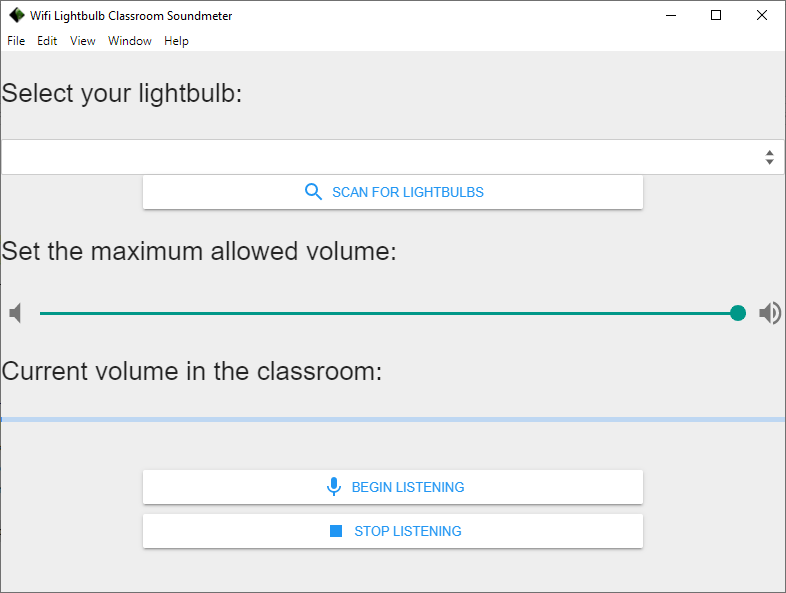
This is an exciting new project I’ve been working on to use off-the-shelf smart lightbulbs to make an inexpensive and automatic classroom management gadget. Using a bit of Node I was able to get the noise level of a classroom and translate it into a color for a connected smart lightbulb, from green to red as the classroom gets louder! Inspired by the ‘traffic light’ noise warning gadgets I see in classrooms, this one is fully automatic. There are no switches to throw- just set the maximum volume in the free software and the lightbulb will change color on its own!
Screenshot of the GUI. The program is an Electron application, and I have applied a material design stylesheet.
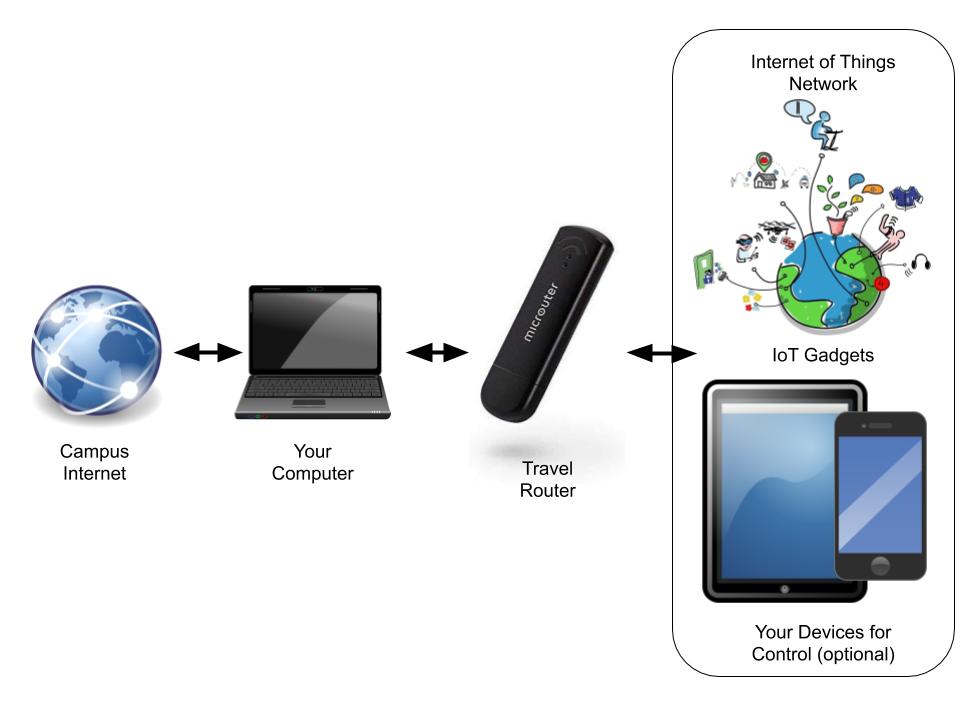
It can be difficult or dangerous to connect internet of things (IoT) gadgets like sensors, smart light bulbs, switches, digital assistants, etc. to campus WiFi networks. Your information technology department may have instituted restrictions on connecting these devices to their network, a landing page may make connecting impossible, or no guest network may exist. Additionally, it is good practice to keep IoT gadgets on their own separate network for security. The FBI has made several recommendations including using a separate network for operating IoT gadgets safely.
Travel routers offer a convenient way to set up this separate network inexpensively and with portable equipment. Unlike your home router or the router in your workplace these routers are small and low power, and can even be run off a USB port on your computer! The range of these devices vary, but generally will cover a single room.
THE SOLUTION
Introducing the GL.iNet GL-USB150 Microuter! This handy little USB microrouter creates a small, easy to set-up WiFi network around your computer. When connected to your laptop, it will appear as a second network connection, letting you access all of your IoT gadgets as well as your campus internet. There are many travel routers out there that may better suit your needs, but this one is small, inexpensive, and has worked for me in the past. It is easy to use and portable.
If your devices will need internet access, you can connect your router to the campus internet itself using the connect tool on the main page.
Your router is now broadcasting. Connect your IoT gadgets to the network using their respective apps. You should see a network that starts with the words “GL-USB150…”. Your devices should have no problem connecting to this new network instead of the campus network.
Connect your tablet or phone to your new network when you want to control the devices with their apps. Your computer will always be connected to this network as well as the campus network, requiring no reconnection. It will treat the new network as a second network connection.
Potential Issues
The GL-USB150 router is a 2.4 GHz device. If you plan on connecting it to the campus WiFi because some of your devices require internet access (note that many devices like switches, light bulbs, etc. do not need internet access, they can be operated on a network without an internet connection) you should verify it is not a newer 5 GHz network. Note that some devices, like Amazon Echo devices, do need internet access so putting them onto a network like this without setting up an internet connection will not work.
Some IT policies forbid you from running your own networking equipment.
CONCLUSION
When volunteering in schools I have run into this problem before- a teacher wants to use a cool new gadget but it just won’t connect to the WiFi. This workaround as worked for me, and I hope it works for you!
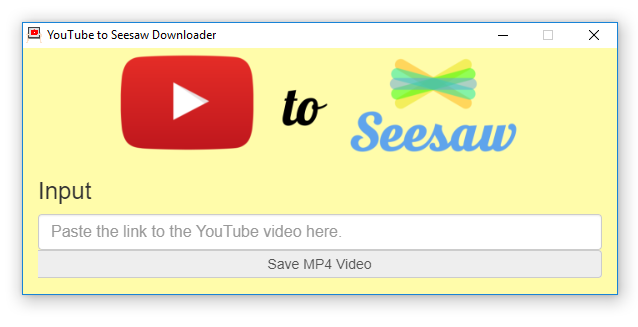
Have you ever wanted to download a YouTube video to share elsewhere but found that every ‘YouTube Downloader’ on the internet is an adware-filled, slow-to-load piece of junk? This is especially problematic when you are trying to get video content to your students- most of the time you cannot directly link to YouTube on a school network connection as it will be blocked, leaving your only option to download the video and re-share it on a platform like Seesaw, a popular platform for student engagement. So how can you get the raw video file to share without getting your computer infected? I have designed a simple desktop application that downloads YouTube videos and I am offering it for free to download! It is available for MacOS and Windows. Best of all it’s a portable app- meaning no installer and therefore no need for an administrator password to use on your school computer!
If you are interested in how I developed this program, read on.
THE PROBLEM
YouTube download websites are filled with adware, malware, deceiving links, and often inappropriate ads. Educators need to be able to download YouTube videos to get around school content filters. They need to be able to use a program that can also evade roadblocks like not being able to install software on a school-issued computer.
THE SOLUTION
The Windows version of the application
The solution was to develop a desktop application (ensuring the longevity of the project as there would be no need to pay for hosting a website or risking my web application getting blocked by a content filter). I also wanted to write this application once and deploy to my two target platforms – Mac and Windows. There are various libraries for downloading YouTube videos simply – I figure a lot of the scammy websites are making use of the open-source ytdl-core or similar JavaScript libraries to download their videos and quickly deploy new websites. I wanted to use something similar as these libraries are easy to use, well-supported, and cross-platform. The solution for all of my problems was to build my app using Electron, which lets you build cross-platform apps using HTML, CSS, and JavaScript. I could build a website using ytdl-core to download videos using the same technology as the sites people are being driven to by Google and then make it a desktop application. Then, using the exact same code for both platforms, I could then deploy to Windows and Mac! And that’s exactly what I did- what you see above in these screenshots is literally a simple website using jQuery,Bootstrap, and ytdl-core that takes in the YouTube link the user pastes in the box, uses regex to check that the link is a properly formatted YouTube link, and then opens a save prompt to save the video to the user’s computer! The save prompt is one of the neat elements of the Electron API that you can just use and have it work one each platform, pulling up a native save dialog and letting me configure it to ensure the user can only save MP4 files, for example, as that is the file format Seesaw accepts. The open-source Electron Packager then lets me bundle all of my dependencies together and create a Windows and Mac application bundle. These bundles include everything needed to run the application in exactly the spot the application needs it, meaning there is no installer to run and therefore it can run without administrator access on your computer! The whole ecosystem let me hack this together very quickly with almost no friction between any of the tools.
ytdl-core lets me ensure that we automatically grab the highest-quality version of the video and download it in MP4 format, making sure everything is as simple as possible to go from video to Seesaw fast, saving teachers time. This all happens in the background – the goal was to make a tool that takes minimal thought to use. Just grab the video your students need, and paste the link!
SHARING THE SOLUTION
This application is completely open-source. You can view it on GitHub here! This also serves a project homepage you can share with your friends and colleagues as it features download buttons for both Mac and Windows. It is also where you should go to get the most up-to-date versions of the software- as I improve it and make bug fixes the links below will not be updated, but they will always get you the first release.
I’m at PyCon 2018 in Cleveland this upcoming week, so I thought that it would be a great time to post a quick Python writeup on how you can collect data from microcontrollers like Arduino and then save the data to your PC to process however you wish! PySerial makes this remarkably easy. This is a great project for science teachers as they show how you can use simple, ~$10 microcontrollers to create excellent data collection systems by connecting a few sensors and modifying my simple software! If you want to skip the tutorial you can download my software for Windows or Mac at the bottom of this page or use the link there to clone my repository on GitHub.
As usual,
THE PROBLEM
How can I collect a bunch of sensor data and then save it to my computer so that I can analyze it in a Jupyter notebook or in Excel?
THE SOLUTION
Over serial, and then use a simple Python program to save the data into a format like CSV that can be easily read by any analysis program!
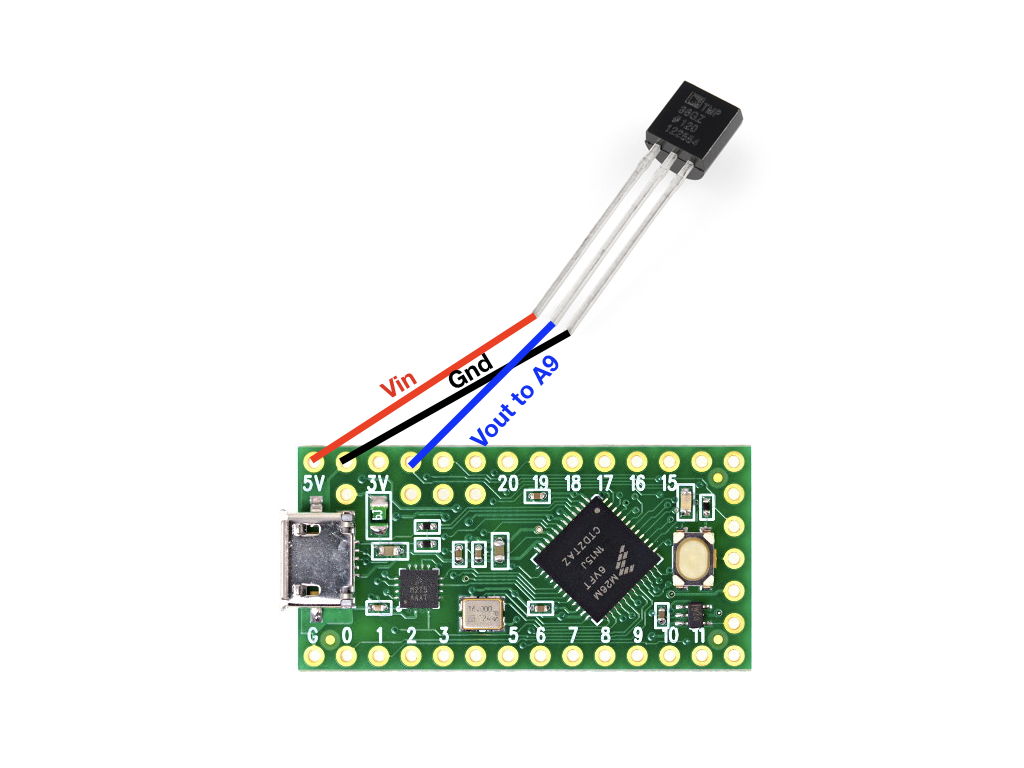
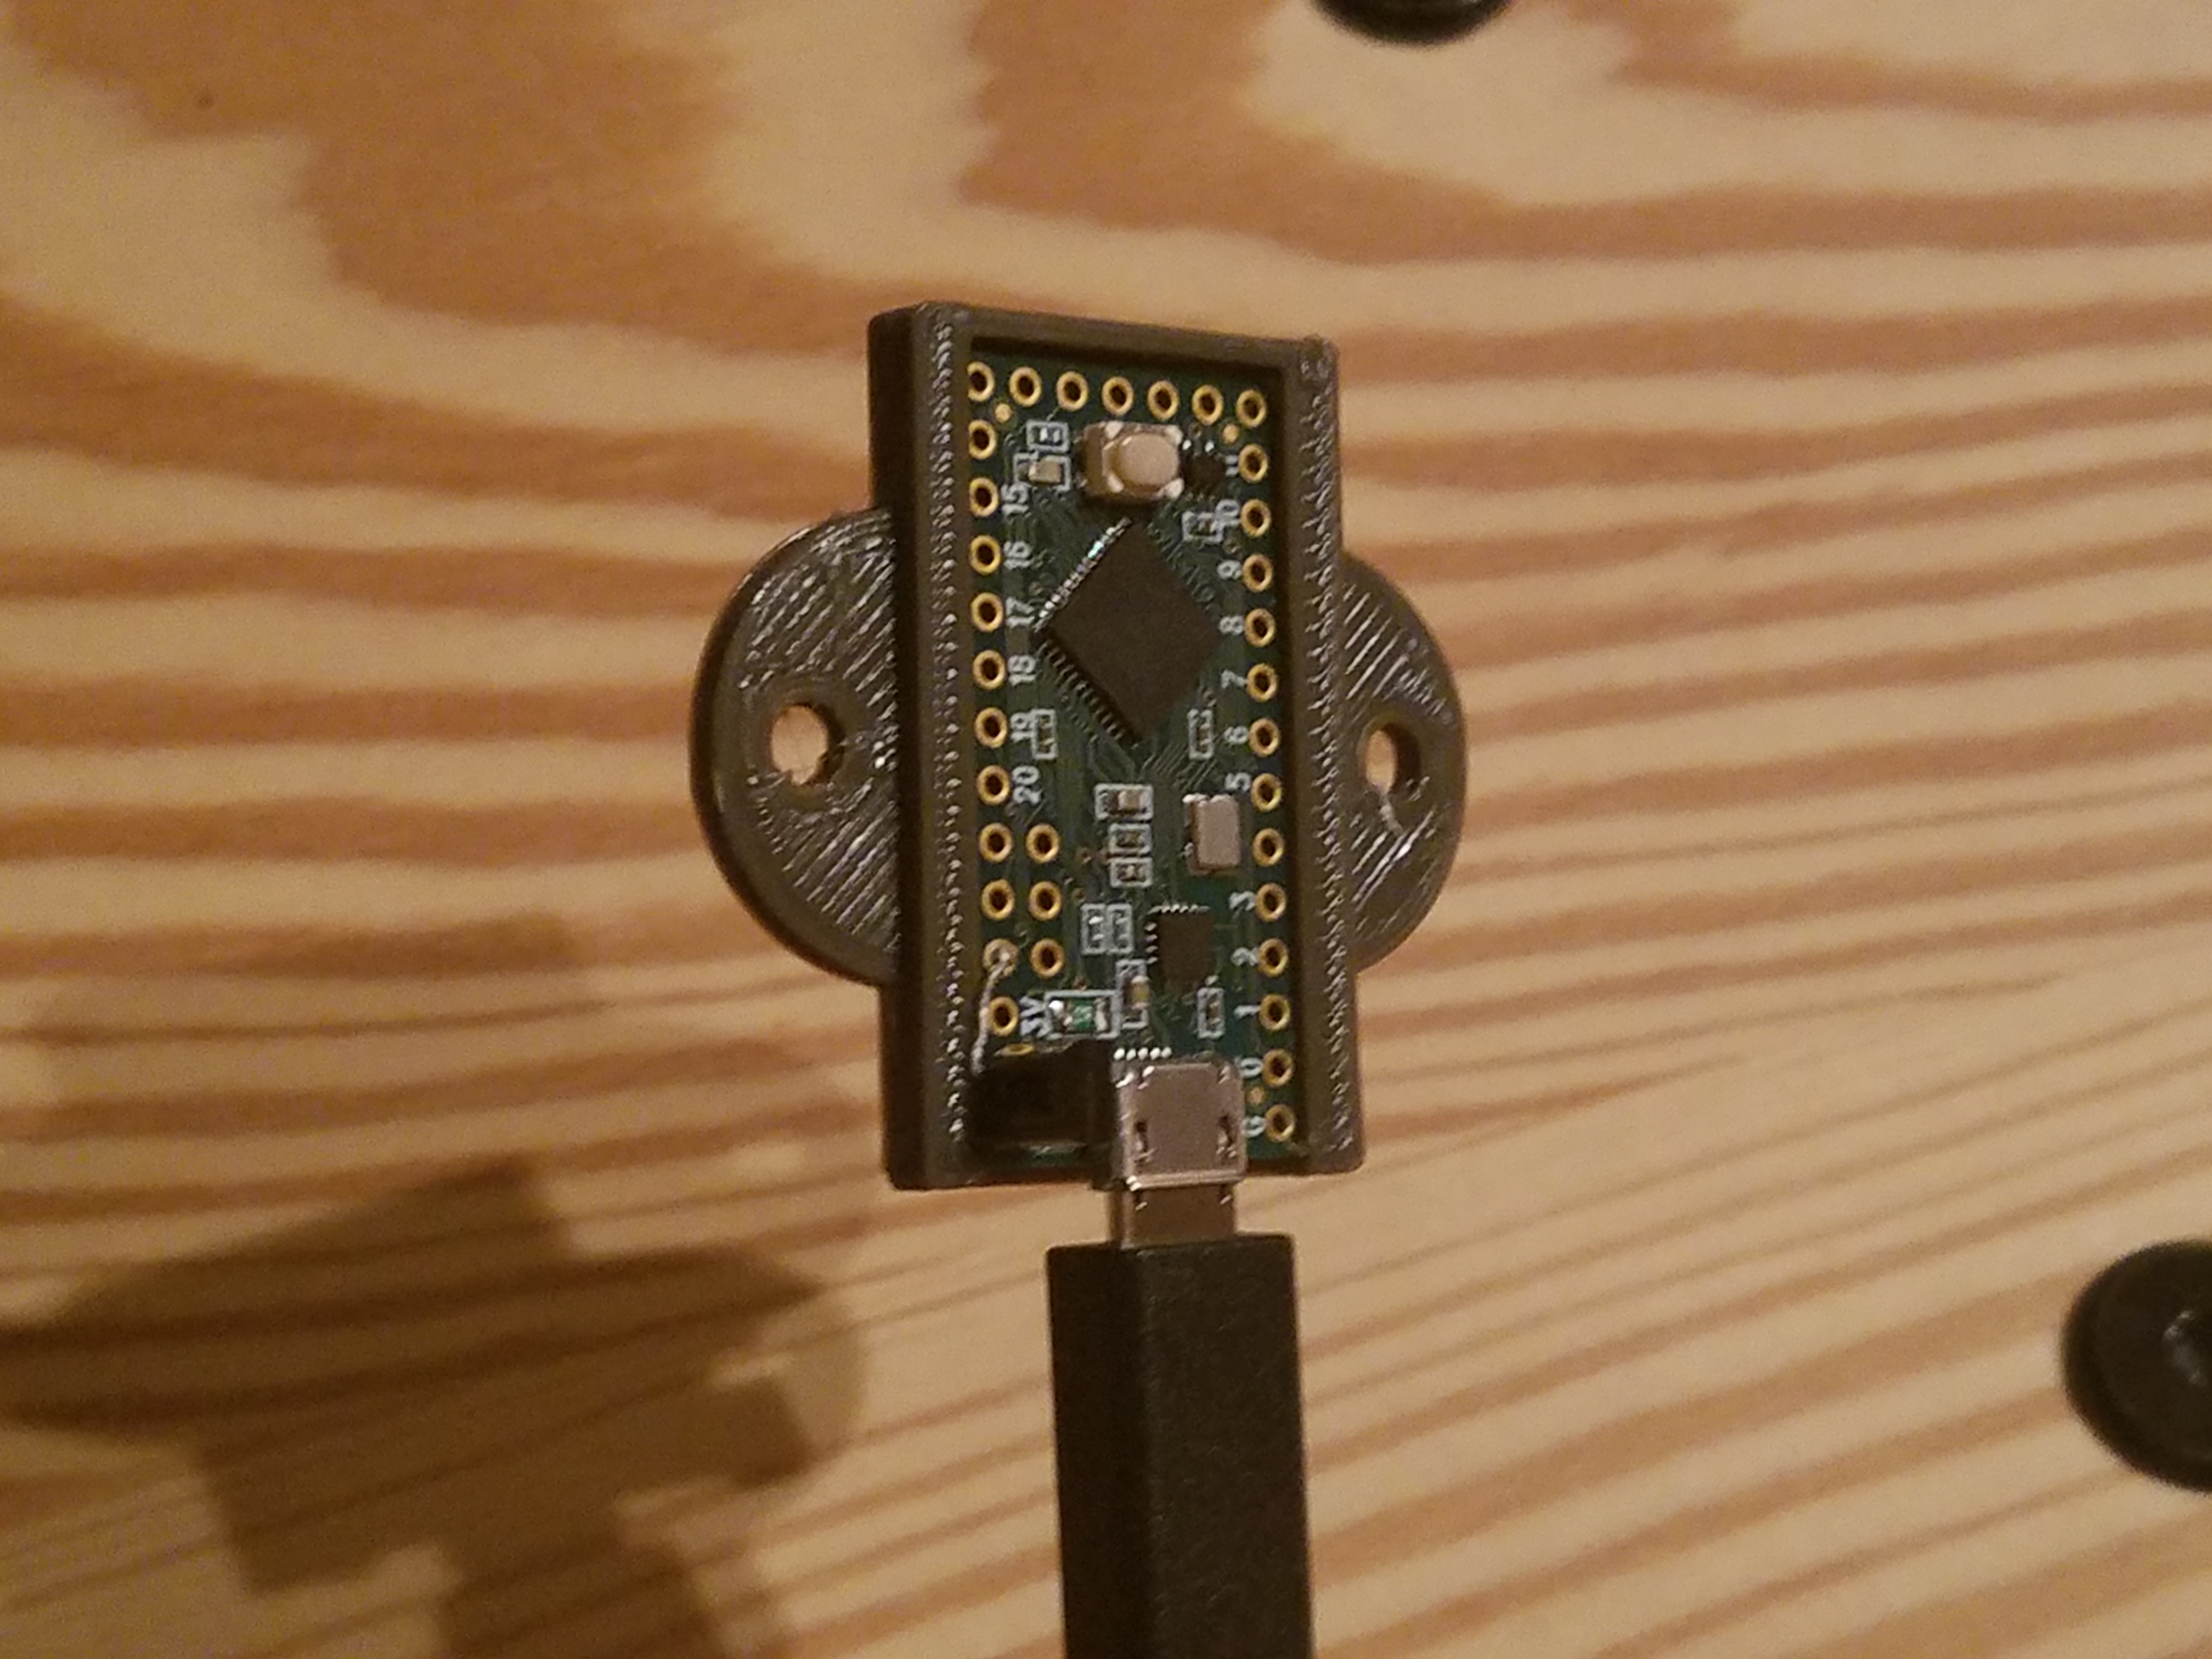
For this writeup, I was specifically trying to collect data from an analog temperature sensor (TMP36) and then plot that temperature over time. I used a Teensy LC- a $12 Arduino-compatible microcontroller board that is so cheap and easy to use that I throw them at any of my rapid-prototyping problems. It features an ARM Cortex-M0+ processor, lots of analog and digital pins (including capacitive touch!) and a convenient micro-USB port for setting up an easy USB serial connection.
Here’s how I wired up the sensor:
This probably would not pass UL certification.
Since all of my projects must include 3D printing, I also 3D printed a great case off of Thingiverse by a user named Kasm that nicely contains the project and makes sure I don’t accidentally short any of the pins to anything:
Slightly more safe and professional looking. The temperature sensor is down on the bottom left.
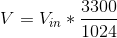
For those curious how this works, the temperature sensor is an analog component that, when given 3-5V, returns a voltage that is proportional to the temperature around it. We are feeding the voltage into an analog to digital converter (ADC) so that our digital microcontroller can make sense of the reading. This means that in our code, we need to convert a number from 0-1023 back into a voltage so that we can use the formula from the data sheet to convert to a temperature. Fortunately, this is a simple conversion:
This will return a voltage in millivolts. The 3300 comes from the 3.3V reference voltage of the Teensy, and the 1024 comes from the Teensy having a 10-bit ADC, meaning it has 210 discrete analog levels.
We can then convert to a temperature using the formula from the device data sheet:
This will return a temperature in Celsius. I have adapted the Arduino sketch from this excellent Adafruit tutorial so that it will work with the Teensy:
This file contains hidden or bidirectional Unicode text that may be interpreted or compiled differently than what appears below. To review, open the file in an editor that reveals hidden Unicode characters. Learn more about bidirectional Unicode characters
We are opening a serial port at 9600 baud (bits per second)
We are reading from analog pin 9 on the Teensy, where the voltage out pin is connected
We are converting the reading there to a voltage.
We are converting that voltage to a temperature
We are printing that line to serial so that it is transmitted
We convert again from Celsius to Fahrenheit
We print this line to serial as well
We print a new line character so each row only has the one pair of readings
We wait one minute to take another reading
Pretty simple! You can change the delay to any interval you wish to collect more or less data- the units are milliseconds. I wanted to only collect data once per minute, so I set it to 60000 milliseconds. Go ahead and flash this to your Teensy or Arduino using the Arduino IDE, making sure your device type is set to Serial. This is important, as without doing it you will not be able to read the data being sent over serial USB.
All software must have a nice icon.
Now to build the Python program. If you would rather simply download the binaries or clone the repository on Github for the Python client the links are available at the bottom of this page. We are going to use PySerial. We are also going to use Python 3, so make sure you have it installed if you are still using Python 2. Pip install PySerial by typing pip install pyserial. The logger is going to be wrapped in a simple Tkinter GUI. We want to accomplish the following:
Read the temperature data being printed to serial by the Teensy
Save it to a CSV value
Let the user select an interval to read from serial
Let the user select where they want the csv file saved
Let the user select what serial port they want to read off of.
The end result will look like this:
Who says Tkinter has to look ugly?
Let’s take a look at the code and then break it down:
This file contains hidden or bidirectional Unicode text that may be interpreted or compiled differently than what appears below. To review, open the file in an editor that reveals hidden Unicode characters. Learn more about bidirectional Unicode characters
What’s happening here is actually more simple than it seems! Let’s go through how it works, step by step, starting in Main():
We create the root window where all of our widgets are stored (buttons, fields, etc.)
We give it a name
We grid a label
We grid a dropdown menu
We use PySerial to look at all serial ports open on the system and look for one called ‘USB Serial’. By default when you flash the Arduino or Teensy with the sketch shown above it will appear as ‘USB Serial’ on either Windows or Mac computers. We want to make sure the user selects the right serial port, so we filter the choices to these. More than likely there will be only one- the Teensy or Arduino connected to the machine.
We populate the dropdown menu with these serial ports.
We add a button and a counter. The default value of this counter is 60. This is letting the user know that they don’t have to sample every 60 seconds, and they can increment this value if they wish. You can change this value to whatever sampling rate you have set on your Teensy or Arduino in the sketch above.
We add a button that lets the user start the data collection. This triggers a function where we ask the user where they want to save their output file in a save dialog, then open a serial port we called sp using PySerial. We must make sure we open it at 9600 baud, just like the serial port we opened on the Teensy! This is so the two ports can talk to each other. We then create a new thread to run our code in- if we did not, the program would freeze and you would not be able to stop the program because it would constantly be running the timer() function, collecting data, and never returning to the thread running the GUI! We set up this thread to run the timer() function as long as the global variable running is set to true. This lets us have a stop condition to terminate the thread when we are finished. In the timer function we use the filename the user has given to use and every sixty seconds save a time stamp in the first column, the temperature in Celsius in the second column, and the temperature in Fahrenheit in the third column. We read a line of of serial using the PySerial serial port’s readline() function and then convert whatever it gets to UTF-8 to make sure that what we are saving are readable Unicode characters. The output database is always being updated with each minute’s data in a new row! We open the CSV value in append mode (open(f.name, “a“)) so that we do not overwrite any existing data.
We add a button to stop data collection. This sets the global variable running to false, causing the thread where we are saving the temperature data to stop. This halts all data collection.
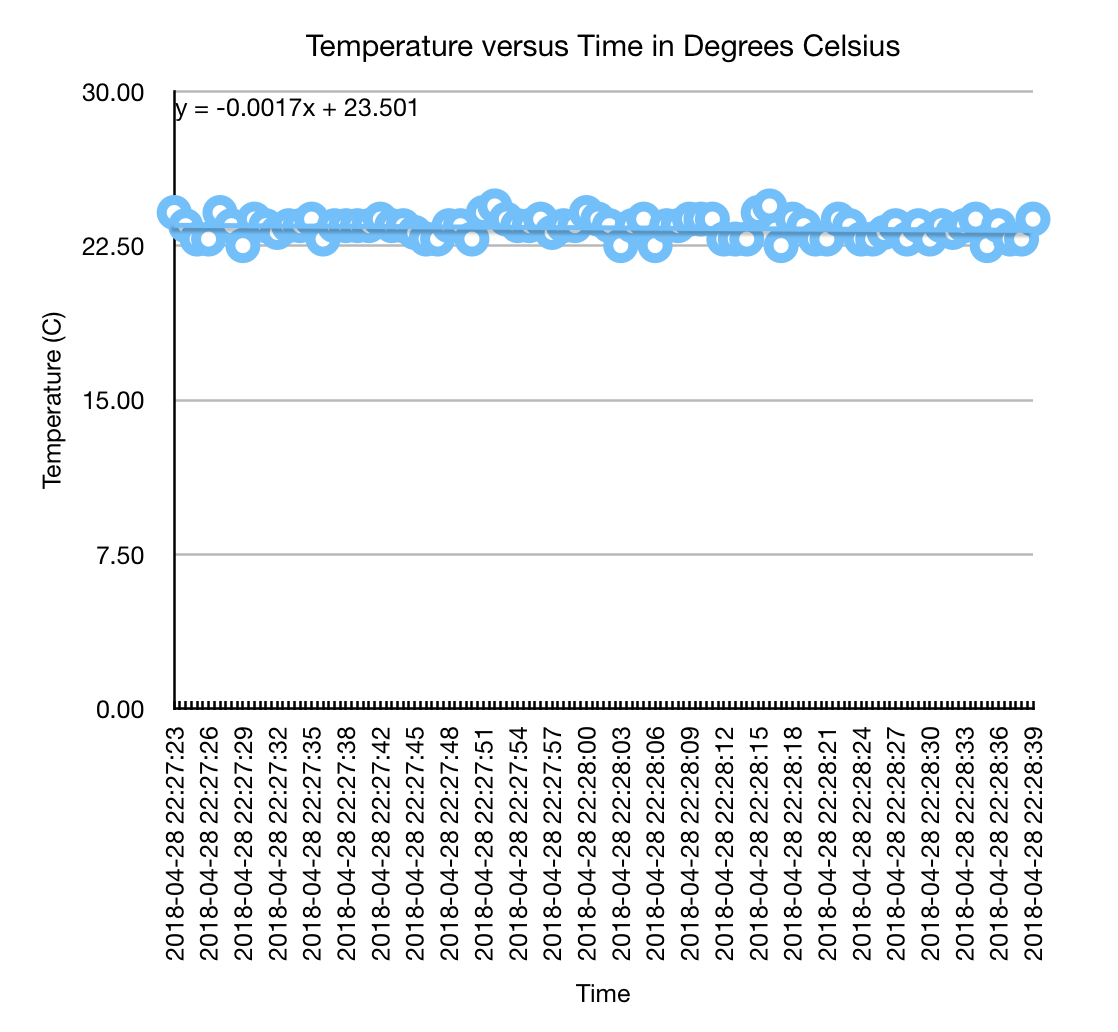
And we are done! PySerial handles the heavy lifting and we have a nice, simple GUI to collect our data from. The CSV files can then be read into your favorite analysis program to create plots or fits:
A quick plot I created in Numbers, showing that over the short interval tested the temperature did not stray far from 23 degrees.
SHARING THE SOLUTION
You can clone or fork the repository that contains all of these files here or you can download binaries to use right away on your system: