What’s great about using them is you avoid the auto-playing video, image carousels, comment sections, and other clutter that not only make the article difficult to read- it makes the page load time go through the roof! Knowing these text-only, or “lite”, versions exist is great, but I get sent a lot of articles via social media and messages. Remembering how to convert the URL for many of these sites is a hassle.
I wrote an open-source and free browser extension called LiteNews! It automatically will redirect you to the lite version of articles for the above news outlets when you click a link. It’s available for Chrome, Firefox, and Edge. It’s the first time I’ve written a cross-platform browser extension, and I can thank the Plasmo Framework for making it easy. I wrote my extension once and published in stores for all three browsers without needing to change a line of code!
I’ve spent the last few days learning about my new favorite serverless app development platform, Atlassian Forge. It lets you easily develop apps for Confluence, JIRA, and more using JavaScript, and even comes with some really nice UI widgets you can use in their UI kit. While not the main subject of this article, one of my favorite things about their tools is that they make it very simple to store credentials encrypted for use with your Forge app – it’s built into the Forge CLI and is a breath of fresh air for those familiar with more complicated solutions like Amazon’s Key Management Service. Anything to make it easier for folks not to accidentally commit their tokens to GitHub!
Those snazzy UI elements may start to feel a bit constricting if you’re looking to display the results from your favorite REST API. Take for example the Table widget. The docs are very helpful explaining all the features, but what if you don’t know how many elements you’re going to have? What if you have a key that stores a list with a variable number of objects, and maybe you don’t know what their attributes are going to be yet? Maybe there’s a computation you need to do with the data and display the result? What if you don’t want to have any degree of repetition, defining each row yourself? We need a way to programmatically create a table (or similar container- doing this for a button set or tag group is left as an exercise to the reader!).
This is where the humble map comes in. Maps are common in JavaScript- they hold key value pairs. You can build a map that then lets you iterate over all the objects you want to display- even if you don’t know how many there are going to be! The UI kit markdown can look static but you can actually use JavaScript like maps inside your UI kit responses from Forge! You can also compute new results not in your data source right in line. If you didn’t know this, you may be tempted to do something like the following. Let’s say you have an API that returns some team group members for a given project. It has a list of team members under the key ‘members’. You may be tempted to write a return like this in your Forge app to put them in a table inside an inline dialogue:
And so on, and so forth, until you’re writing markup all day, your boss is mad, and you still haven’t solved the issue that you don’t know how long the ‘members’ list is. You also are just putting the number of tasks completed- no the percentage score your API doesn’t return and you need to find a way to compute within Forge.
Well it turns out the following will work just fine, and is far shorter:
We now accommodate however many members there are (even 0!) and do the math for our score right in line. Forge will evaluate all of this JavaScript and programmatically create as many lines as you want.
Why am I sharing this? It’s a key part of the UI of my new Forge app PriorWise! As part of my submission to the 2023 Codegeist Unleashed Hackathon I use this trick to list as many patents and papers as I can based on a user’s query. It lets you highlight some text or even search a full page for relevant patents and research papers, known as prior art. This helps innovators find out if they are infringing on an existing idea, or inform new avenues of research and collaboration. It uses AI to find results that are similar in terms of meaning and topic. While I don’t always know how many results I’ll get back, if they will have images or not, and I still need to compute a similarity score for the user, I know Forge and UI kit will take care of all of this and display an organized result for my users. This stumped me for a bit, don’t let it stump you!
Example of a programmatically generated list of patents returned in an inline modal from PriorWise
This Halloween I have a new treat for everyone- a multiplayer remake of Death Race, an infamous arcade game from 1976. Video game developer Exidy built the game as a modification of their popular Destruction Derby game in which drivers hit cars to win points. In Death Race they instead were challenged to run over monsters called “gremlins”, which in the primitive graphics of the time looked like stick figures that resemble people. To add to the confusion the “gremlins” give out a high pitched scream when hit. This game marks the earliest controversy regarding video game violence and as such has a special place in video game and computer software history, as never before had a program been as attacked in the media as Death Race. Now you and your friends can play against each other in a web-optimized multiplayer remake!
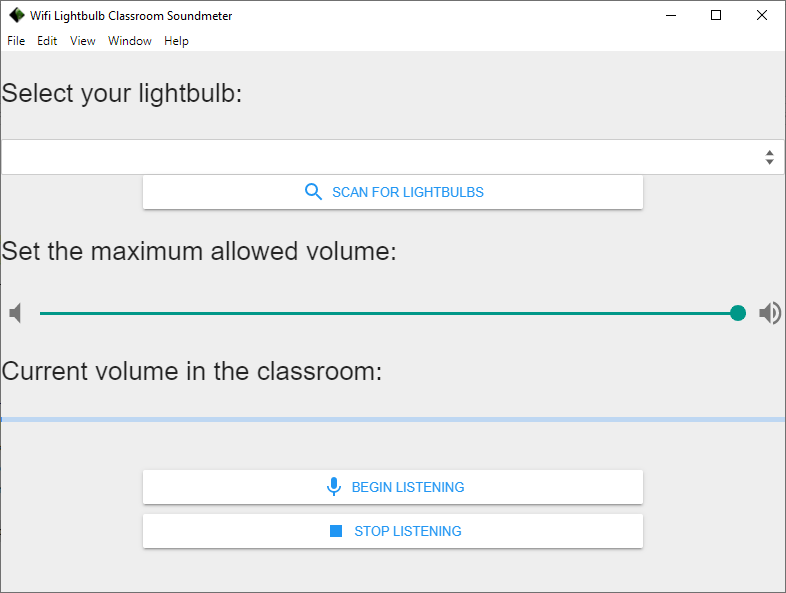
This is an exciting new project I’ve been working on to use off-the-shelf smart lightbulbs to make an inexpensive and automatic classroom management gadget. Using a bit of Node I was able to get the noise level of a classroom and translate it into a color for a connected smart lightbulb, from green to red as the classroom gets louder! Inspired by the ‘traffic light’ noise warning gadgets I see in classrooms, this one is fully automatic. There are no switches to throw- just set the maximum volume in the free software and the lightbulb will change color on its own!
Screenshot of the GUI. The program is an Electron application, and I have applied a material design stylesheet.
IBM has made the disappointing decision to retire the Weather Underground API effective 12/31, leaving many developers scrambling due to the abruptness of this decision and the complete lack of roadmap or guidance as to how to transition to a replacement so that their applications will work on January 1st.
One key element of the Weather Underground API that my popular tutorial for making an Alexa Skill makes use of is the ‘feels-like’ temperature. When updating this tutorial due to the bad news I chose to transition this tutorial to the OpenWeatherMaps API, which offers a free tier like the Weather Underground API used to that allows for up to 60 requests per minute and the current weather.
While it does not offer a ‘feels-like’ temperature, this can be easily calculated by simply factoring in wind chill to the temperature you report. This means you do not need to use OpenWeatherMaps- you can really use any API that gives you a current temperature and wind speed! It really is as simple as this:
This file contains hidden or bidirectional Unicode text that may be interpreted or compiled differently than what appears below. To review, open the file in an editor that reveals hidden Unicode characters. Learn more about bidirectional Unicode characters
where T is a temperature in Fahrenheit and V is a wind speed in MPH. You should be able to find a corresponding formula for metric online.
I also went ahead and rounded my ‘feels like’ temperature to one decimal place, to make it easier to read (or for a voice assistant to read out loud, which is how I eventually used this code).
I hope this helps others as they transition to other weather APIs as Weather Underground winds down. Its developer community will be missed!
Today Samsung made the Bixby Developer Studio available for download and use so that developers can start building capsules to publish on their marketplace starting in 2019. I am an early adopter of the new Bixby and wanted to share how to build a simple capsule using the new developer kit as well as share my experience with using the new platform. Readers of this blog know that I have made and published Skills for Amazon’s Alexa and published tutorials on how you can develop for that platform. Similarly this writeup will focus on a minimal application that will help you get started with the features of Bixby’s impressive development tools.
Bixby is a wonderful platform to develop for and it has top-notch development tools. Building software for Bixby is a lot like teaching someone a new skill. It uses natural language model training so you can show Bixby what parts of user phrases are important and it uses the idea of concepts to define Bixby’s understanding of what capability you are giving it. These concepts will be discussed in detail below.
Today we will be making a capsule to generate passwords made up of a random string of words, inspired by XKCD’s Password Strength comic. We will be taking advantage of Bixby’s visual interface to make a password users can easily remember as well as easily copy and use for their accounts. The XKCD algorithm sticks random, memorable words together so that passwords are complex but can also be easily recalled by the user. They also are higher entropy than a random string of characters and numbers, making them harder to crack my many brute-force methods. After giving the comic a quick look, read on.
We want to build a Bixby capsule that can generate memorable passwords for users. These passwords should be of a user-specified length.
The overall requirements are:
Generates a password using regular English words
Takes in a user’s specified length
Displays the password graphically for copying
Displays a calculation of the entropy of the password so the user knows how good the password is.
THE SOLUTION
You should now have Bixby Studio installed on your system. As of writing it is available for Windows and macOS.
Create a new project by clicking File>New Capsule.
The first bit of code we will focus on is the generator.js file. This is where we define our entry point and what we are going to return.
This file contains hidden or bidirectional Unicode text that may be interpreted or compiled differently than what appears below. To review, open the file in an editor that reveals hidden Unicode characters. Learn more about bidirectional Unicode characters
Notice how we export the function generate- this is the function where I generate everything we need for the response you see in the screenshot above. We take our wordlist dictionary file (how to get that will be discussed shortly), we build our password using a user-specified length called numWords, and we calculate the entropy of the password. We then return a result we can parse into a nice, visual response like in the screenshot.
Whew, there’s a lot going on in here though! Let’s start with the wordlist. This is a JSON-formatted list of common English words I found searching for open-source corpora. Why JSON? As you might have surmised from the above code snippet, Bixby capsules are written in JavaScript! Importing this data as JSON makes it very easy to loop through and use, as you can see in my generate function. I stored this in a directory called lib but you can call it whatever you please. Just be sure to update the path in the generator!
Next, we need to discuss how we get numWords. This is the user-input. We want the user to say ‘Make me a password with three words’ and Bixby needs to know how to do that.
In the resources directory you will find endpoints.bxb. The actions your capsule can take are called endpoints. Let’s define one for generating a password:
This file contains hidden or bidirectional Unicode text that may be interpreted or compiled differently than what appears below. To review, open the file in an editor that reveals hidden Unicode characters. Learn more about bidirectional Unicode characters
Let’s look at what we have here: We have authorization set to none because this endpoint is public and available to any user without authorization. We have specified an action endpoint for our generate function as defined in the generator.js snippet above and we have told Bixby that the input for this endpoint is numWords. We also tell it what file it will find the definition for this endpoint in- generator.js.
Now that Bixby has an available action in the form of the endpoint, we get to the really interesting stuff- teaching Bixby what everything in our capsule means. The way we do this is via a model. In the model directory we have actions and concepts. These make up Bixby’s understanding of what your capsule can do, and we just need to write some high-level markup to make this work. Let’s start with the action our capsule is going to have- generating passwords. This will inform what concepts Bixby needs to have definitions for so that we can move on to training our natural language model.
This file contains hidden or bidirectional Unicode text that may be interpreted or compiled differently than what appears below. To review, open the file in an editor that reveals hidden Unicode characters. Learn more about bidirectional Unicode characters
Above is the generator.model.bxb action file. You will find it in my action directory. What does this do? Read through the comments carefully. It defines the actions Bixby will take when running this capsule, and it covers all our bases regarding various user inputs! We tell it our action is to run our generate function. We tell it to collect numWords, and we tell it that numWords is of the numWords concept type which we will define shortly. We tell Bixby that there can be at most one numWords (so that we ignore other numbers in the user’s invocation) and we tell Bixby that this value is required. If Bixby cannot find a number in the invocation to use, we define a default initialization with four words- the same as our XKCD comic! We then do some validation in the event we find a number in the user’s invocation. If numWords is 0 or less, we want to display some text telling the user that you cannot have a password that is negative in length (duh, but the bulk of software development is anticipating stupid). Finally we tell Bixby what our result is going to be- an instance of our PasswordResult concept, which will be of the type Calculation. This is a type Bixby provides for a result that it needs to compute or otherwise derive. Let’s get started defining what these concepts are.
If you are following along in the repo, look at the numWords concept.
This file contains hidden or bidirectional Unicode text that may be interpreted or compiled differently than what appears below. To review, open the file in an editor that reveals hidden Unicode characters. Learn more about bidirectional Unicode characters
This is a good minimal example of a Bixby concept. These are the variables that are key to our capsule working. You can think of them as teaching Bixby a new idea, slowly building for it the picture of what you are trying to achieve. We tell Bixby that NumWords is an integer (we don’t want fractional words). We also give a brief description of what this has to do with our capsule. For NumWords this is obvious- it is the number of words in the password.
Password is almost the same except this concept is given the ‘name’ type since we need an output string. We describe it as the output password. Entropy is similar- we describe it as the approximate bits of ‘randomness’ in our password and give it the integer type since it will be a number we calculate. Length, predictably, is an integer that represents the length in words for our password. This is utilized in the entropy calculation, which taking the formula from the comic is taking two to the power of the number of words and then dividing for the number of attempts to brute force the password you could make if your computer could make 1000 attempts per second for a year. This yields an estimation of the number of years the password would take to crack in these circumstances. Finally Years is given the integer type and described as the number of years simple brute forcing would take to crack this password- it is also part of the entropy calculation we display at the bottom of our result as you can see in the above screenshot.
The most complicate concept is our PasswordResult:
This file contains hidden or bidirectional Unicode text that may be interpreted or compiled differently than what appears below. To review, open the file in an editor that reveals hidden Unicode characters. Learn more about bidirectional Unicode characters
It has the type Structure because it contains multiple properties- namely every concept we have just defined. We give these properties types- I just made these the same as the property name for simplicity but they can be used in more complicated capsules to link properties together with a descriptive type. We again describe each property and what it does, tell Bixby if the property is required, and for each tell Bixby that there can be at most one value for each. This result, as you may recall from the generate method, is what we will use to generate our visual response on the screen of the device. We have now explicitly told Bixby everything there is to know about how our capsule is going to work! It knows every concept and every result we are going to want. We now can teach Bixby how to handle speech.
Click training in the resources/en directory.
You will see a list of training examples I have provided the natural language model. We are effectively training Bixby to understand how to parse user phrases and turn them into useful input for our capsule. This is an application of machine learning! Notice the examples I have provided. I have made one: ‘generate a password for me’ with no numbers in it- this is to provide an example where Bixby should use our default input of four words from above, like the XKCD comic. I also provide numerous examples with varying numbers of words asking Bixby to generate a password in various ways. Notice how I have clicked on and highlighted the number in each training phrase and I have labeled this value as numWords! You will do this for each input your capsule needs- the more examples the better. Bixby will use the labels and examples you provide to teach itself that when something sounds similar to your examples Bixby is being asked to open your capsule and feed the data that is similar to the labeled phrases you gave it to the capsule as input. Bixby is learning, so make sure to spend plenty of time here to make sure Bixby really gets it! Compiling the model will make Bixby learn each of your examples and you can view what Bixby’s output for your examples would be so you can be sure that Bixby has not mis-learned how to handle your examples. A well-trained model will make your users happier and your capsule easier to use. This is my favorite part of the Bixby developer tools- it is very intuitive and fun to use, and it offers a look for machine learning enthusiasts into the underlying technologies behind Bixby. This is a defining attribute of the platform for me- it feels much more flexible than Alexa, which as a developer seems to encourage a more robotic and specific interface for its skills than the more flexible Bixby interfaces for capsules.
With your model trained and your concepts laid out, the last thing to do is to specify how Bixby should display our output. This is done with dialogs and layouts.
Dialogs define for Bixby’s interface the concepts (inputs) and the results. Therefore for each input you need there will be a dialog and for each result there will be a dialog.
NumWords therefore gets a dialog like so:
This file contains hidden or bidirectional Unicode text that may be interpreted or compiled differently than what appears below. To review, open the file in an editor that reveals hidden Unicode characters. Learn more about bidirectional Unicode characters
This is pretty bare-bones: We define a concept dialog (input dialog), tell it to look for NumWords (like in our training!) and we provide some template text for this type if we wanted to display something related to this input (in my project I ended up not using it).
The Password Result Dialog defines the dialog for our result. This one is more important for this project as it will populate our layout.
This file contains hidden or bidirectional Unicode text that may be interpreted or compiled differently than what appears below. To review, open the file in an editor that reveals hidden Unicode characters. Learn more about bidirectional Unicode characters
We define an output (result) dialog, have it match this time for our PasswordResult concept (passing in the output from calling generate with our numWords result) and then we tell Bixby what to write on the screen with the template text: Notice that this is the first bit of text in the above screenshot that appears when Bixby is displaying a result telling the user what it did for them!
This file contains hidden or bidirectional Unicode text that may be interpreted or compiled differently than what appears below. To review, open the file in an editor that reveals hidden Unicode characters. Learn more about bidirectional Unicode characters
<div>This password has a length of {{r.length}} words. This password has ~{{r.entropy}} bits of entropy and would therefore take a computer about {{r.years}} years to guess at 1000 guesses per second.</div>
The layouts for the visual part of the display (like this one, PasswordResult.layout.bml) look a lot like HTML! There are many documented UI widgets you can use such as pictures, hyperlinks, cards, and more. Here you can see we use a card to display the actual password, making it wrap onto the next line for long passwords and making them easy to copy. Down below in a div tag we display the password entropy. This is calculated using the formula from the XKCD comic, as described above. Finally we hyperlink to the comic that inspired this project as a way of giving credit.
A few more example passwords are shown below:
You can try it out for yourself in Bixby Studio! Simply click the icon that looks like a phone on the left hand side of the screen to open the Simulator, giving you an idea of what your capsule will look like on an actual Samsung device when the marketplace opens in a few months.
SHARING THE SOLUTION
This project can be found in its entirety on my GitHub! I hope this very early tutorial can help developers make their first steps into developing for Bixby, which I think has some very compelling development tools and technology behind it.
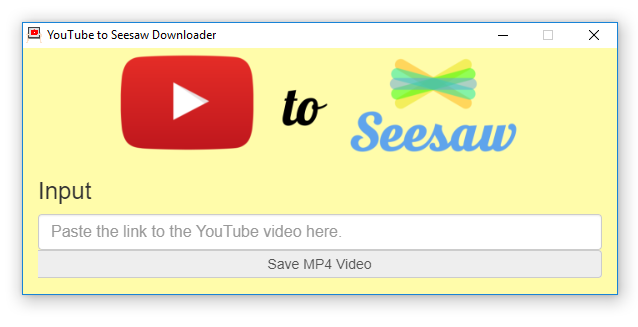
Have you ever wanted to download a YouTube video to share elsewhere but found that every ‘YouTube Downloader’ on the internet is an adware-filled, slow-to-load piece of junk? This is especially problematic when you are trying to get video content to your students- most of the time you cannot directly link to YouTube on a school network connection as it will be blocked, leaving your only option to download the video and re-share it on a platform like Seesaw, a popular platform for student engagement. So how can you get the raw video file to share without getting your computer infected? I have designed a simple desktop application that downloads YouTube videos and I am offering it for free to download! It is available for MacOS and Windows. Best of all it’s a portable app- meaning no installer and therefore no need for an administrator password to use on your school computer!
If you are interested in how I developed this program, read on.
THE PROBLEM
YouTube download websites are filled with adware, malware, deceiving links, and often inappropriate ads. Educators need to be able to download YouTube videos to get around school content filters. They need to be able to use a program that can also evade roadblocks like not being able to install software on a school-issued computer.
THE SOLUTION
The Windows version of the application
The solution was to develop a desktop application (ensuring the longevity of the project as there would be no need to pay for hosting a website or risking my web application getting blocked by a content filter). I also wanted to write this application once and deploy to my two target platforms – Mac and Windows. There are various libraries for downloading YouTube videos simply – I figure a lot of the scammy websites are making use of the open-source ytdl-core or similar JavaScript libraries to download their videos and quickly deploy new websites. I wanted to use something similar as these libraries are easy to use, well-supported, and cross-platform. The solution for all of my problems was to build my app using Electron, which lets you build cross-platform apps using HTML, CSS, and JavaScript. I could build a website using ytdl-core to download videos using the same technology as the sites people are being driven to by Google and then make it a desktop application. Then, using the exact same code for both platforms, I could then deploy to Windows and Mac! And that’s exactly what I did- what you see above in these screenshots is literally a simple website using jQuery,Bootstrap, and ytdl-core that takes in the YouTube link the user pastes in the box, uses regex to check that the link is a properly formatted YouTube link, and then opens a save prompt to save the video to the user’s computer! The save prompt is one of the neat elements of the Electron API that you can just use and have it work one each platform, pulling up a native save dialog and letting me configure it to ensure the user can only save MP4 files, for example, as that is the file format Seesaw accepts. The open-source Electron Packager then lets me bundle all of my dependencies together and create a Windows and Mac application bundle. These bundles include everything needed to run the application in exactly the spot the application needs it, meaning there is no installer to run and therefore it can run without administrator access on your computer! The whole ecosystem let me hack this together very quickly with almost no friction between any of the tools.
ytdl-core lets me ensure that we automatically grab the highest-quality version of the video and download it in MP4 format, making sure everything is as simple as possible to go from video to Seesaw fast, saving teachers time. This all happens in the background – the goal was to make a tool that takes minimal thought to use. Just grab the video your students need, and paste the link!
SHARING THE SOLUTION
This application is completely open-source. You can view it on GitHub here! This also serves a project homepage you can share with your friends and colleagues as it features download buttons for both Mac and Windows. It is also where you should go to get the most up-to-date versions of the software- as I improve it and make bug fixes the links below will not be updated, but they will always get you the first release.
Do you remember playing Roller Coaster Tycoon, the famous amusement park simulation game that shattered sales records and that remains one of the most beloved computer games of all time? I do, and I also remember the most important part of building any roller coaster in the game – testing. While it may seem mundane to someone who has never played, testing was how you figured out if your ride was going to make any money. The game would give your ride a score in three categories- excitement, intensity, and nausea. The goal was to maximize excitement, keep intensity reasonable, and keep nausea minimal. Largely this score was determined by the g-forces your ride produced. High g-forces could mean high excitement or it could mean people are too afraid to go on your ride. These ratings each varied from ‘low’ to ‘ultra-extreme’- both being scores you generally wanted to avoid. ‘Medium’ and ‘High’ were the sweet spot (except for nausea of course, which you always wanted ‘low’) and if you started to edge into ‘Very-high’ intensity you would start to see a drop in ridership, and thus revenue.
G-force relates the acceleration produced by something to the gravitational pull of the Earth. Most roller coasters pull at most 5G’s, or 5 times Earth’s gravity. They only do this briefly though- on big hills or tight turns. The Space Shuttle, for example, pulled 3Gs on reentry and sustained them longer – amusement park goers are clearly not astronauts! Big drops, lots of inversions, intense helixes, and lots of air-time (or negative Gs, where you feel like you are floating out of your seat) are what sell big rides. While real coaster designers don’t use the Roller Coaster Tycoon rating system to determine if their ride is any good they surely have the same design philosophy- be exciting, be intense but not too intense, and make sure the poor teenagers running the thing aren’t scrubbing vomit off the seat every time people get off. I hypothesized most rides, if they were in the game, would probably fall in the ‘Medium’ to ‘High’ intensity and excitement scores. Fortunately we now all carry around an accelerometer in our pockets built right into our smart phones so we can find out for ourselves!
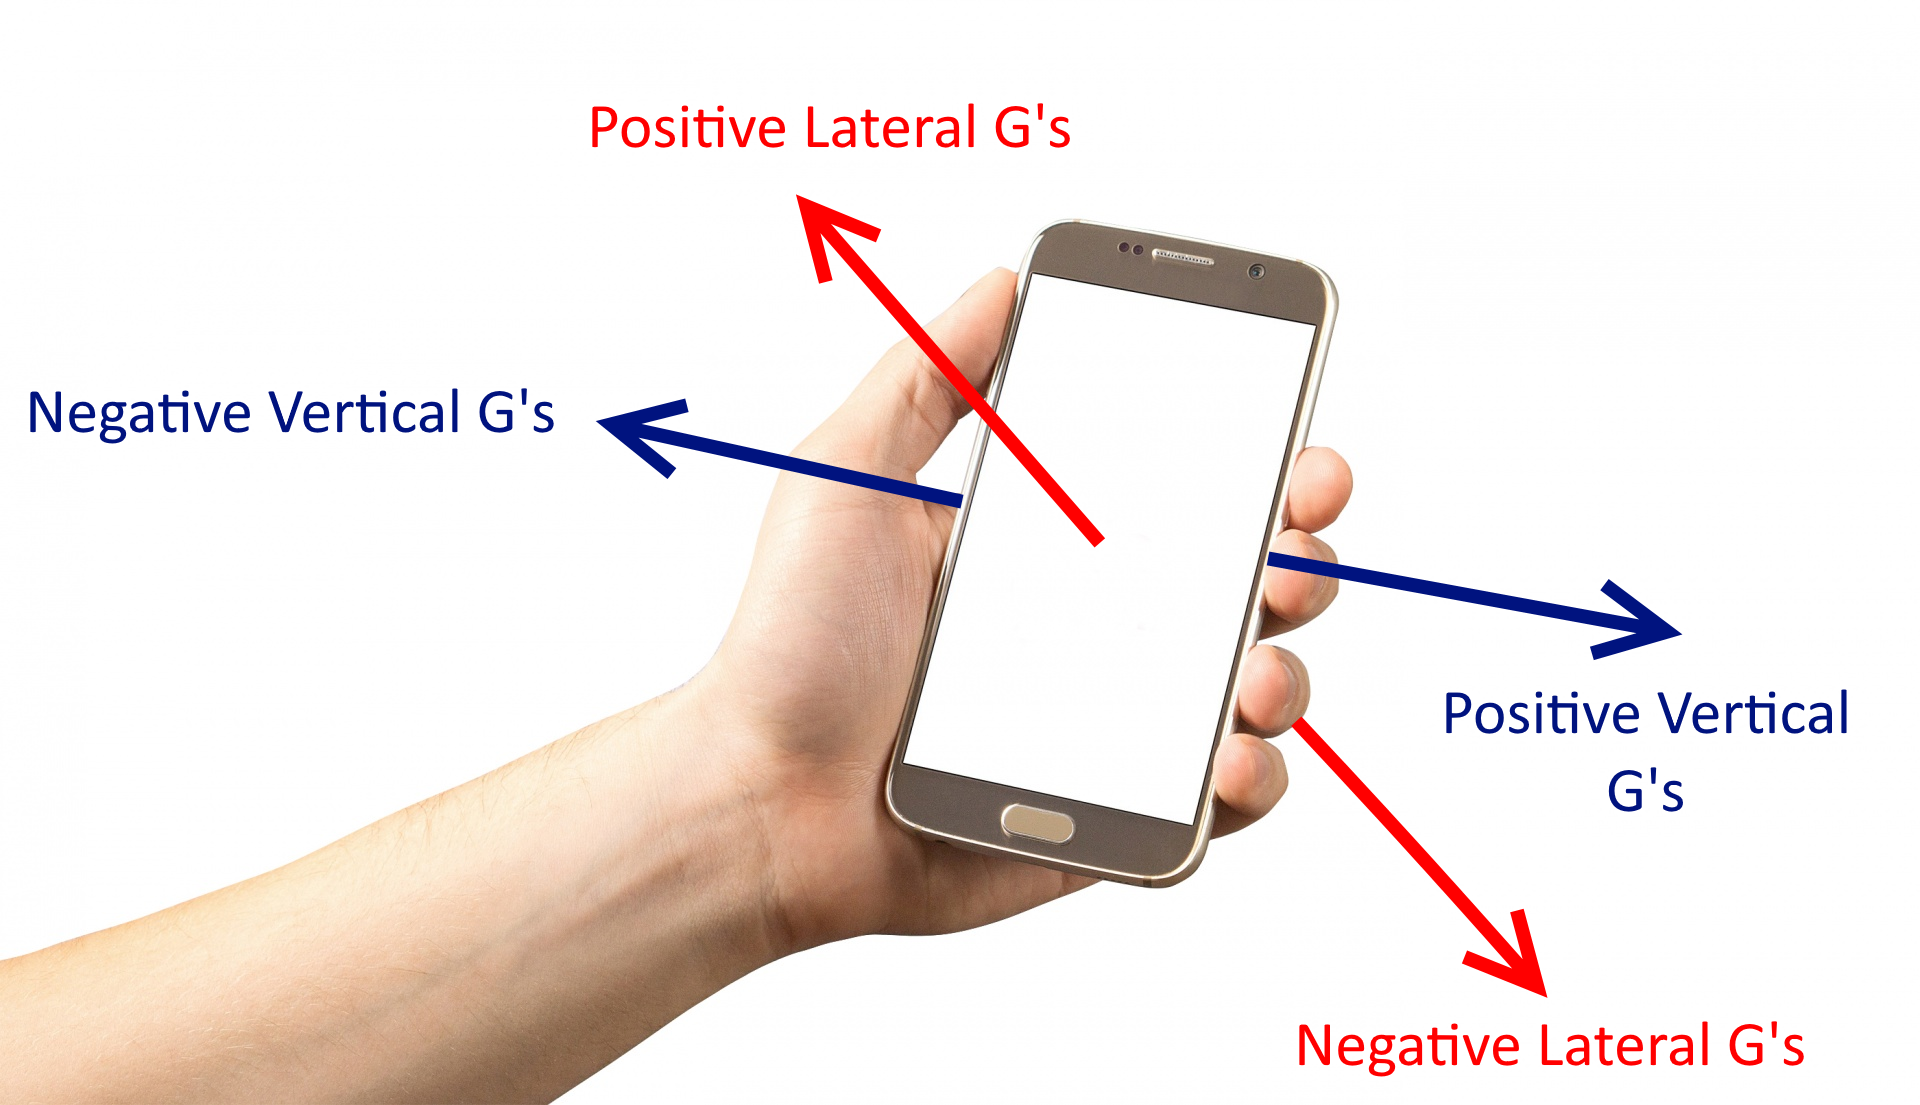
This diagram shows how the accelerometer maps to the G’s measured by the Roller Coaster Test Meter.
The above diagram shows the axes I chose so that your phone could measure acceleration while resting safely in a zipped or sealed pocket while you rode a roller coaster. Vertical Gs are along your phone’s x-axis while lateral G’s are measured along your phone’s z-axis. This assumes that you put your phone into your pocket with your screen facing to your left and top-first, by convention.
The game’s formulas for computing the ratings for each ride were somewhat mysterious until the OpenRCT2 project published their open-source code and formulas. We knew for years that primarily the g-forces the ride produced made up the bulk of the score, and other features like theming, dueling trains, and music among other things also contributed. There are also unique multipliers for each ride that come into play.
I am simply trying to build a toy however that you can turn on, throw in a pocket, and share with your friends so I avoided the design route of asking you a whole survey about the ride’s features before you get on. Instead I went a different route to produce a set of formulas that roughly approximate that in the game regardless of what kind of roller coaster you are on, mystery multiples and all, by comparing the scores of real roller coasters to those in the game. Fortunately this summer I have had access to a roller coaster that was in the game and that I could ride in real life- a ‘boomerang’! These roller coasters are everywhere, as they have a small footprint and low cost that makes them perfect for parks wanting to add a coaster on a small budget. The model in the game is ‘Defibrillator’ and it can be found in the ‘Funtopia’ scenario of the original game.
So, readers, I rode it just for you! Just kidding- I am obsessed with roller coasters and the fact that I needed to ride one to complete this project was no coincidence. I started building a prototype of my app using Ionic and Apache Cordova, which would enable me to release my app for you on either Android or iOS without needing to rewrite any of my code. There are excellent tools for making a fun UI (I tried to keep the colors and theming true to the original game) and you can import great packages for social sharing and interfacing with the accelerometer. I ran my app and saved the base score using the basic formulas from OpenRCT2 with no multiples. I then tested for the scores for ‘Defibrillator’ in the game, computed my multiples empirically to scale my ratings appropriately, and voila! We now get scores we would expect if real coasters were in the game!
My Boomerang test ride with raw (unscaled) scores reported at the bottom.
Additionally I wanted to provide you with the raw data that went into your scores, just like the game. I used the awesome Chart.js library to plot the vertical and lateral G-forces live for you right on the screen, letting you have a nice plot of the forces experienced on the ride once you’re done:
It is amazing fun- my favorite highlights are the legendary The Beast having an appropriate intensity of ‘Very-high’ and the crowd-favorite Maverick having excitement at ‘Very-high’. I even rode the new Steel Vengeance– just look at those vertical G’s! Simply download the app from Google Play or Apple App Store, insert the phone top-first and screen facing left into a pocket, and hang on tight! Obviously follow any rules about loose articles (they are there for a reason) but generally as long as you have a pocket that can be sealed this is a fun way to rate coasters, plot their g-forces, and brag to your friends about how you pulled 5G’s on Steel Vengeance this summer. Once you hit the ‘end’ button hit ‘share’ and post the scores to social media, then hit ‘clear’ and enter the next coaster’s name before going and conquering it. Have fun and make good choices!