This Halloween I have a new treat for everyone- a multiplayer remake of Death Race, an infamous arcade game from 1976. Video game developer Exidy built the game as a modification of their popular Destruction Derby game in which drivers hit cars to win points. In Death Race they instead were challenged to run over monsters called “gremlins”, which in the primitive graphics of the time looked like stick figures that resemble people. To add to the confusion the “gremlins” give out a high pitched scream when hit. This game marks the earliest controversy regarding video game violence and as such has a special place in video game and computer software history, as never before had a program been as attacked in the media as Death Race. Now you and your friends can play against each other in a web-optimized multiplayer remake!
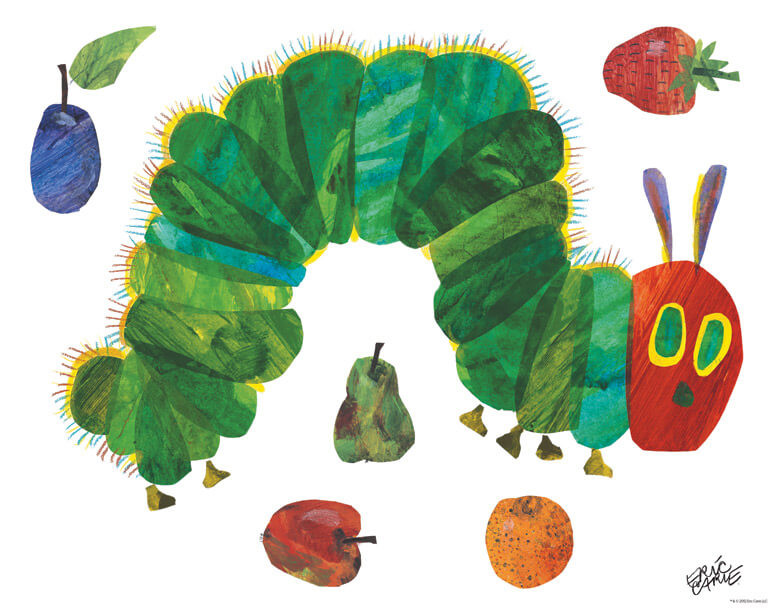
Famous author and artist Eric Carle turns 91 today. I remember loving his books when I was a kid, especially The Very Hungry Caterpillar and Brown Bear, Brown Bear, What Do You See?. Each book features his distinctive art style. The images are collages composed of tissue paper and acrylic paint, producing vivid depictions of animals and nature.
THE PROBLEM
Carle’s work is as complex as it is beautiful. How can we make it easier for children to produce their own homages to his creations?
THE SOLUTION
Neural style transfer is a technique that allows you to compose images in another’s style using deep learning. That is, you teach a computer to identify key elements of an image’s style and redraw that image in that style it has just learned.
Taking the code from the tutorial I built a website that lets you upload images, have the style of Eric Carle’s The Very Hungry Caterpillar transferred to it, and display it for the world to see and for you to download! At any given time the latest 10 images will be displayed for any visitors to see. The website is built in one of my favorite frameworks, Flask.
You can access the website at ericcarletransfer.ml. Be warned, the transfer time can be in excess of 10 minutes- it is very computationally intensive.
The results have been encouraging though! Take a look:
The neural network is picking up on the look of the tissue paper and paint. In the future I want to work on reducing the amount of noise seen in the backgrounds.
Zoom Bombing is exposing children learning remotely to inappropriate content and disrupting meetings so a few pranksters can have a laugh. The biggest unsolved issue with Zoom Bombing is that people are sharing links and passwords on social media in order to egg trolls and classmates on to bomb these classes and meetings. How can we share a meeting without disclosing the meeting ID and password?
THE SOLUTION
BombSquad is a solution I built on Amazon Web Services to help mitigate the worst of Zoom Bombing. Here’s how it works:
Select your meeting options- you can permanently turn off the participant microphone and camera so that nobody can reenable it by clicking the checkboxes.
Paste your invitation link
Get a sharable cloaked URL that goes right to your meeting!
Continue orchestrating your meeting from the Zoom client like normal.
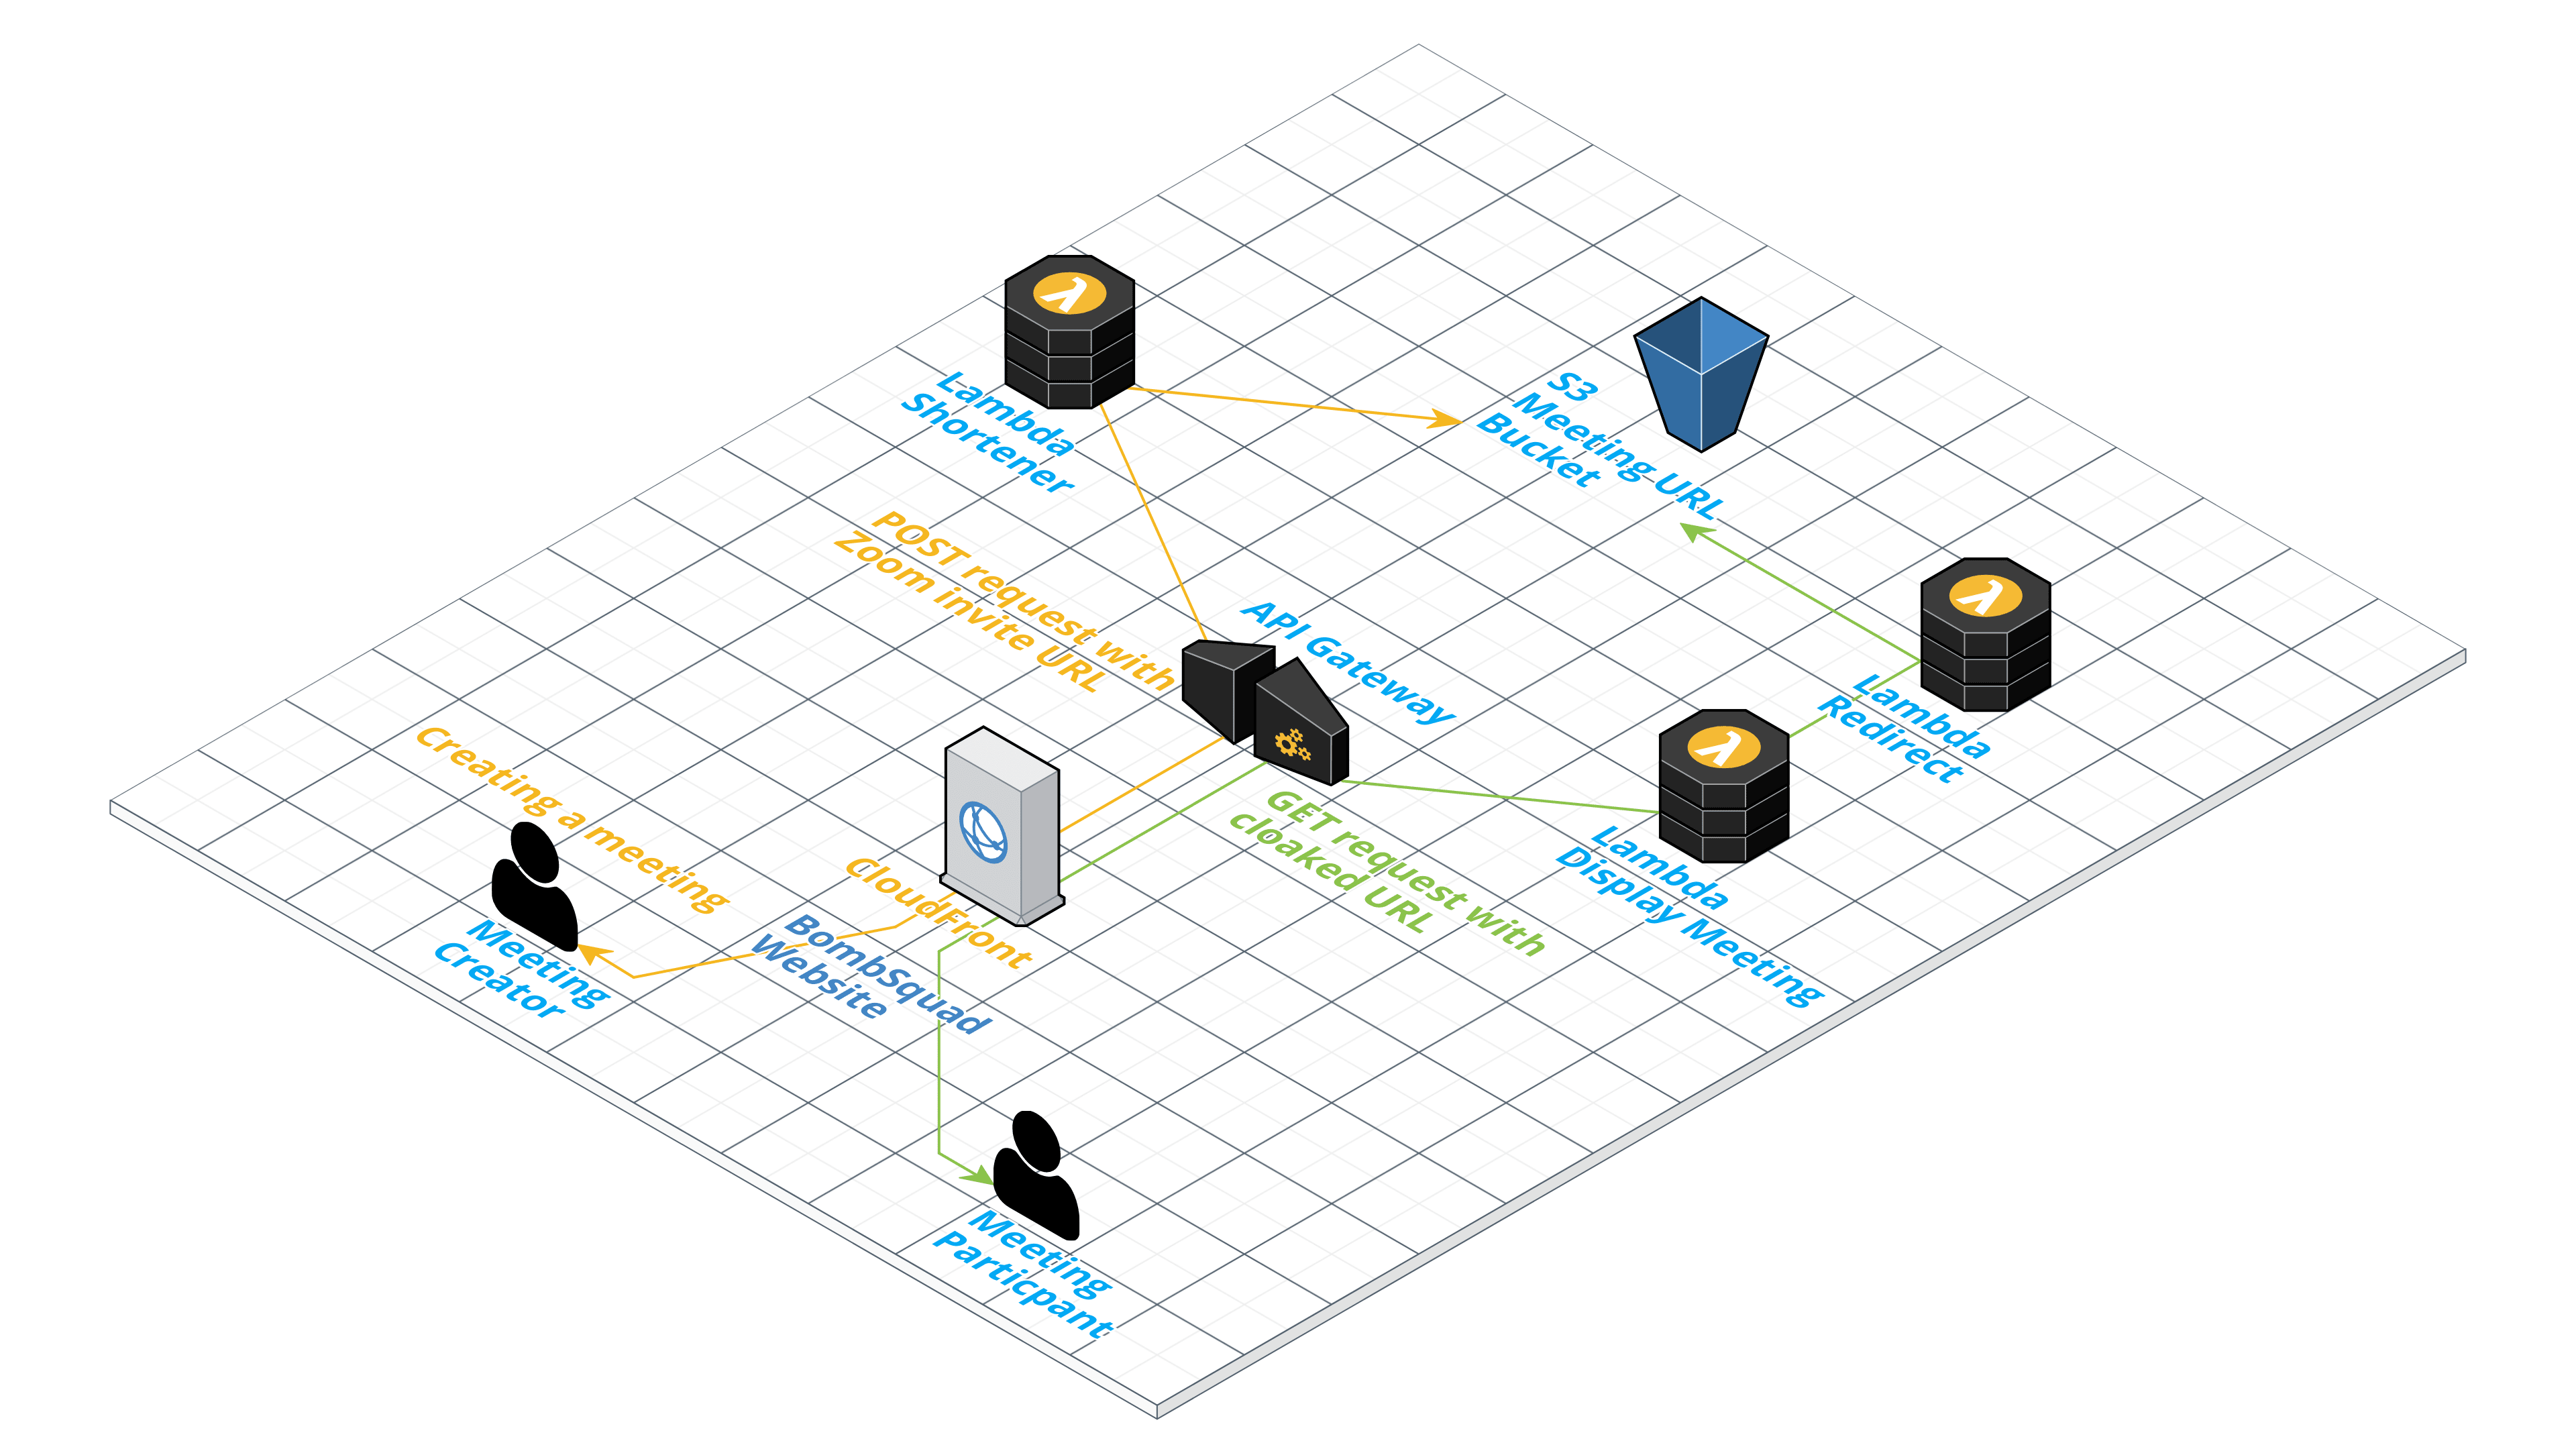
The technical details are as follows: BombSquad takes your URL, transforms it to force the user to use the Zoom web client, stores the original URL securely, and only redirects the browser to the real meeting URL if the user clicks through the sharable link you receive. The invitation link inside the window is disabled. Thus, all a user can see are BombSquad URLs! This is performed using a combination of AWS S3 and Lambda instances as shown above, making this a neat example of a serverless application– the first I am distributing publicly!
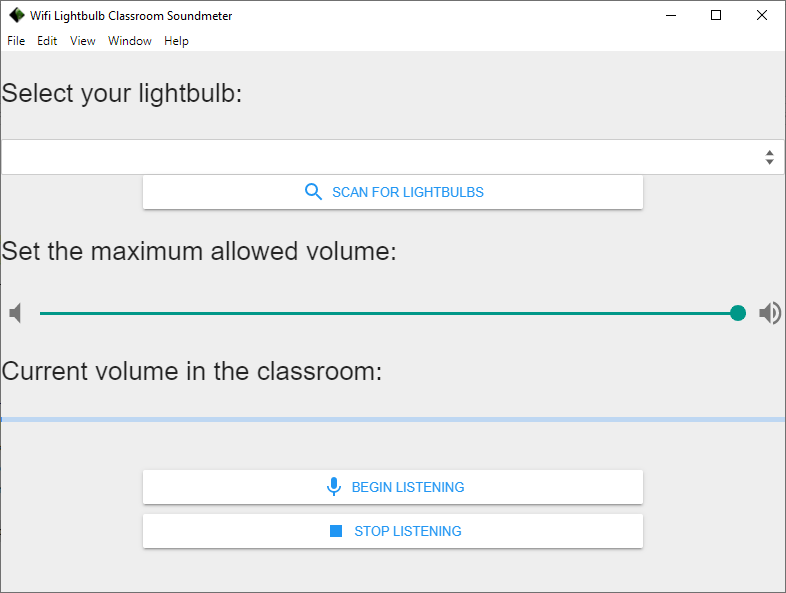
This is an exciting new project I’ve been working on to use off-the-shelf smart lightbulbs to make an inexpensive and automatic classroom management gadget. Using a bit of Node I was able to get the noise level of a classroom and translate it into a color for a connected smart lightbulb, from green to red as the classroom gets louder! Inspired by the ‘traffic light’ noise warning gadgets I see in classrooms, this one is fully automatic. There are no switches to throw- just set the maximum volume in the free software and the lightbulb will change color on its own!
Screenshot of the GUI. The program is an Electron application, and I have applied a material design stylesheet.
Today Samsung made the Bixby Developer Studio available for download and use so that developers can start building capsules to publish on their marketplace starting in 2019. I am an early adopter of the new Bixby and wanted to share how to build a simple capsule using the new developer kit as well as share my experience with using the new platform. Readers of this blog know that I have made and published Skills for Amazon’s Alexa and published tutorials on how you can develop for that platform. Similarly this writeup will focus on a minimal application that will help you get started with the features of Bixby’s impressive development tools.
Bixby is a wonderful platform to develop for and it has top-notch development tools. Building software for Bixby is a lot like teaching someone a new skill. It uses natural language model training so you can show Bixby what parts of user phrases are important and it uses the idea of concepts to define Bixby’s understanding of what capability you are giving it. These concepts will be discussed in detail below.
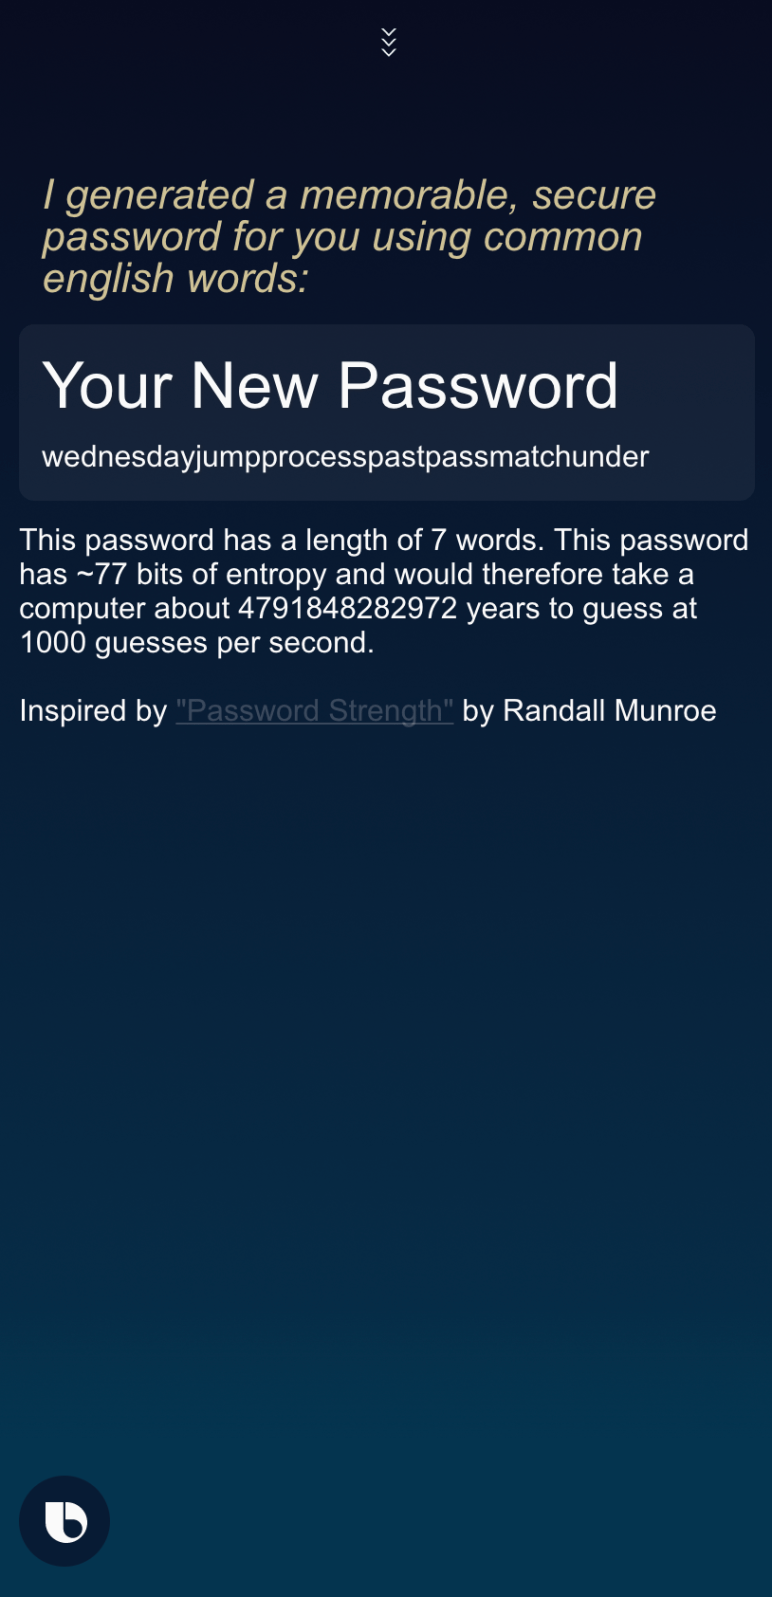
Today we will be making a capsule to generate passwords made up of a random string of words, inspired by XKCD’s Password Strength comic. We will be taking advantage of Bixby’s visual interface to make a password users can easily remember as well as easily copy and use for their accounts. The XKCD algorithm sticks random, memorable words together so that passwords are complex but can also be easily recalled by the user. They also are higher entropy than a random string of characters and numbers, making them harder to crack my many brute-force methods. After giving the comic a quick look, read on.
We want to build a Bixby capsule that can generate memorable passwords for users. These passwords should be of a user-specified length.
The overall requirements are:
Generates a password using regular English words
Takes in a user’s specified length
Displays the password graphically for copying
Displays a calculation of the entropy of the password so the user knows how good the password is.
THE SOLUTION
You should now have Bixby Studio installed on your system. As of writing it is available for Windows and macOS.
Create a new project by clicking File>New Capsule.
The first bit of code we will focus on is the generator.js file. This is where we define our entry point and what we are going to return.
This file contains hidden or bidirectional Unicode text that may be interpreted or compiled differently than what appears below. To review, open the file in an editor that reveals hidden Unicode characters. Learn more about bidirectional Unicode characters
Notice how we export the function generate- this is the function where I generate everything we need for the response you see in the screenshot above. We take our wordlist dictionary file (how to get that will be discussed shortly), we build our password using a user-specified length called numWords, and we calculate the entropy of the password. We then return a result we can parse into a nice, visual response like in the screenshot.
Whew, there’s a lot going on in here though! Let’s start with the wordlist. This is a JSON-formatted list of common English words I found searching for open-source corpora. Why JSON? As you might have surmised from the above code snippet, Bixby capsules are written in JavaScript! Importing this data as JSON makes it very easy to loop through and use, as you can see in my generate function. I stored this in a directory called lib but you can call it whatever you please. Just be sure to update the path in the generator!
Next, we need to discuss how we get numWords. This is the user-input. We want the user to say ‘Make me a password with three words’ and Bixby needs to know how to do that.
In the resources directory you will find endpoints.bxb. The actions your capsule can take are called endpoints. Let’s define one for generating a password:
This file contains hidden or bidirectional Unicode text that may be interpreted or compiled differently than what appears below. To review, open the file in an editor that reveals hidden Unicode characters. Learn more about bidirectional Unicode characters
Let’s look at what we have here: We have authorization set to none because this endpoint is public and available to any user without authorization. We have specified an action endpoint for our generate function as defined in the generator.js snippet above and we have told Bixby that the input for this endpoint is numWords. We also tell it what file it will find the definition for this endpoint in- generator.js.
Now that Bixby has an available action in the form of the endpoint, we get to the really interesting stuff- teaching Bixby what everything in our capsule means. The way we do this is via a model. In the model directory we have actions and concepts. These make up Bixby’s understanding of what your capsule can do, and we just need to write some high-level markup to make this work. Let’s start with the action our capsule is going to have- generating passwords. This will inform what concepts Bixby needs to have definitions for so that we can move on to training our natural language model.
This file contains hidden or bidirectional Unicode text that may be interpreted or compiled differently than what appears below. To review, open the file in an editor that reveals hidden Unicode characters. Learn more about bidirectional Unicode characters
Above is the generator.model.bxb action file. You will find it in my action directory. What does this do? Read through the comments carefully. It defines the actions Bixby will take when running this capsule, and it covers all our bases regarding various user inputs! We tell it our action is to run our generate function. We tell it to collect numWords, and we tell it that numWords is of the numWords concept type which we will define shortly. We tell Bixby that there can be at most one numWords (so that we ignore other numbers in the user’s invocation) and we tell Bixby that this value is required. If Bixby cannot find a number in the invocation to use, we define a default initialization with four words- the same as our XKCD comic! We then do some validation in the event we find a number in the user’s invocation. If numWords is 0 or less, we want to display some text telling the user that you cannot have a password that is negative in length (duh, but the bulk of software development is anticipating stupid). Finally we tell Bixby what our result is going to be- an instance of our PasswordResult concept, which will be of the type Calculation. This is a type Bixby provides for a result that it needs to compute or otherwise derive. Let’s get started defining what these concepts are.
If you are following along in the repo, look at the numWords concept.
This file contains hidden or bidirectional Unicode text that may be interpreted or compiled differently than what appears below. To review, open the file in an editor that reveals hidden Unicode characters. Learn more about bidirectional Unicode characters
This is a good minimal example of a Bixby concept. These are the variables that are key to our capsule working. You can think of them as teaching Bixby a new idea, slowly building for it the picture of what you are trying to achieve. We tell Bixby that NumWords is an integer (we don’t want fractional words). We also give a brief description of what this has to do with our capsule. For NumWords this is obvious- it is the number of words in the password.
Password is almost the same except this concept is given the ‘name’ type since we need an output string. We describe it as the output password. Entropy is similar- we describe it as the approximate bits of ‘randomness’ in our password and give it the integer type since it will be a number we calculate. Length, predictably, is an integer that represents the length in words for our password. This is utilized in the entropy calculation, which taking the formula from the comic is taking two to the power of the number of words and then dividing for the number of attempts to brute force the password you could make if your computer could make 1000 attempts per second for a year. This yields an estimation of the number of years the password would take to crack in these circumstances. Finally Years is given the integer type and described as the number of years simple brute forcing would take to crack this password- it is also part of the entropy calculation we display at the bottom of our result as you can see in the above screenshot.
The most complicate concept is our PasswordResult:
This file contains hidden or bidirectional Unicode text that may be interpreted or compiled differently than what appears below. To review, open the file in an editor that reveals hidden Unicode characters. Learn more about bidirectional Unicode characters
It has the type Structure because it contains multiple properties- namely every concept we have just defined. We give these properties types- I just made these the same as the property name for simplicity but they can be used in more complicated capsules to link properties together with a descriptive type. We again describe each property and what it does, tell Bixby if the property is required, and for each tell Bixby that there can be at most one value for each. This result, as you may recall from the generate method, is what we will use to generate our visual response on the screen of the device. We have now explicitly told Bixby everything there is to know about how our capsule is going to work! It knows every concept and every result we are going to want. We now can teach Bixby how to handle speech.
Click training in the resources/en directory.
You will see a list of training examples I have provided the natural language model. We are effectively training Bixby to understand how to parse user phrases and turn them into useful input for our capsule. This is an application of machine learning! Notice the examples I have provided. I have made one: ‘generate a password for me’ with no numbers in it- this is to provide an example where Bixby should use our default input of four words from above, like the XKCD comic. I also provide numerous examples with varying numbers of words asking Bixby to generate a password in various ways. Notice how I have clicked on and highlighted the number in each training phrase and I have labeled this value as numWords! You will do this for each input your capsule needs- the more examples the better. Bixby will use the labels and examples you provide to teach itself that when something sounds similar to your examples Bixby is being asked to open your capsule and feed the data that is similar to the labeled phrases you gave it to the capsule as input. Bixby is learning, so make sure to spend plenty of time here to make sure Bixby really gets it! Compiling the model will make Bixby learn each of your examples and you can view what Bixby’s output for your examples would be so you can be sure that Bixby has not mis-learned how to handle your examples. A well-trained model will make your users happier and your capsule easier to use. This is my favorite part of the Bixby developer tools- it is very intuitive and fun to use, and it offers a look for machine learning enthusiasts into the underlying technologies behind Bixby. This is a defining attribute of the platform for me- it feels much more flexible than Alexa, which as a developer seems to encourage a more robotic and specific interface for its skills than the more flexible Bixby interfaces for capsules.
With your model trained and your concepts laid out, the last thing to do is to specify how Bixby should display our output. This is done with dialogs and layouts.
Dialogs define for Bixby’s interface the concepts (inputs) and the results. Therefore for each input you need there will be a dialog and for each result there will be a dialog.
NumWords therefore gets a dialog like so:
This file contains hidden or bidirectional Unicode text that may be interpreted or compiled differently than what appears below. To review, open the file in an editor that reveals hidden Unicode characters. Learn more about bidirectional Unicode characters
This is pretty bare-bones: We define a concept dialog (input dialog), tell it to look for NumWords (like in our training!) and we provide some template text for this type if we wanted to display something related to this input (in my project I ended up not using it).
The Password Result Dialog defines the dialog for our result. This one is more important for this project as it will populate our layout.
This file contains hidden or bidirectional Unicode text that may be interpreted or compiled differently than what appears below. To review, open the file in an editor that reveals hidden Unicode characters. Learn more about bidirectional Unicode characters
We define an output (result) dialog, have it match this time for our PasswordResult concept (passing in the output from calling generate with our numWords result) and then we tell Bixby what to write on the screen with the template text: Notice that this is the first bit of text in the above screenshot that appears when Bixby is displaying a result telling the user what it did for them!
This file contains hidden or bidirectional Unicode text that may be interpreted or compiled differently than what appears below. To review, open the file in an editor that reveals hidden Unicode characters. Learn more about bidirectional Unicode characters
<div>This password has a length of {{r.length}} words. This password has ~{{r.entropy}} bits of entropy and would therefore take a computer about {{r.years}} years to guess at 1000 guesses per second.</div>
The layouts for the visual part of the display (like this one, PasswordResult.layout.bml) look a lot like HTML! There are many documented UI widgets you can use such as pictures, hyperlinks, cards, and more. Here you can see we use a card to display the actual password, making it wrap onto the next line for long passwords and making them easy to copy. Down below in a div tag we display the password entropy. This is calculated using the formula from the XKCD comic, as described above. Finally we hyperlink to the comic that inspired this project as a way of giving credit.
A few more example passwords are shown below:
You can try it out for yourself in Bixby Studio! Simply click the icon that looks like a phone on the left hand side of the screen to open the Simulator, giving you an idea of what your capsule will look like on an actual Samsung device when the marketplace opens in a few months.
SHARING THE SOLUTION
This project can be found in its entirety on my GitHub! I hope this very early tutorial can help developers make their first steps into developing for Bixby, which I think has some very compelling development tools and technology behind it.