The awesome soda crate shelving cart I built for my dad this Father’s Day

My father loves to collect vintage wooden soda crates. These used to be used to deliver soda bottles to grocery stores, and many were lost either due to rot or because they were replaced with plastic crates and tossed. They feature beautiful vintage logos and artwork and serve as advertising pieces. Today they are highly collectable, and make for some fantastic up-cycled storage.

I wanted to build my dad a set of shelves that he could use to display his crates as well as use them functionally as storage. As usual, I jumped to my favorite computer aided design program, OnShape, to start sketching up the perfect soda crate shelving cart. First however I needed to know what I was going to make the shelves out of.

My dad had found another design online where the builder had welded a cart together that he really liked, and it had an awesome industrial look. I am not a welder, but I loved working in the machine shop in college. One of my favorite things to build with is 80/20, which is pretty much a heavy-duty erector set for adults. We used it to hold up heavy vacuum chambers and other equipment, but 80-20 also has a lightweight series called Quick Frame which features 1″ by 1″ aluminum extrusions and is far cheaper than its industrial counterpart. These square extrusions can be stuck together using a variety of plastic connectors, and there are extrusions with flanges perfect for holding up the crates. Even better they offer cheap machining services which means that I could literally design a complete shelf on my computer and have them cut each piece to size and ship it to me – I would just need to assemble it!

Also working in my favor was that the crates are roughly standardized- roughly each one is 4″ tall, 18.5″ deep, and 12″ wide. This let me assemble a repeating pattern of aluminum bars with flanges on the sides to support the crates, and design for having six inches for each shelf, giving 2″ of additional storage above the crate. I also added caster wheels to the bottom so that the shelves could be mobile, adding to the industrial look. To finish the shelves off, I added a wooden shelf on top to store the odd-sized crates in my dad’s collection. The final design ended up looking like this:

Screen Shot 2018-06-12 at 9.16.37 PM
A roughly dimensioned drawing of the shelves.

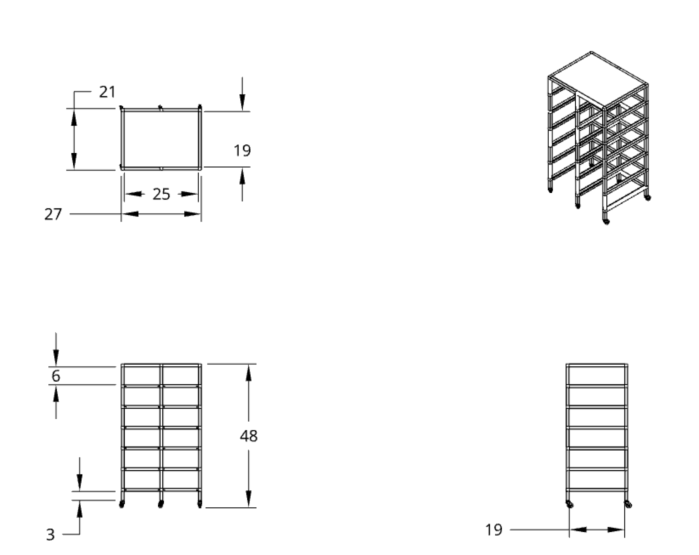
OnShape let me render this design using RealityServer, which gave this gorgeous render of what the eventual shelves would look like:

save_image-4

Sure enough, on assembly this is exactly how the shelves looked! And there is plenty of room for my dad to collect more. Happy Father’s Day!

For those interested, here is the final list of materials in case you wish to order a similar shelf from 80/20, and here is a link to the OnShape design so you can view and edit it yourself!

  • 16 12″ aluminum tubes, SKU #9000
  • 36 6″ aluminum tubes, SKU #9000
  • 6 3″ aluminum tubes, SKU #9000
  • 14 18.75″ aluminum tubes with a flange on one side, SKU #9005
  • 6 18.75″ aluminum tubes with a flange on both sides, SKU #9015
  • 20 gray plastic tee-connectors, SKU #9130
  • 6 gray plastic five-way junction connectors, SKU #9180
  • 4 gray plastic three-way corner connectors, SKU #9150
  • 12 gray plastic four-way corner connectors, SKU #9170
  • 6 gray plastic caster wheel receptacles, SKU #9113
  • 6 threaded stem swivel casters, 3/8-16×1.5″, SKU #2299


Roller Coaster Tycoon Ride Ratings IRL

Do you remember playing Roller Coaster Tycoon, the famous amusement park simulation game that shattered sales records and that remains one of the most beloved computer games of all time? I do, and I also remember the most important part of building any roller coaster in the game – testing. While it may seem mundane to someone who has never played, testing was how you figured out if your ride was going to make any money. The game would give your ride a score in three categories- excitement, intensity, and nausea. The goal was to maximize excitement, keep intensity reasonable, and keep nausea minimal. Largely this score was determined by the g-forces your ride produced. High g-forces could mean high excitement or it could mean people are too afraid to go on your ride. These ratings each varied from ‘low’ to ‘ultra-extreme’- both being scores you generally wanted to avoid. ‘Medium’ and ‘High’ were the sweet spot (except for nausea of course, which you always wanted ‘low’) and if you started to edge into ‘Very-high’ intensity you would start to see a drop in ridership, and thus revenue.

G-force relates the acceleration produced by something to the gravitational pull of the Earth. Most roller coasters pull at most 5G’s, or 5 times Earth’s gravity. They only do this briefly though- on big hills or tight turns. The Space Shuttle, for example, pulled 3Gs on reentry and sustained them longer – amusement park goers are clearly not astronauts! Big drops, lots of inversions, intense helixes, and lots of air-time (or negative Gs, where you feel like you are floating out of your seat) are what sell big rides. While real coaster designers don’t use the Roller Coaster Tycoon rating system to determine if their ride is any good they surely have the same design philosophy- be exciting, be intense but not too intense, and make sure the poor teenagers running the thing aren’t scrubbing vomit off the seat every time people get off. I hypothesized most rides, if they were in the game, would probably fall in the ‘Medium’ to ‘High’ intensity and excitement scores. Fortunately we now all carry around an accelerometer in our pockets built right into our smart phones so we can find out for ourselves!

smartphonediagram.png
This diagram shows how the accelerometer maps to the G’s measured by the Roller Coaster Test Meter.

The above diagram shows the axes I chose so that your phone could measure acceleration while resting safely in a zipped or sealed pocket while you rode a roller coaster. Vertical Gs are along your phone’s x-axis while lateral G’s are measured along your phone’s z-axis. This assumes that you put your phone into your pocket with your screen facing to your left and top-first, by convention.

The game’s formulas for computing the ratings for each ride were somewhat mysterious until the OpenRCT2 project published their open-source code and formulas. We knew for years that primarily the g-forces the ride produced made up the bulk of the score, and other features like theming, dueling trains, and music among other things also contributed. There are also unique multipliers for each ride that come into play.

I am simply trying to build a toy however that you can turn on, throw in a pocket, and share with your friends so I avoided the design route of asking you a whole survey about the ride’s features before you get on. Instead I went a different route to produce a set of formulas that roughly approximate that in the game regardless of what kind of roller coaster you are on, mystery multiples and all, by comparing the scores of real roller coasters to those in the game. Fortunately this summer I have had access to a roller coaster that was in the game and that I could ride in real life- a ‘boomerang’! These roller coasters are everywhere, as they have a small footprint and low cost that makes them perfect for parks wanting to add a coaster on a small budget. The model in the game is ‘Defibrillator’ and it can be found in the ‘Funtopia’ scenario of the original game.

So, readers, I rode it just for you! Just kidding- I am obsessed with roller coasters and the fact that I needed to ride one to complete this project was no coincidence. I started building a prototype of my app using Ionic and Apache Cordova, which would enable me to release my app for you on either Android or iOS without needing to rewrite any of my code. There are excellent tools for making a fun UI (I tried to keep the colors and theming true to the original game) and you can import great packages for social sharing and interfacing with the accelerometer. I ran my app and saved the base score using the basic formulas from OpenRCT2 with no multiples. I then tested for the scores for ‘Defibrillator’ in the game, computed my multiples empirically to scale my ratings appropriately, and voila! We now get scores we would expect if real coasters were in the game!

Screenshot_20180604-132623.png
My Boomerang test ride with raw (unscaled) scores reported at the bottom.

Additionally I wanted to provide you with the raw data that went into your scores, just like the game. I used the awesome Chart.js library to plot the vertical and lateral G-forces live for you right on the screen, letting you have a nice plot of the forces experienced on the ride once you’re done:

Screenshot_20180606-103541.png

Here are a few scores from my recent trip to Cedar Point and Kings Island in Ohio:

It is amazing fun- my favorite highlights are the legendary The Beast having an appropriate intensity of ‘Very-high’ and the crowd-favorite Maverick having excitement at ‘Very-high’. I even rode the new Steel Vengeance– just look at those vertical G’s! Simply download the app from Google Play or Apple App Store, insert the phone top-first and screen facing left into a pocket, and hang on tight! Obviously follow any rules about loose articles (they are there for a reason) but generally as long as you have a pocket that can be sealed this is a fun way to rate coasters, plot their g-forces, and brag to your friends about how you pulled 5G’s on Steel Vengeance this summer. Once you hit the ‘end’ button hit ‘share’ and post the scores to social media, then hit ‘clear’ and enter the next coaster’s name before going and conquering it. Have fun and make good choices!

Download on Google Play

Download on the Apple App Store